
It surprises me that most people don’t really know how to use a calendar effectively. When you think about it, no one really teaches you how to use them properly and as a result you will most likely use it inefficiently (especially when it comes to digital calendars). It’s really Asian Inefficient, so we want to change that.
Here are seven tips to help you get more out of your calendar. If you’re someone who struggles with remembering appointments, events and commitments, this will help you a lot. You might want to read our primer on using a calendar before you get started.
I have included tips for both OS X’s Calendar and Google Calendar – the two most popular calendar solutions out there. Let’s get started with the first tip.
1. Know Your Shortcuts
When you routinely add and edit stuff in your calendar, you can speed up that process by learning a couple shortcuts. If there is one shortcut we recommend you learn, it’s the one for adding events.
Most calendar software support a “quick add” feature where you speedily can enter new events. In Apple’s Calendar it’s ⌘ + N whereas with Google Calendar it’s by pressing ‘q’.
Once you’re prompted to add a new event, use a simple syntax to add events: [event name] @ [time]. For example: Lunch w/ Aaron @ 2pm or Conference call at 5.
To find all macOS Calendar shortcuts, click here. For a list of all Google Calendar shortcuts, click here.
2. Use the Extra Fields
Whenever you’re adding an event you can add more notes and meta-info than just the name of the event. These extra fields are really useful and you should take advantage of them.
I had plenty of situations where I had a call with someone and as I was going to call that person, I didn’t have this contact’s number anywhere in sight. This sort of frustration can be easily addressed by adding that extra piece of information to the event on your calendar.
Here are some useful pieces of information you should add:
- Phone numbers – I like adding country codes. You can use Skype names too.
- Addresses – for lunches, dinners or any place you’ll be heading towards.
- Misc notes – This can be anything, such as what to wear, what to bring, conference call agenda, and such. Anything that will remind you of important information for this event.
For the advanced users: you can also embed links to specific emails, Evernote or Devonthink notes or even specific files on your computer. It’s also possible to attach files to events on OS X’s Calendar.
3. Change Your Calendar’s Default Event Duration
Apple’s Calendar default duration for every event is an hour. I always change this to something else, since most of my events are either 15 or 30 minutes.
Luckily you can easily change this default duration. Fire up Terminal (Applications > Utilities) and type this:
defaults write com.apple.iCal ‘Default duration in minutes for new event’ 30
This will change the duration to 30 minutes. Change the number to your liking.
You can do the same for Google Calendar: Go to the Gear icon (top right) > Settings. Under the General tab, scroll down to “default meeting in length” and change it.

Hopefully this will contribute to shorter meetings :-)
4. Strategic Alerts and Reminders
We’ve briefly mentioned strategic reminders before in our introductory calendar post, but it’s worthwhile mentioning again since they are so useful.
The basic idea is that you put reminders on your calendar to help you with specific goals and things you want to remember. You simply create a new event with a 5 minute duration and name the event with something you want to remind yourself with. Then set an alert to “on date of event” and you’re set.
For example, I have a daily reminder at 7pm to write in my journal and reminders throughout the day to remind me to eat (I have a complex nutrition plan).
Here are some other ideas for strategic reminders and alerts:
- Daily alert at 12pm with “Are you productive or not?”
- Daily alert at 10am and 4pm for checking email.
- Weekly reminder on Sunday to do your weekly review.
- Every Friday at 3pm to clean your desk.
- Every Monday at 10am to plan your week.
They become really useful when you try to build multiple habits at the same time. Play around with these strategic reminders because they are really useful.
5. Set Default Alerts for Events
If you are someone who has no problem adding stuff to your calendar but still forgets commitments, you want to add a default alert for every new event. That way you will always be reminded of events that are about to happen and you will never forget commitments ever again.
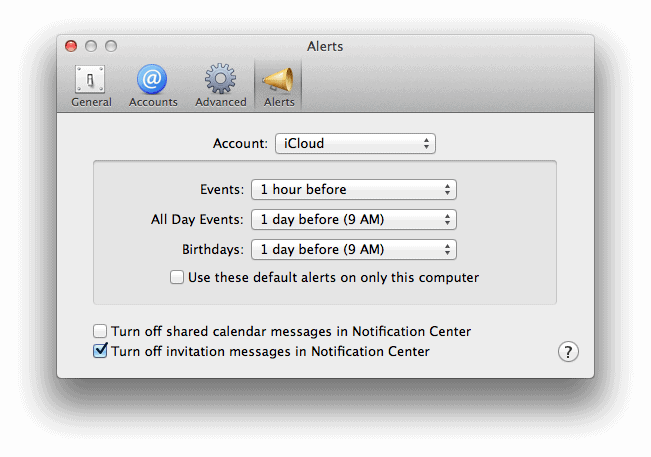
Personally, I like to reminded an hour before every event. That usually gives me enough time to make necessary adjustments.
Here’s how you do it in OS X’s Calendar: Go to Preferences (Calendar > Preferences) and go to the Alerts tab. Here’s a screenshot of how I have it setup.
In Google Calendar it’s a little trickier to find. Go to Gear icon (top right) > Settings. Then Go to the Calendar tab and it show you all your calendar. Under the Notifications column, click on the Reminders and notifications link to change your alert settings.
Now you can add default reminders, as shown below:

6. Your Favorite Subscriptions
An underutilized feature of calendars is the subscription feature. You can subscribe to specific feeds (read-only) and see all important events coming up.
For example, I have my stock portfolio set up via Google Finance and it automatically subscribes me to a feed that shows me when all earning calls will be of companies I’ve invested in. That way I don’t have to manually add those events every quarter to my calendar.
There aren’t many useful subscription feeds out there (I suspect because many people don’t know this feature exists) but they are really useful if you find the ones you want.
Due to the lack of subscription feeds, most websites offer a way to stay updated by downloading an ICS file (.ics extension) so you can import events onto your calendar.
Here are some ideas for using subscriptions and importing events:
- Import your favorite sports team schedule(s) – you will likely have to go to their official website and find it there.
- Public holidays – always a good idea to know when these take place. Especially if you travel a lot to the same countries.
- Birthdays of friends – you can sync your Calendar with Facebook and it shows you all your friends’ birthdays.
7. Add Additional Time Zones
If you’re frequently dealing with different time zones, it’s a good idea to add an additional time zone to your calendar. Instead of (incorrectly) calculating the different times, you can easily switch time zones in your calendar.
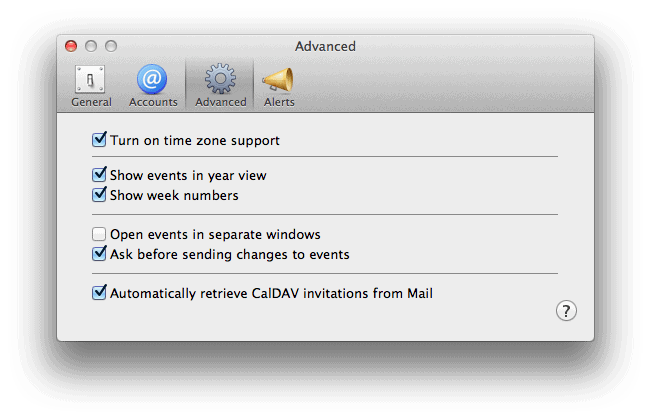
In OS X’s Calendar it’s easy to add time zones. First you have to enable time zone support. Go to Preferences and under the Advanced tab you tick the box to turn on time zone support.
Now on the top right corner of the Calendar, you will see a time zone pull down menu. Here you can add additional time zones and switch between them.
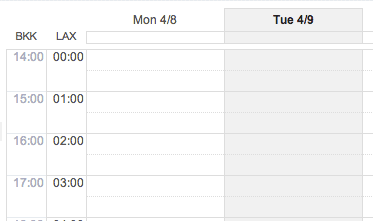
In Google Calendar it’s easy to set up too. Go to Settings and under the General tab you can add additional time zones. The view in the calendar is different though as you can’t switch between time zones. Instead, you’ll see on the left how the times compare between different time zones.
There you have it. Seven tips to help you get more out of your calendar. Implement them one by one and it will change your life. I’m not kidding. Do it! :-)
No to No.4
“You simply create a new event with a 5 minute duration and name the event with something you want to remind yourself with. Then set an alert to “on date of event” and you’re set.”
This is like using your email inbox as a todo list. A calendar is for appointments an time sensitive events that will block you at the specified time. A reminder for daily/weekly review or… has to be part of your todo list in omnifocus. Cause its not time sensitive that you do your review at 7:00pm. Its just a reminder at 7:00pm but you can do it at 7:30 / 8:00 … too
To not clutter your calendar you should avoid to have non time sensitive entries.
These are great. I didn’t even realize there were keyboard shortcuts in the iCal apps and Google Calendar. Thanks for sharing! Also – my favorite tip might be to adjust the default length of events. So many meetings take 30 minutes just because thats the time we block on the calendar for them, even though they could take about 5.
When you travel to a different time zone, how do you handle your repeating DAILY reminders/alerts (in Apple calendar)? For instance: Morning Routine, Lunch, Take afternoon med, Dinner, Evening Routine, Weekly planning, Daily journaling…
Unlike live webinar/call alerts (which events occur at a specific time no matter which time zone you’re in), I don’t want my daily reminders to go off six hours earlier (my home TZ).
I couldn’t find a way to automatically adjust them to the same relative time (ex: 7am) in the new time zone, so ended up deleting or manually changing them for the two weeks I was traveling, which was kind of a pain, as I have several daily reminders.
Is there a better solution?
One thing I have struggled with is the distinctions between events on a calendar as an FYI that they are happening, versus events on a calendar which require action/attention.
For example, by subscribing to calendar s of events occurring within an organisation (meetings within the department you supervise, but aren’t expected to attend) or between friends (e.g. social events or birthdays) or in the general business world (financial news, to use an example from the article), the two choices are to:
1) Have each as a separate calendar and remember to turn it off/on regularly (multiplied across several calendars!!), or
2) Have each permanently cluttering my view.
Currently I’m at an awkward inbetween. Is this something you are able to comment and/or advise on?
Cheers.
Yeah there aren’t too many great calendar subscriptions but I recently found this one:
– 2016 TV Premier Schedule https://www.spoilertv.com/2013/05/the-spoilertv-tv-premiere-dates-201314.html?m=1#.Vw_AVl60N7g.twitter
– Skimm Ahead (Premium)
https://www.theskimm.com/skimm-ahead
Great insight, I will be sure to follow up with these tips!
Another tip is to use the google labs feature in Google calendar called World clock. If you’re working with people across timezones, this is brilliant. Click on a appointment, and it instantly tells you the time in the timezones you have selected. If you’re scheduling a new appointment, then itdoesn’t work for when you’re adding details, but for the quick entries (click on the calendar rather than hitting ‘q’ then it tells you what time it is across the timezones selected.
Here’s another tip – ClipPod for Google Calendar. We’ve been using it to chat and share files inside our calendars and it’s worked out quite well so far.
Excellent post per usual! I think Command + N will change my life (works on Busycal too). Im also a huge fan of timezones. Busycal makes it easy in the top right corner and it will save a few commonly used ones up there. Keep up the excellent work gents!
Love these tips. Everyone uses calendar, but I doubt that many know these little tweaks!
About the reminders, I tend to dislike them because they add to my email clutter, which I want to keep as low as possible.
Saving the skype name/number is a nice thought!
I think Thanh was referring to calendar reminders, not email reminders. They show up as pop-ups on your screen/phone, not in your email inbox (at least in OSX they do – can’t remember if Outlook integrates them).
Less email clutter = definitely better!
Thanh, very interesting tips. Especially I like the shortcut things and the common format which we have to follow in every event. You know its really helps to manage time. I use Outlook, not any other thing yet. I want software which should free and also remind me. Once again thank you very much..
Cool tips thanks … Like the tip 4 …. and 1 & 3 (which I already use )
Great post guys, thanks.
I’m also an advocate of putting as much info as possible into calendar entries, but a word of warning regarding your advanced tip for those who (like me) are using Outlook, especially if their IT department sets an MB limit on the size of the inbox.
Attachments in calendar entries are like corn starch in food. You will blow up to your limit without realising it pretty quick. So your tip regarding links (or only attaching vital, low MB docs) is a wiser course of action
Ah good point about the size limits. Luckily I don’t deal with that but I can see how that can limit you in such environments.
Having links to files is probably the best way to address this.
p.s. I forgot to mention that BusyCal’s built-in alarm system is so unbelievably awesome… you can customize unique time durations to sleep or snooze each individual event as it pops up. And, there’s a customizable BusyCal menu in the menubar that shows you upcoming events and lets you add new events. I could go on & on.
Haha Scott I love the enthusiasm. Yeah I use BusyCal 2.x too. I recently met the developers at Macworld – great bunch. Been a Busycal user for 3+ years and the software keeps getting better.
Great article!! Have you tried BusyCal? You will absolutely FLIP OUT when you see how much better it is than Apple’s built-in Calendar app. It’s like the OmniFocus of calendar systems for the Mac. I’ve been using it since version 1.0 came out many years ago, and I’ve never launched Apple’s iCal or Calendar since. Now BusyCal is up to version 2.x. It is amazing. I’ve got about 100 favorite features of BusyCal, but one of my all-time favorite features is that you can scroll by one week at a time on the month view (or one day at a time on the week view), so the current week (day) is always at the top (left) of your calendar. You can also customize how many weeks at a time you want to see on the month view. They have a list view, 3 different ways to search, smart filters, folder grouping of calendars, graphics support, integrated weather, the ability to scroll up & down through all your events on month view (without having to switch into day view), a floating info panel, integrated to-do list right on the days itself, and sooo much more! You’ve gotta see it to believe it!!