

There are a number of applications that we recommend here at Asian Efficiency that make the Mac an excellent platform from a productivity perspective. Keyboard Maestro is one of those tools that, like TextExpander (which we’ve written about previously), can justify switching from PC to Mac because of how easy it can make repetitive tasks. While it may not seem like it’s for you until you really start using it, once you do you’ll find yourself wondering how you survived so long without it.
In this article, we’ll introduce you to Keyboard Maestro and show you some of the awesome things you can do with it to automate your Mac and become #AsianEfficent.
What is Keyboard Maestro?
Keyboard Maestro is (simplest definition) an application to launch macros on your Mac. These macros can be used to automate just about any repetitive task, like navigating running applications, opening documents, managing text, and controlling web applications. For those of you who aren’t familiar, macros are actions that can be activated by triggers.
Basically, Keyboard Maestro automatically performs certain actions whenever a particular trigger is activated. This could be something like a hotkey combination, connecting to a wireless network, or even connecting a specific USB device to your Mac. For example, if you open a certain set of applications or browser windows when you get to work in the morning, you can automate the whole process using Keyboard Maestro, so when you open your computer you’re ready to get to work.
If you don’t already have it, you can download Keyboard Maestro here.
Let’s walk through creating your first macro in Keyboard Maestro together:
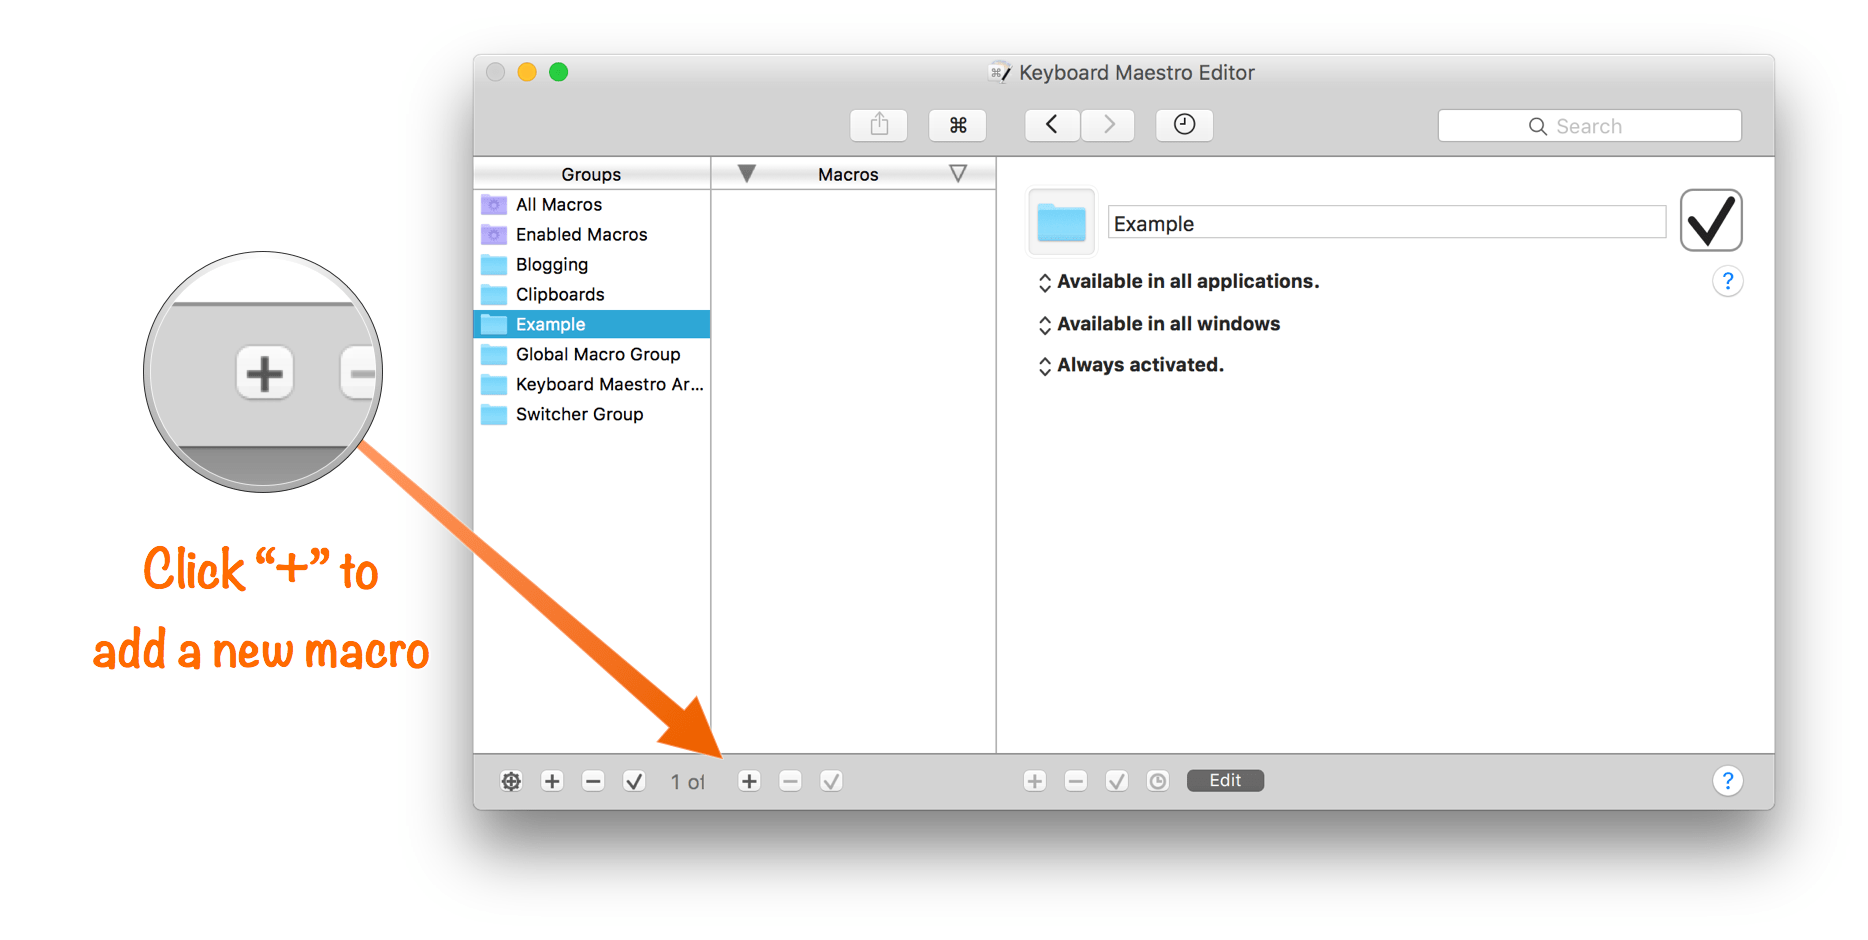
1. Open Keyboard Maestro


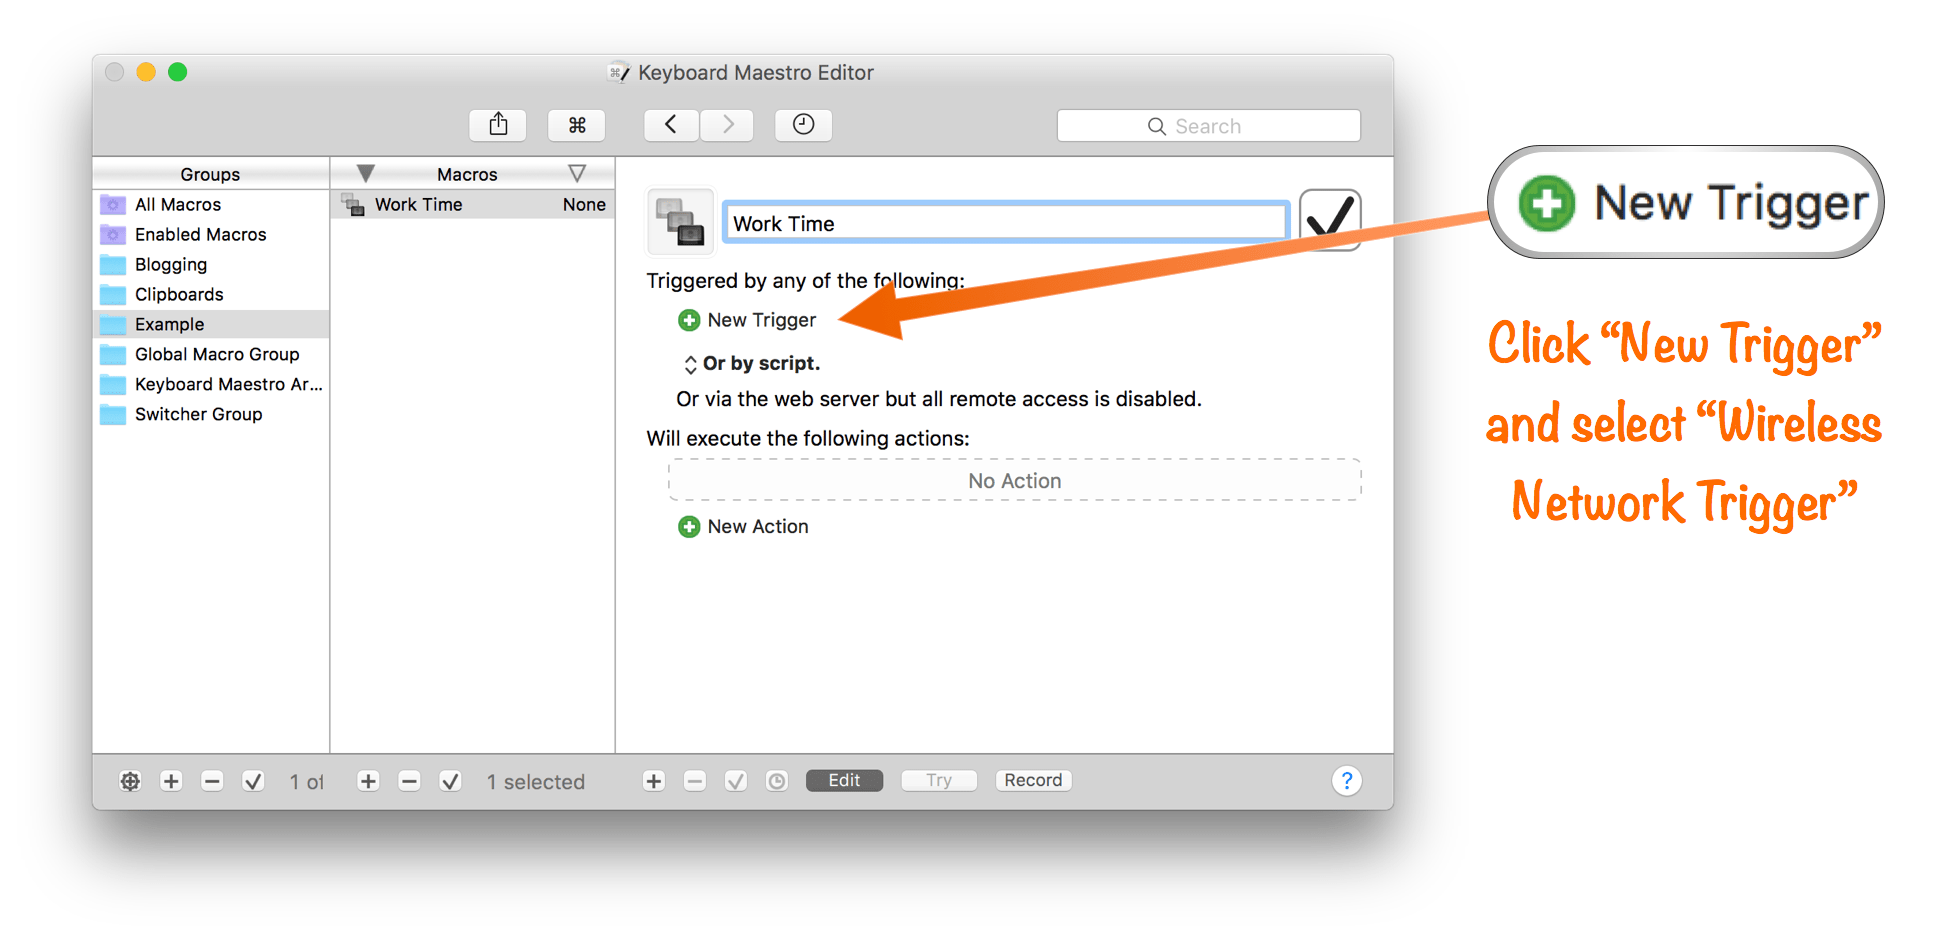
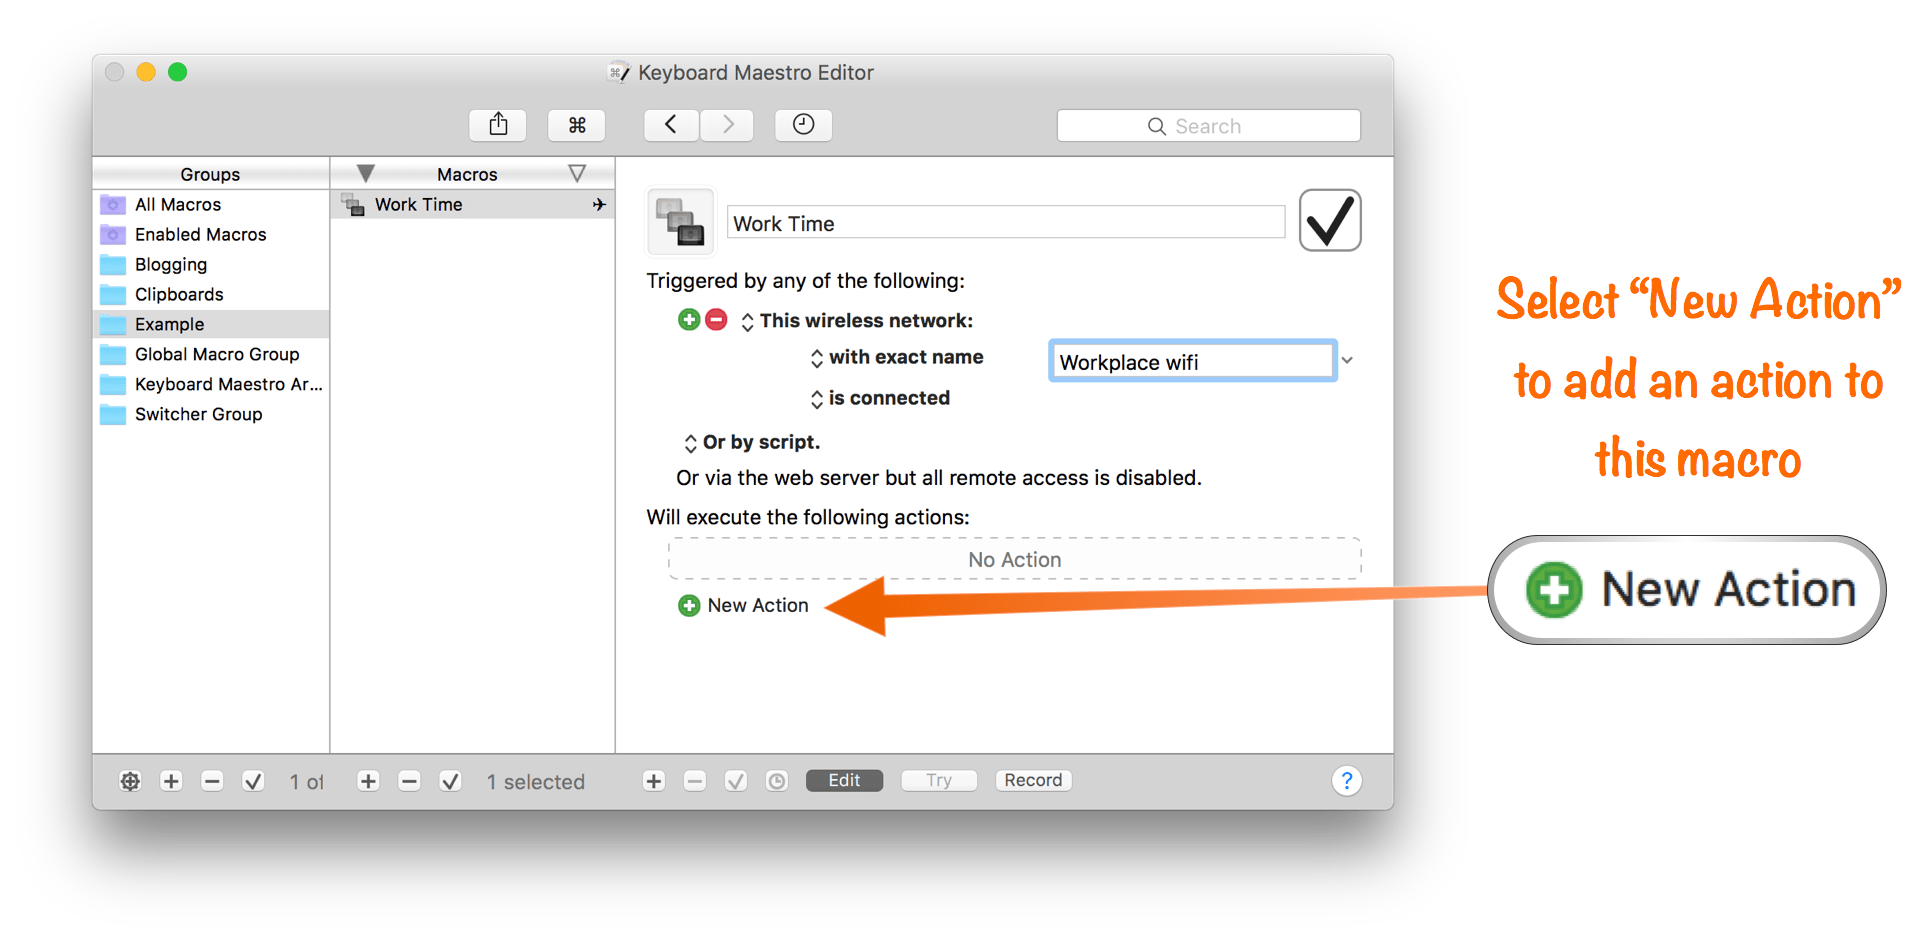
3. Name your macro (something like “Work Time”)


4. Click the “+ New Trigger” button and select “Wireless Network Trigger”

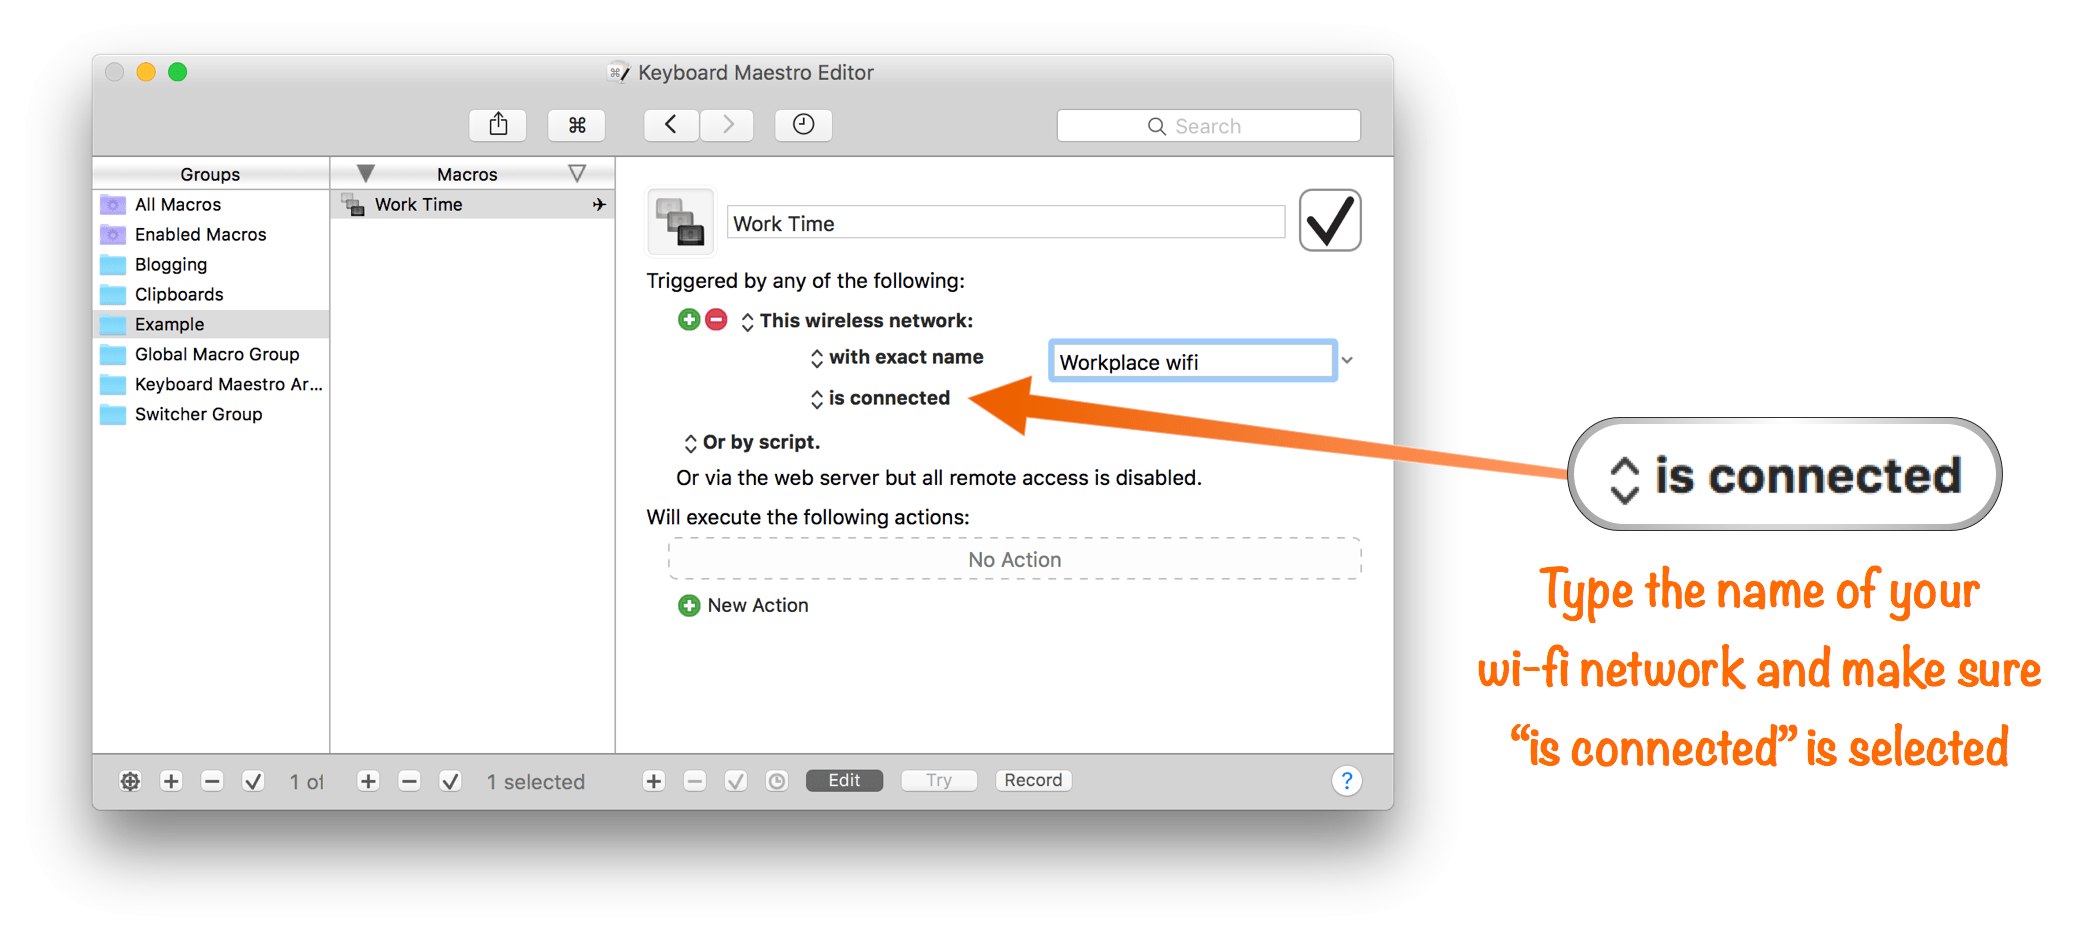
5. Type the name of your wireless network or select it from the drop down menu and select “Is Connected” for the state

6. Click the “+ New Action” button

7. Select the “Open” category and double-click “Open a File, Folder, or Application”
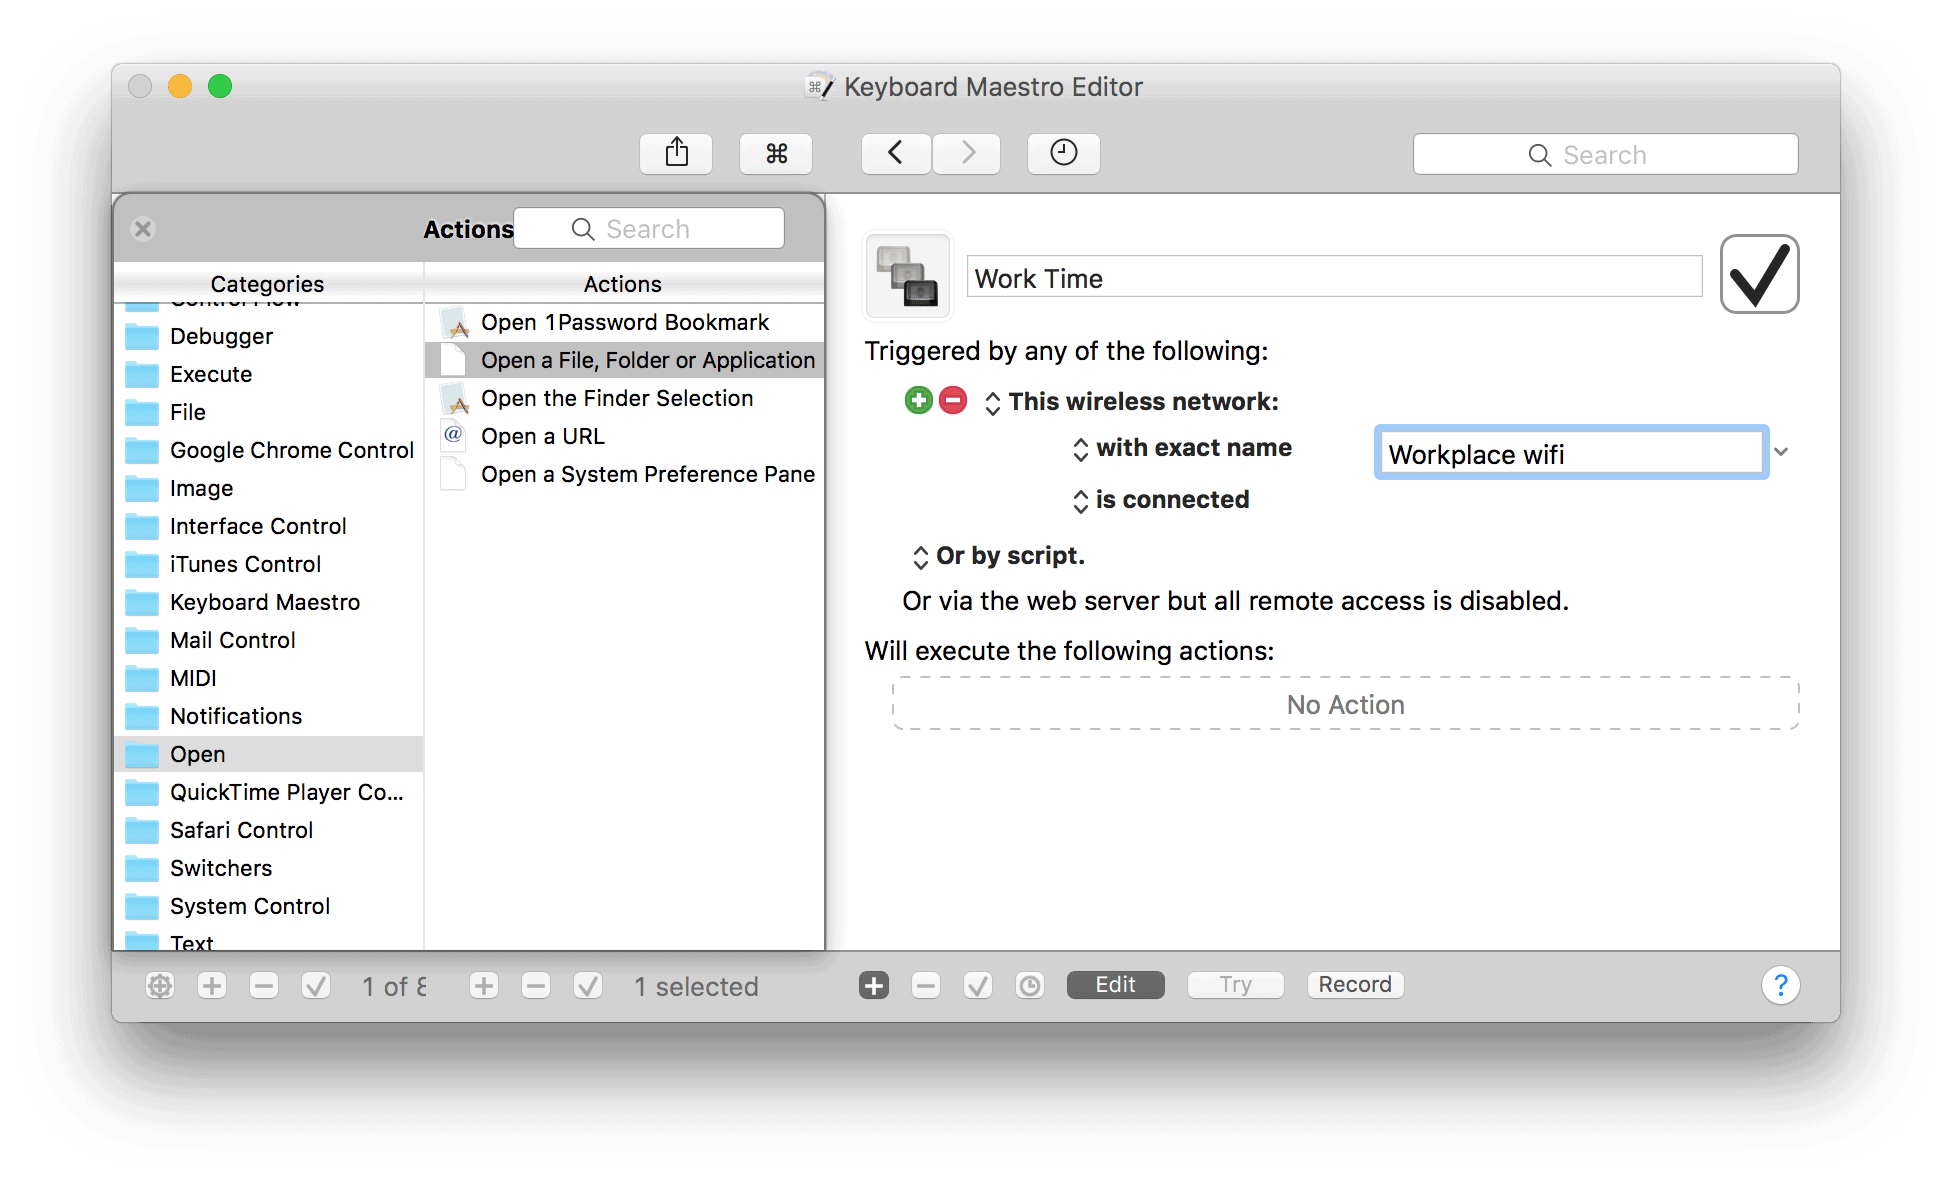

8. Select the app you want to launch when you connect to your work WiFi (e.g., “HipChat”)
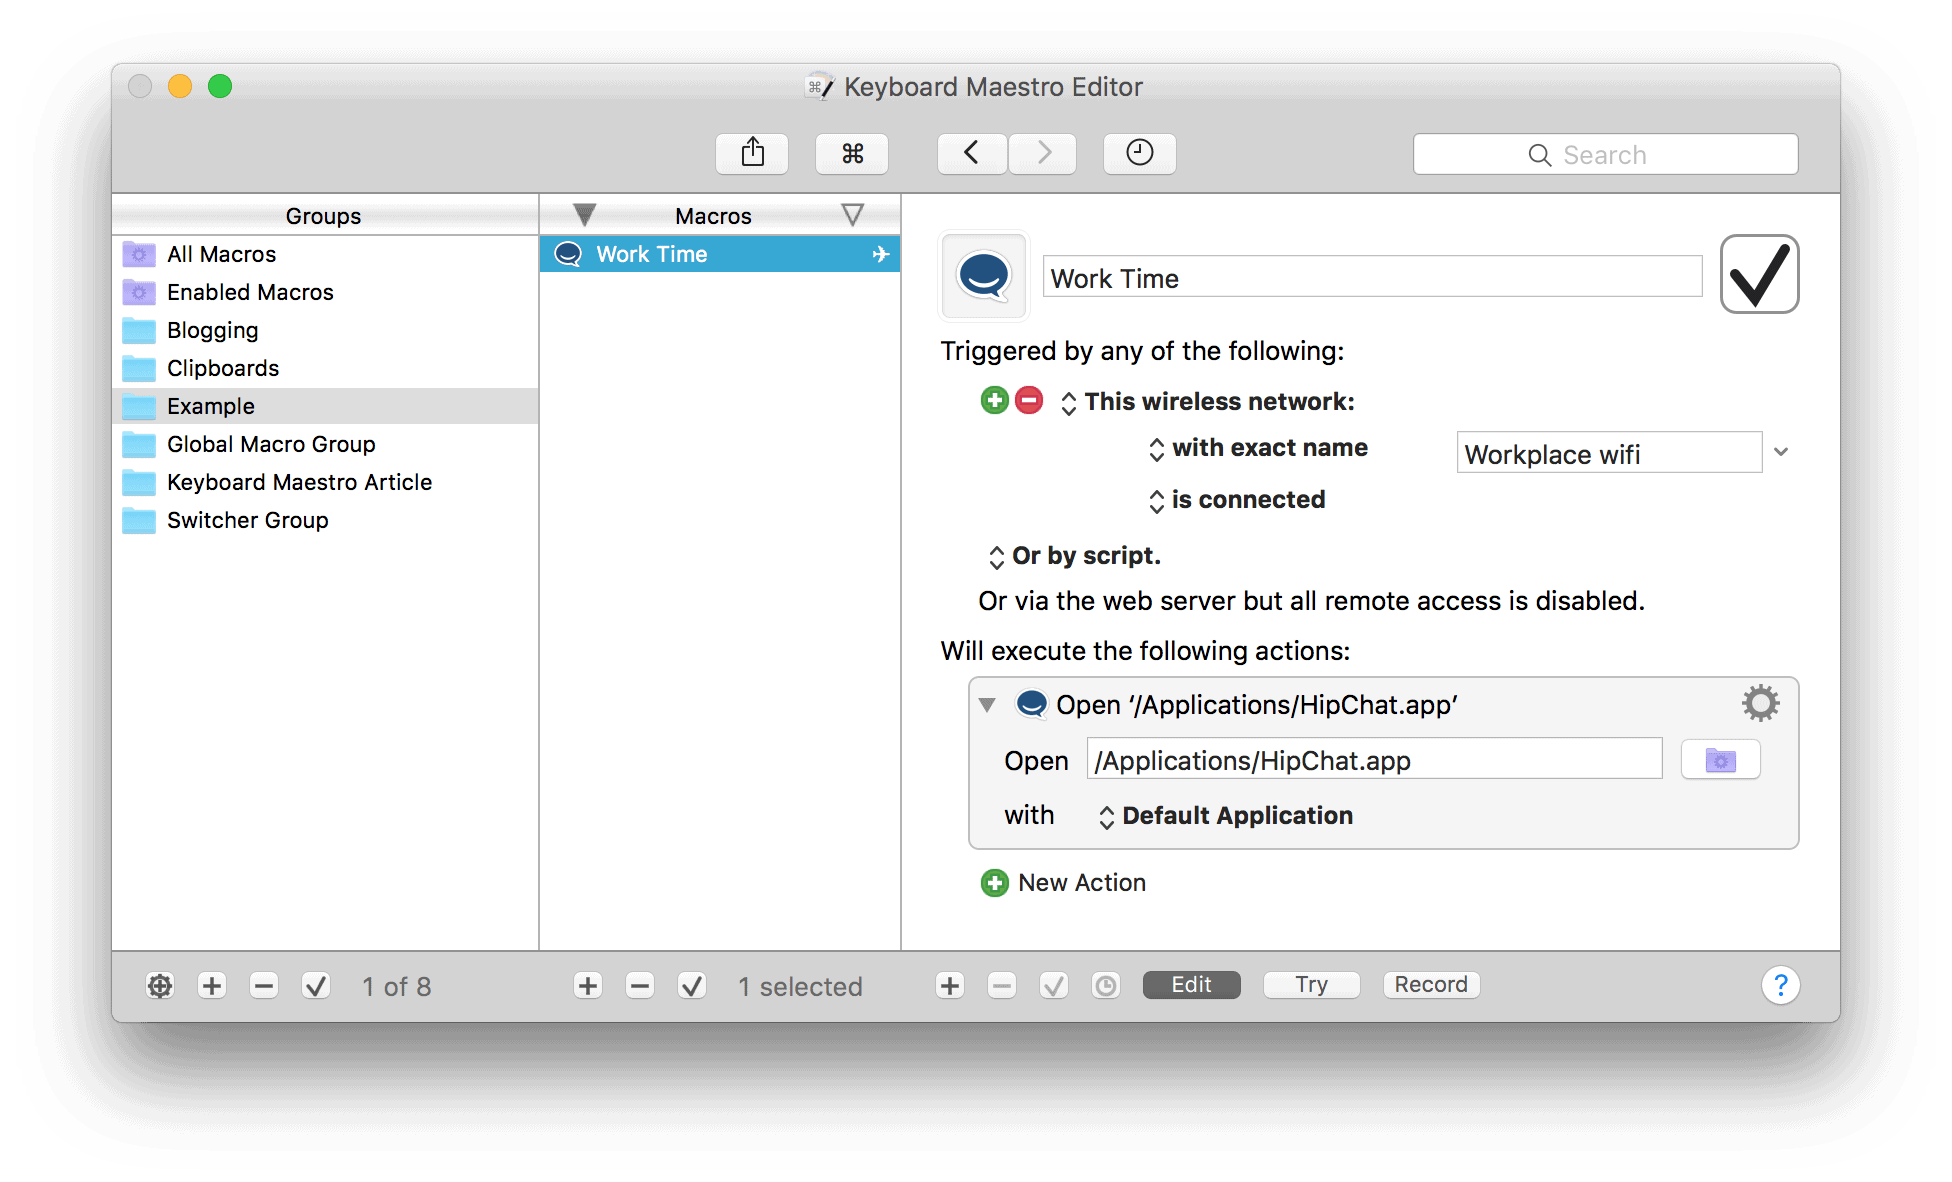
9. Repeat for any other apps you want to automatically open
Note that if you use web apps, you can do the same thing with web apps by selecting the “Open a URL” action (useful for things like JIRA or Basecamp).
Learning to Think Like a Maestro
Keyboard Maestro is an incredibly powerful application that can do just about anything, but this makes it a little bit difficult to implement sometimes, because it doesn’t have a specific, specialized use case scenario. The App Store is full of applications that are designed do one specific thing, and Keyboard Maestro doesn’t fit into this mold. Instead, Keyboard Maestro gives you a sophisticated palette of very powerful tools that you can use in many different ways. We’ve just given you several examples of how you can put Keybaord Maestro to work for you, but you’ll really start to see the benefits when you customize this to fit into your specific workflow.
The key question you need you ask yourself before implementing Keyboard Maestro into your workflow is:
“What do I find myself doing repeatedly on my Mac?”
This could be as simple as switching windows or ejecting USB devices, or as complicated as running scripts or creating spreadsheets.
Pulling the Trigger
There are a ton of potential trigger actions available in Keyboard Maestro. Now that you’ve built your first couple macros, let’s take a look at some of the other available triggers that you can use to activate macros on your Mac.
- Hot Key – this trigger will execute the macro when a specific keyboard combination is pressed, regardless of the application that is open at the time. This is the most common way to execute a macro in Keyboard Maestro.
- Macro Palette Entry – this trigger will execute the macro when it’s selected from the floating Macro Palette. The Macro Palette will only appear when the macro is available to be run, meaning that if you have Keyboard Maestro set to ignore certain applications, the floating Macro Palette may not appear.
- Status Menu Item – this trigger will execute the macro when selected from a dropdown menu that’s accessible by clicking on the Keyboard Maestro status bar menu icon in the upper-right corner of your screen.
- Typed String – this trigger will execute the macro when a specific keyboard string is pressed. This is different than a hot key because the keys do not all need to be pressed at the same time.
- Application – this trigger will execute the macro when the selected application achieves a certain state. The available states are launches, quits, is running, activates, deactivates, and is active.
- System Clipboard – this trigger will execute the macro whenever the system clipboard changes.
- Engine Launch – this trigger will execute a macro when the Keyboard Maestro engine launches. Typically this would be used on system startup, but it could also be when you quit and relaunch the Keyboard Maestro engine for any reason.
- Focussed Window – this trigger will execute the macro whenever the focussed window status changes to match the identified criteria. There are four variables you can use with this trigger: changes, title changes, window’s title changes, and window’s frame changes.
- Folder this trigger executes a macro whenever the contents of the identified folder change. You can set it so that the macro runs either when a file is added to the folder or when a file is removed.
- Login – this trigger executes a macro when you log in to your computer (assuming that the Keyboard Maestro is set to launch at login, which can be configured by checking the “Launch Engine at Login” option under the General preference pane).
- MIDI Note – perhaps the strangest trigger, this executes a macro whenever a a specific MIDI note is played via a MIDI device (like an electronic keyboard). You can set the macro to execute when the note is pressed (note on), released (note off), or continuously held down.
- Volume – this trigger executes a macro whenever a specific network volume is either mounted or unmounted, depending on your setting.
- Periodically While Logged In – this trigger executes a macro periodically while the User is logged in. This can be useful when performing routine maintenance tasks or tracking changes.
- Public Web Entry is Executed – WARNING: this one is a little technical…this trigger will execute a macro when you log in to Keyboard Maestro’s built-in web server (must be enabled in “Web Server” preference pane). You can set this trigger up to execute the macro when authenticated (a user logs in), or you can set up a “public” trigger which will execute the macro when anyone on the internet accesses the web server.
- System Sleep – this trigger executes a macro right before your Mac goes to sleep. Keep in mind that using this macro can cause your Mac to defer going to sleep by around 30 seconds.
- Time – this trigger executes a macro at a scheduled time.
- Device Key – this trigger executes a macro when a specific device key is pressed. This could be modifier keys on your keyboard or extra buttons on your mouse (if you use something like the Logitech MX Master mouse, you have a lot of programmable buttons that could be used to trigger macros).
- USB Device – this trigger executes a macro whenever a specific USB device is either attached or detached, depending on your setting. This could be useful when opening a particular program, like the Fujitsu software when you connect your ScanSnap scanner.
- System Wake – this trigger executes a macro when your system wakes from sleep.
- Wireless Network – this trigger executes a macro whenever a specific wireless network is either connected or disconnected, depending on your setting.
Action!
The second thing you have to identify when creating a Keyboard Maestro macro is what you want the macro to do. This is called the “Action.” While there are too many actions supported by Keyboard Maestro to list them all here, they are broken down into the following categories:
- Application Control – these are actions that you can use to Activate, Show, Hide, Switch, or Quit specific applications.
- Clipboard – these are actions that allow you manipulate the system clipboard, named clipboards, and clipboard history.
- Control Flow – these are actions that manipulate the flow of the macro, like pausing/waiting to complex if/then statements.
- Debugger – these are actions that allow you to observe and control the individual steps of a macro while you are working on it.
- Execute – these are actions that execute scripts, other macros, or Automator workflows.
- File – these are actions that manipulate files by moving, copying, duplicating, trashing, or deleting files or folders.
- Google Chrome Control – these are actions that control Google Chrome, like opening windows or tabs and interacting with web pages.
- Image – these are actions that manipulate image files, like flipping, rotating, or resizing.
- Interface Control – these are actions that allow you to interact with the User Interface by selecting menu options, pressing keystrokes, or manipulating your pointing device.
- iTunes Control – these are actions that control iTunes playback like play/pause, skip, rate, etc.
- Keyboard Maestro – these are actions that control how Keyboard Maestro behaves.
- Mail Control – these are actions that allow you to send messages or set flags in Apple Mail.
- MIDI – these are actions that send MIDI messages to your computer (e.g., note on/off).
- Notifications – these are actions that provide feedback via a notification on your Mac.
- Open – these are actions that allow you to open files, folders, URLs, or System Preferences.
- Quicktime Player Control – these are actions that allow you to interact with Quicktime Player by playing/pausing a video, skipping forward/back, changing volume, etc.
- Safari Control – these are actions that control Safari, like opening windows or tabs and interacting with web pages.
- Switchers – these are actions that manipulate Keyboard Maestro’s built-in switchers: Application Launcher, Application Switcher, Window Switcher, and Copy, Cut, and Paste Clipboard Switchers and Clipboard History Switcher.
- System Control – these are actions that allow you to control your Mac at a system level (e.g., putting your Mac to sleep, starting a screensaver, etc.)
- Text – these are actions that allow you to manipulate text.
- Variables – these are actions that allow you to store variables in Keyboard Maestro that you can use later in calculations or as text tokens that you can use in Keyboard Maestro fields later on in the macro.
- Web – these are actions that allow you to open URLs and perform searches in your default web browser.
If you want to know more about a specific action, check out the Keyboard Maestro wiki, which provides detailed explanations of each one.
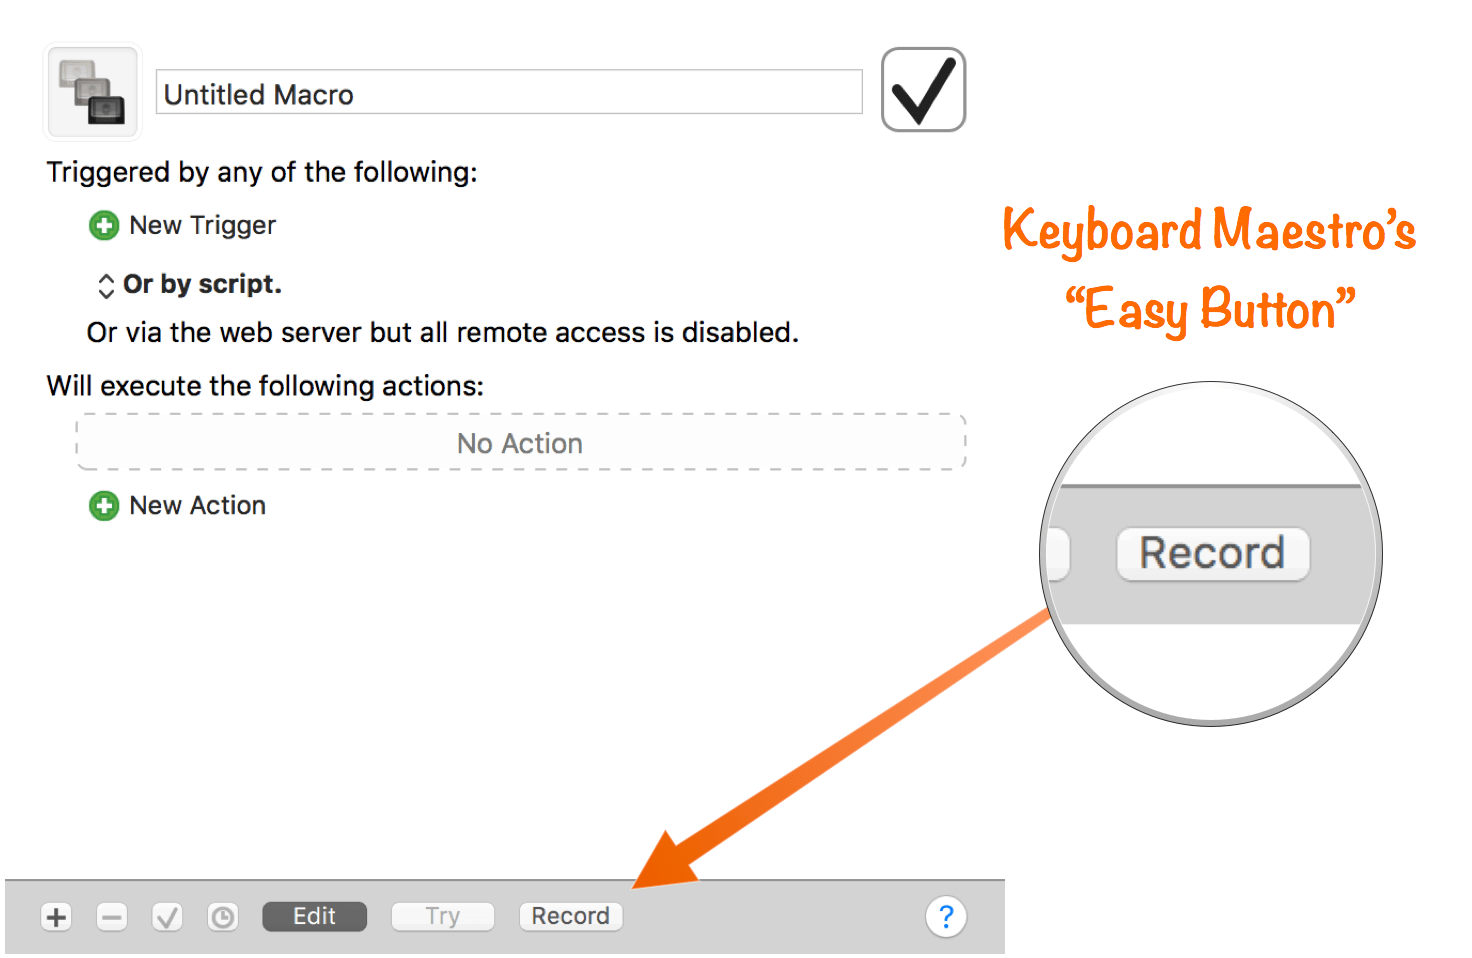
Recording Your Own Macros
If all of this seems like a lot, don’t worry! You don’t need to know what actions are available; you can tell Keyboard Maestro to just watch how you interact with your Mac, and it will add the actions to the macro automatically based on your activity. Keyboard Maestro has a record feature, where it watches what you do on your Mac after you press the Record button and creates the macro for you.

Recording is the easiest way to create a new macro, but here are a couple other example macros to give you a few ideas about how Keyboard Maestro might work for you.
8 Insanely Efficient Macro Examples
Here are eight awesome macros to help you conduct your Mac like a pro and give you an idea of what you can do with Keyboard Maestro:
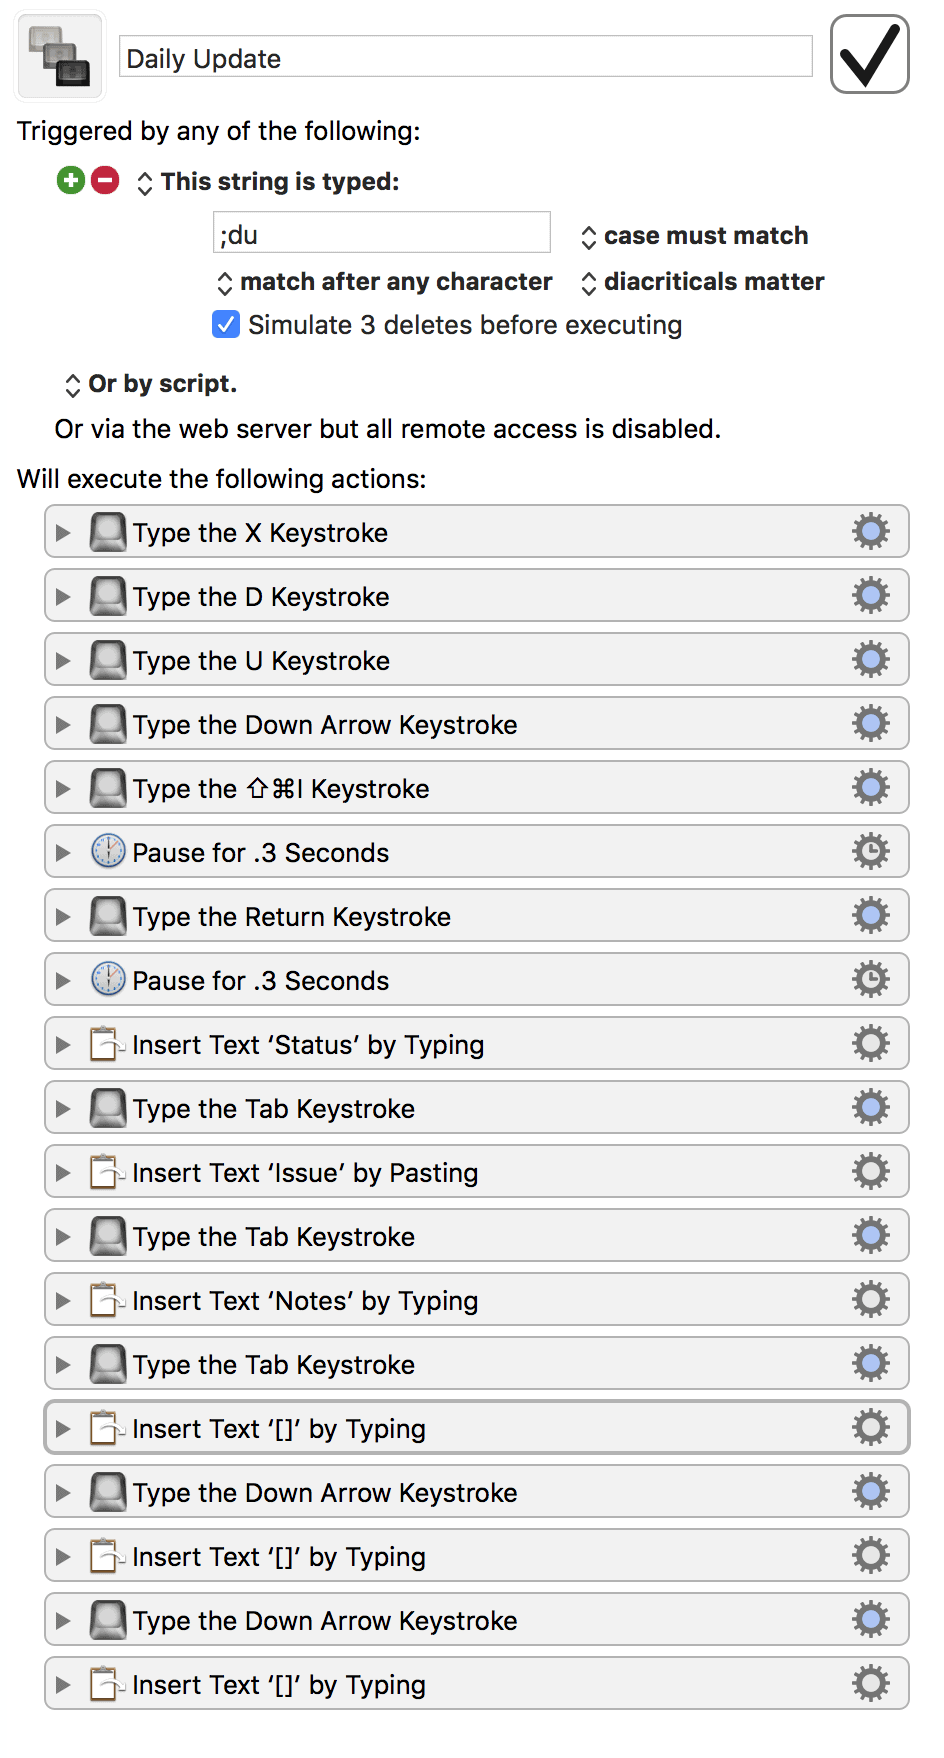
#1: Daily Update
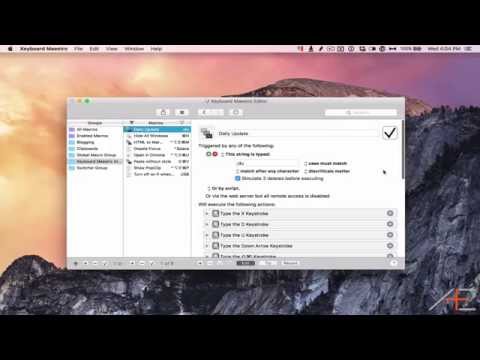
This is a great example of how Keyboard Maestro can speed up mundane, everyday tasks. I use this macro every work day when posting my “Daily Update,” a practice we implemented at Asian Efficiency to help us communicate more effectively as a remote team. We record what we’re working on so that we can get assistance from others on the team who may be able to help us get “unstuck.”
We use the Atlassian software suite at Asian Efficiency (JIRA/Confluence/HipChat), so every day each team member creates a “blog post” in their personal Confluence space with their list of tasks for the day. This post always follows the same format, with a standard title format of DU: YYYY-MM-DD Weekday. For example, the title for the day of publication on this article would be DU: 2015–11–10 Tuesday. Underneath the titles, we use the WYSIWYG editor to create a table with a couple of columns: Status, Issue, and Notes. The status column consists of a checkbox to indicate whether the item was worked on, the Issue field contains the link the to the actual task in JIRA, and the Notes field contains short description of what will be worked on.
It’s possible to manipulate this entire process using keyboard shortcuts. For example, the Tab key switches fields and typing [] in Confluence will create a checkbox. What I did (based on Thanh’s example) is create a Keyboard Maestro macro that types all of these keystrokes in quick succession, so I can just trigger the macro and then the whole process is handled automatically.

Click here to download this macro.
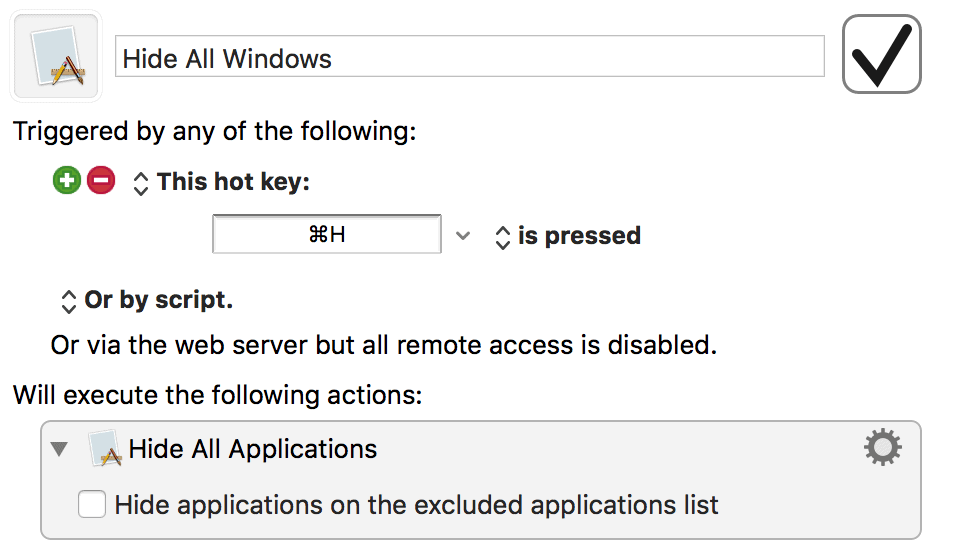
#2: Hide All Windows
Believe it or not, there actually isn’t a Mac keyboard shortcut to hide all windows and show your desktop. You can kind of do this through using a hot corner, but it doesn’t really hide all the windows and instead just temporarily moves them out of the way. The best way to do this before Keyboard Maestro was to combine two separate keyboard shortcuts:
- Option+Command+H to hide all windwos except the current active windown
- Option+Command+M to hide (minimize) the current window
With Keyboard Maestro, you can actually accomplish this with the built-in window management actions.

Click here to download this macro.
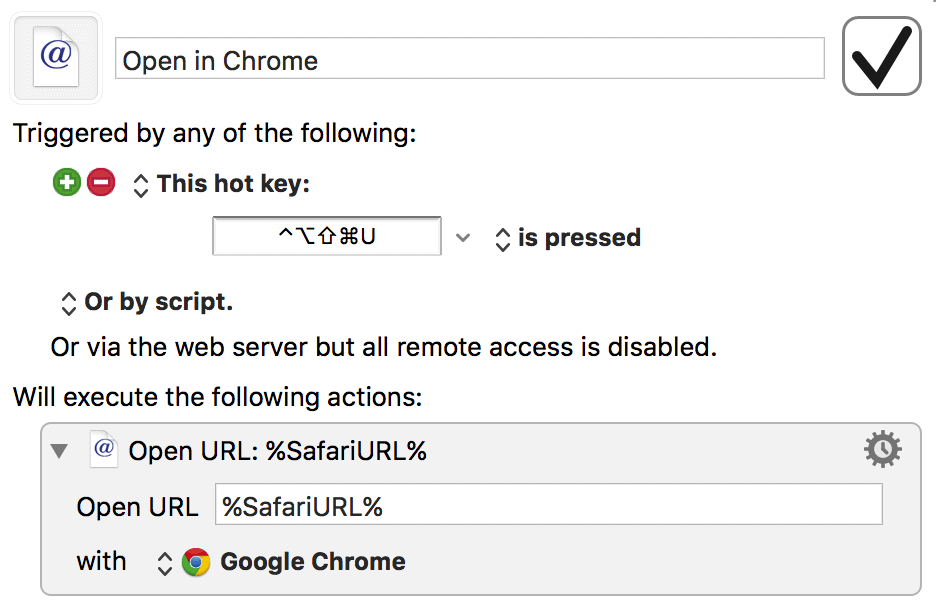
#3: Open URL in Chrome
Thanh and I talked about this on a recent podcast episode, but I don’t install the Adobe Flash Player on my Mac because it is the biggest security hole for Macs to get viruses and malware. In addition, it’s slow and burns up your battery faster because Flash is a resource hog. Since I use Safari as my default web browser because it’s handoff-enabled with my iOS devices, that means I need to either install the Flash Player plugin or use a different browser (like Chrome) that has built-in Flash support.
Fortunately, most websites no longer are built on Flash, but occasionally I’ll come across a site that requires Flash to be installed in order to be functional. In these instances, I use Google Chrome to view the page. It takes time, though, to copy the URL of the site I’m on, open Chrome, and then paste the URL into the Chrome address bar.
Enter Keybaord Maestro.
With Keyboard Maestro, I can launch a macro via a hotkey combination that does this whole process for me automagically.

Click here to download this macro.
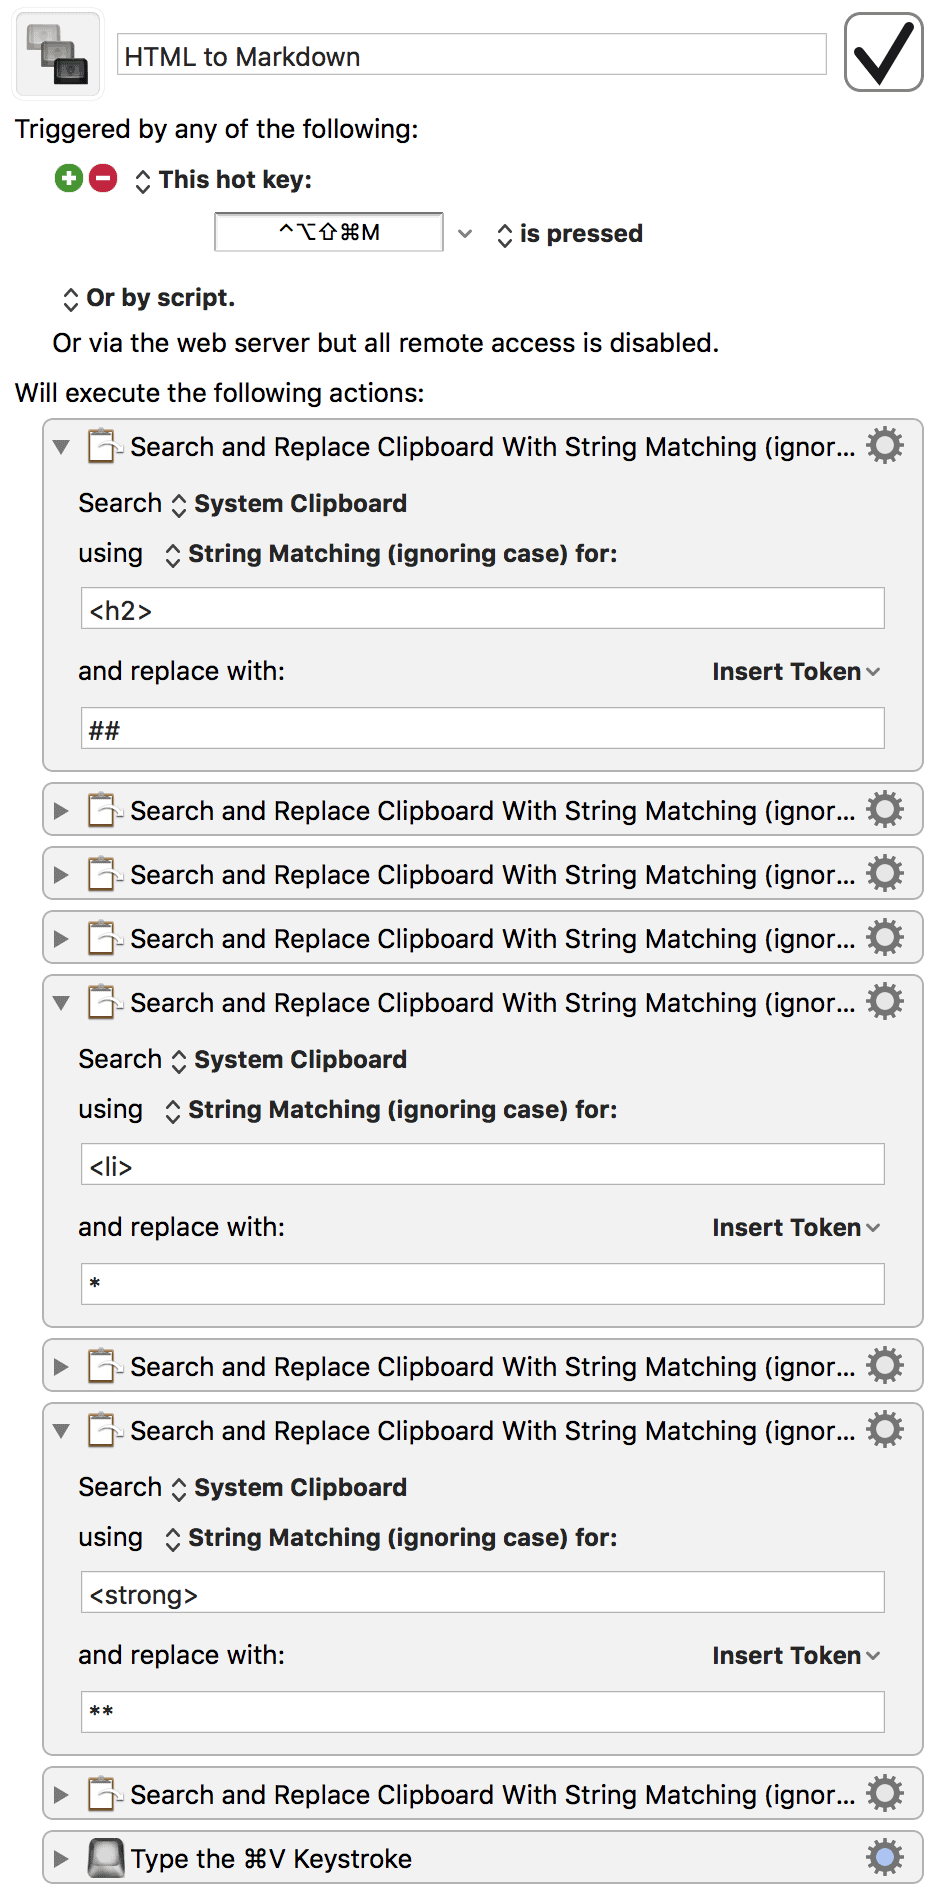
#4: HTML-to-Markdown
This may seem backwards, but it comes in handy in our Asian Efficiency workflows because there are actually two versions of every email we send out: the HTML version and the plain-text version. The Plain text version uses Markdown-style formatting to indicate where the headers, links, etc. should be as it is much more human-readable than HTML. This macro allows us to take the completed HTML email and generate the plain-text version easily.
This would normally be a very manual, cumbersome process. Fortunately, with Keyboard Maestro we can find all the HTML tags and replace them with standard Markdown formatting. What’s really cool about this is that it actually analyzes the contents of the clipboard and does all the formatting prior to pasting. It’s magic.

Click here to download this macro.
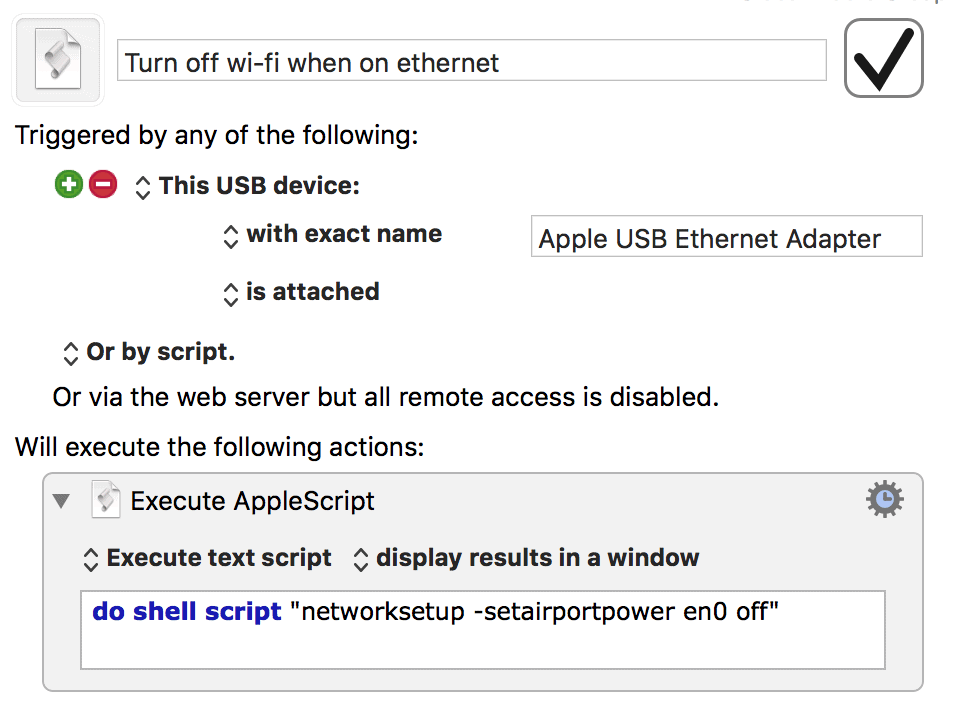
#5: Stop WiFi When Ethernet Is Connected

I heard a discussion on a podcast recently about how someone’s Mac wasn’t using a connected Ethernet cable and instead was staying connected to a weaker wireless network, and I learned that this is actually the default Mac behavior. While high-speed internet is available almost anywhere, a wired connection can still provide faster speeds in some locations (and prove to be more secure).
Most modern Macs (especially MacBooks) don’t have a dedicated Ethernet port, so in many of these instances, you connect to Ethernet via the Apple Ethernet adapter (either USB or Thunderbolt). Because of this, you can actually tell your Mac to turn off WiFi when the Ethernet adapter is connected via Keyboard Maestro.

Click here to download this macro.
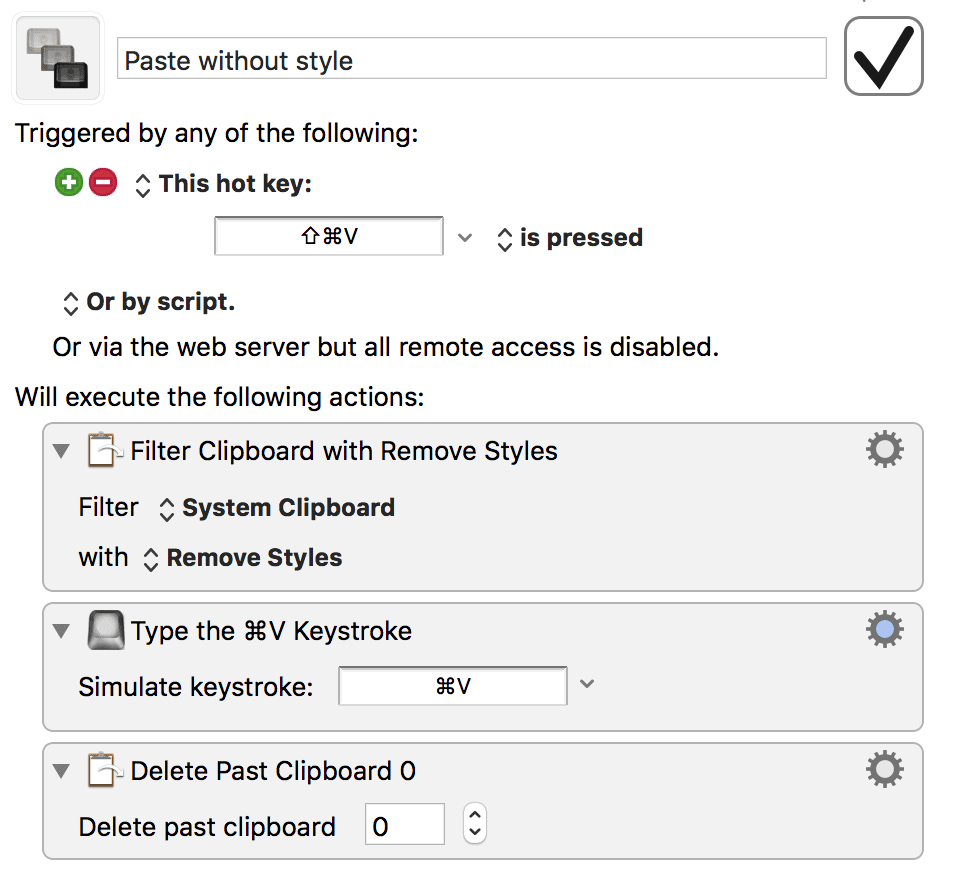
#6: Paste Without Style

There are many advantages to using plain text, and I try to use it everywhere I can. However, there will still be times when you copy text (from a webpage, for example) and you go to paste into another program (like Keynote), and instead of getting text that matches the look and feel of what you’ve already typed, you get gigantic, bold text that looks terrible. In these instances, what you want to do is not just paste, but paste without style. This will paste the text without the formatting data and instead match what you’re already using.

Click here to download this macro.
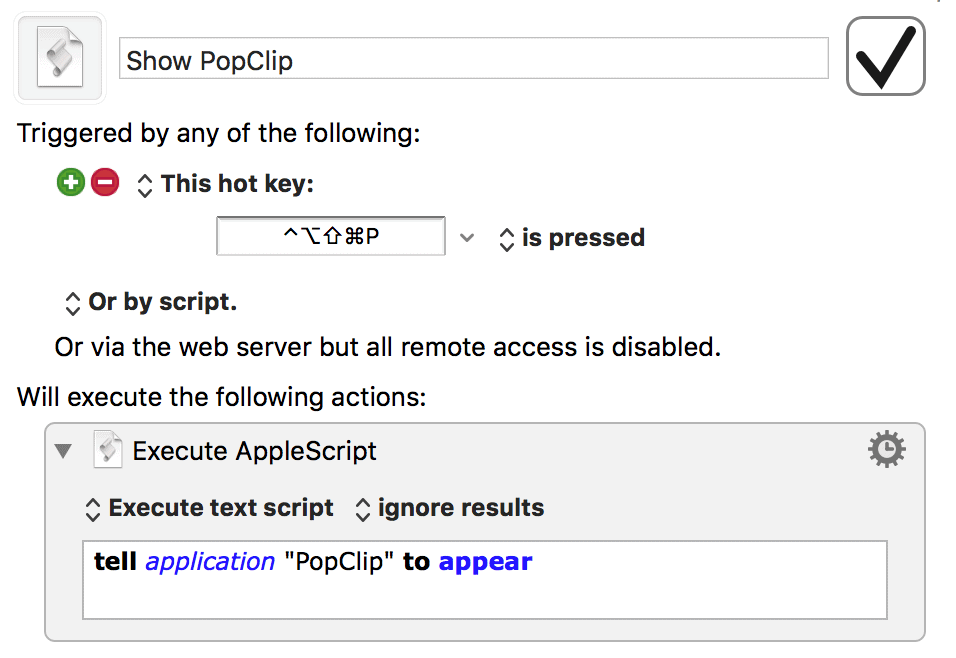
#7: Open PopClip menu

PopClip is one my favorite Mac utilities. When you have it installed, it causes an iOS-style menu to appear whenever you select text on your Mac and allows you to manipulate that text by using a bunch of pre-configured action extensions. There are (as of this writing) 143 to choose from, and they range from basic copy/paste commands to creating OmniFocus tasks to converting to Markdown formatting. You can install any of the free extensions or even make your own, allowing you to configure PopClip however you want.
The only problem with PopClip is that the menu doesn’t appear when you make a keyboard selection, and sometimes you can dismiss it accidentally. When this happens, you normally have to re-select the text to get the menu to appear again, but Brett Terpstra has created a simple script that causes the PopClip menu to appear. With Keyboard Maestro, I’ve set this script to a hotkey trigger, so I can open it at will.

Click here to download this macro.
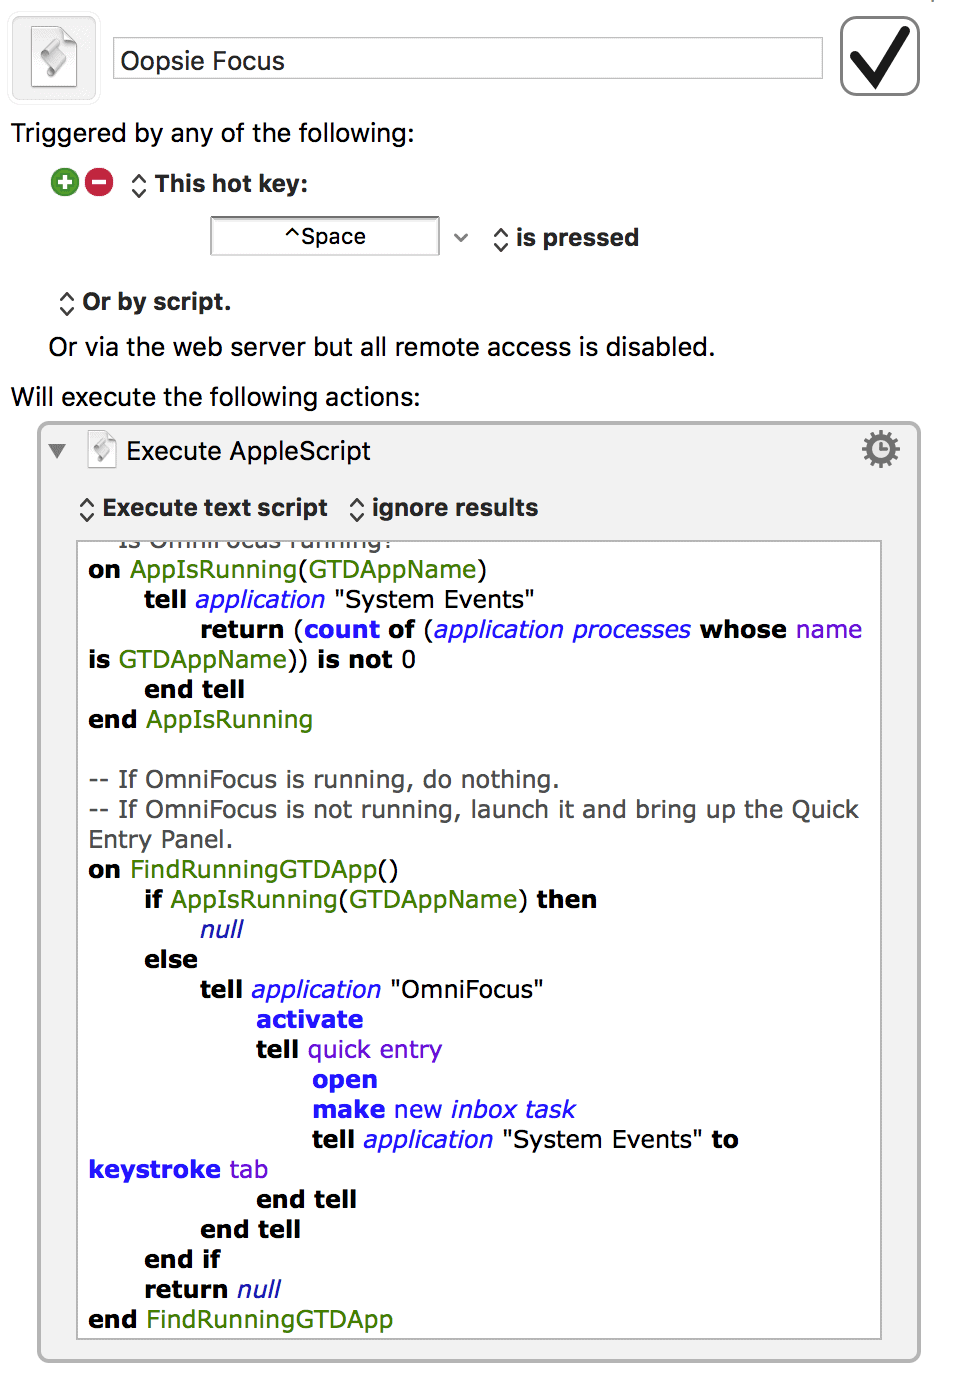
#8: OmniFocus Quick Entry Window

If you use OmniFocus, you probably (hopefully) use the Quick Entry shortcut to add tasks to OmniFocus easily from your Mac. If you do, chances are that you’ve tried to invoke the Quick Entry window using your keyboard shortcut of choice and realized after a couple seconds that nothing was happening, because OmniFocus wasn’t open. Shawn Blanc has written a script to fix this called Oopsie Focus that launches OmniFocus and opens the Quick Entry window automatically to fix this specific problem.
To set it up so that it happens in the background, I’ve created a Keyboard Maestro shortcut that uses the same keyboard shortcut as activating the Quick Entry window. That way, when OmniFocus is running, the script realizes it and does nothing. However, if OmniFocus is not running, pressing the Quick Entry shortcut will actually trigger the script, open the application, and activate the Quick Entry window before you even realize that OmniFocus isn’t running.

Click here to download this macro.
6 Tips & Tricks to Become a Keyboard Maestro Wizard
Now that you’ve seen several examples of Keyboard Maestro macros in action, you’re ready to start building some of your own. Here are six tips to help you build better macros:
- Use “Pause” actions – If your macro is getting stuck, the most common solution is to add a “Pause” action. For example, if you tell Keyboard Maestro to execute an “Enter” key command to confirm a dialog box that hasn’t appeared yet, the macro will fail. Inserting a “pause” action gives your computer a chance to catch up and execute the next steps of the macro after the interface is available.
- Nest macros with the “Execute Macro” action – It’s possible to create very complex macros that have many steps, but chances are that there are pieces of these complex macros that you might want to use somewhere else. In these instances, it makes sense to create a simpler macro which accomplishes one piece of the complex behavior you want to automate and then nest it inside a more complex macro. This allows you to reuse the simpler macro without having to recreate the entire thing inside of the new, more complex macro.
- Use notifications when building macros – Sometimes the activity you’re trying to automate doesn’t have an obvious result that you can see. If you use notifications as the final step in your macros, these can serve as a confirmation that your macro executed successfully.
- Use the Debugger – The Debugger is a powerful tool that allows you to test your macros as you build them, so that you can figure out exactly where the disconnects are if a macro isn’t working for you.
- Remap your Caps Lock key for easier keyboard shorcuts – I use Brett Terpstra’s trick for remapping the Caps Lock key to simulate a key press of the Shift, Control, Option, and Command keys simultaneously. This allows me to use a simple hot key (Caps Lock + # or letter key) to trigger macros that are guaranteed not to conflict with any other system-level keyboard shortcuts. This makes macros easy to remember because I can use the Caps Lock + the first letter of the application or action I want to trigger.
- Launch macros with Alfred/LaunchBar – If you use Alfred or LaunchBar, you can actually use it to launch Keyboard Maestro macros. The process is slightly different depending on which application you use. Fortunately, some smart folks have created resources to help you set this up (I use the Alfred workflow): Alfred | LaunchBar
More Great Macros & Resources
- TJ Luoma has created a set of macros that will actually open up a Keyboard Maestro palette and allow you to turn off both Notification Center and Growl Notifications as well as mute system audio.
- Another awesome macro by TJ Luoma, which takes text and saves it to an external .txt file for further editing. This solves the problem of potentially using large sections of text when filling out web forms, for example.
- Rocket Ink has an incredible guide to using Brett Terpstra’s Markdown services with Keyboard Maestro. Very detailed, but if you use Markdown you should check these out.
- Matt Gemmell has some great macros for use with Safari, Mail, and Finder.
- SalamaAly (forum username) has created a set of useful search hotkey macros, which you can download from the Keyboard Maestro forum.
- MacStories has several articles about using Keyboard Maestro (including the one by TJ Luoma on creating the QuickCursor replacement I mentioned earlier).
- My Easy Buttons has a YouTube playlist that really gets into some advanced features (although his narration style is, shall we say, an acquired taste).
- This article is a bit older, but it has some great, detailed explanations of macros.
- You can find tons of useful macros over at the Keyboard Maestro forums.
- If for some reason you don’t have Keyboard Maestro yet, you can get get it here.
Conclusion
Keyboard Maestro is a very powerful automation tool, and hopefully you have a better idea of how you can make it work for you. A lot of our Dojo members (our productivity community) uses Keyboard Maestro and have shared their own macros over at The Dojo forum. If you have any awesome macros you’d like to share, let us know in the comments!