Ever wish you could do more with your iPhone? Ever struggle to get iOS to do what would take you only a few seconds to do on your Mac? One of the biggest problems with iOS is that everything is “sandboxed”, meaning that it’s very hard to move things from one application to another like you can on your Mac. Apps on iOS tend to function independently and until iOS 8 brought extensions it was pretty much impossible to get them to work together. The touch interface can also cause problems, making it difficult to drag things between apps or even to copy and paste accurately. It’s not that you necessarily can’t do these things, but because everything in iOS is always full screen it just makes it harder and take longer.
Fortunately, Workflow is here to save the day. This essential iOS app has quickly become one of my favorite iOS productivity apps and is beginning to change how I use my iOS device and what I use it for. In this article, I want to introduce you to Workflow and show you some of the neat things it can do, show you the different types of workflows you can build, and how to use it with other awesome productivity apps like Drafts and Launch Center Pro.
What is Workflow?
The best way to describe Workflow is as Automator for your iOS device. And if that definition doesn’t make sense yet, that’s ok – you’re probably having a hard time picturing it because there simply isn’t anything else like Workflow on the App Store right now to compare it to.
Essentially what Workflow does is allow you string together and automate iOS apps and features (including native apps) in an intuitive interface, then save those “workflows” to be used later. This results in your iOS device being able to do many things you previously couldn’t, and also making everyday tasks much quicker and easier. Basically, Workflow makes your iOS device Asian Efficient. If you don’t have it yet, you can download it from the iTunes App Store for $2.99.
The building blocks of Workflow are called Actions. An action tells an iOS app to do a specific thing, and can be linked together using the “Content Graph” to execute a string of commands with a single tap (more on this in a minute). For example, when you open the app for the first time there’s a built-in tutorial for creating an app that makes an animated gif by taking a series of photos and then combining all the images using a “Make GIF” action. What you see when you run the workflow is the camera open up where you take 3 pictures and then Workflow does the rest, combining the images and previewing the file for you. You can even have it share the file automatically to social media if you want to add that final step.
But there’s a lot more you can do with Workflow then just make animated gifs. As of version 1.1, there are now over 200 actions supported in Workflow (if that sounds like a lot, it’s because it is). The actions themselves are broken down into 10 categories:
- Calendar
- Contacts
- Documents
- Maps
- Music
- Photos & Video
- Scripting
- Sharing
- Text
- Web
Where things really get interesting though is when you start using Workflow’s ability to parse information from the stock iOS apps and use it in other apps. For example, you can create a workflow that uses the “Get Current Location” action from the Maps app, then use that information to calculate how far you are from home by using the “Get Travel Time” action, and then grab that information to send your significant other a text that says “Hey babe, I’m on my way home and I’ll be there in 23 minutes” using the “Send Message” action.
Pretty neat, huh?
“Sounds awesome, but I don’t know anything about scripting.”
Me either! With Workflow, you don’t have to. Everything is done via Workflow’s graphical interface, called the Content Graph. You can actually just drag the Actions around on the screen and order them however you want. Let me show you by walking you through how to build the “On My Way” workflow I mentioned earlier. Here’s a short video that will walk you through how to set it up:
Let’s break this down step-by-step:
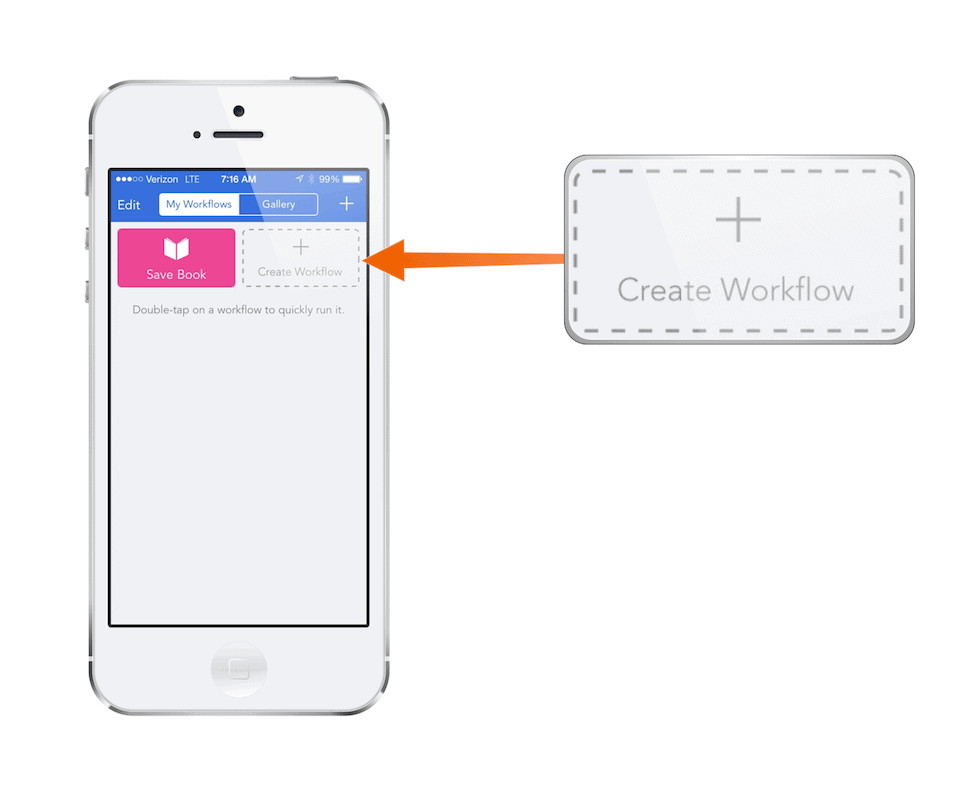
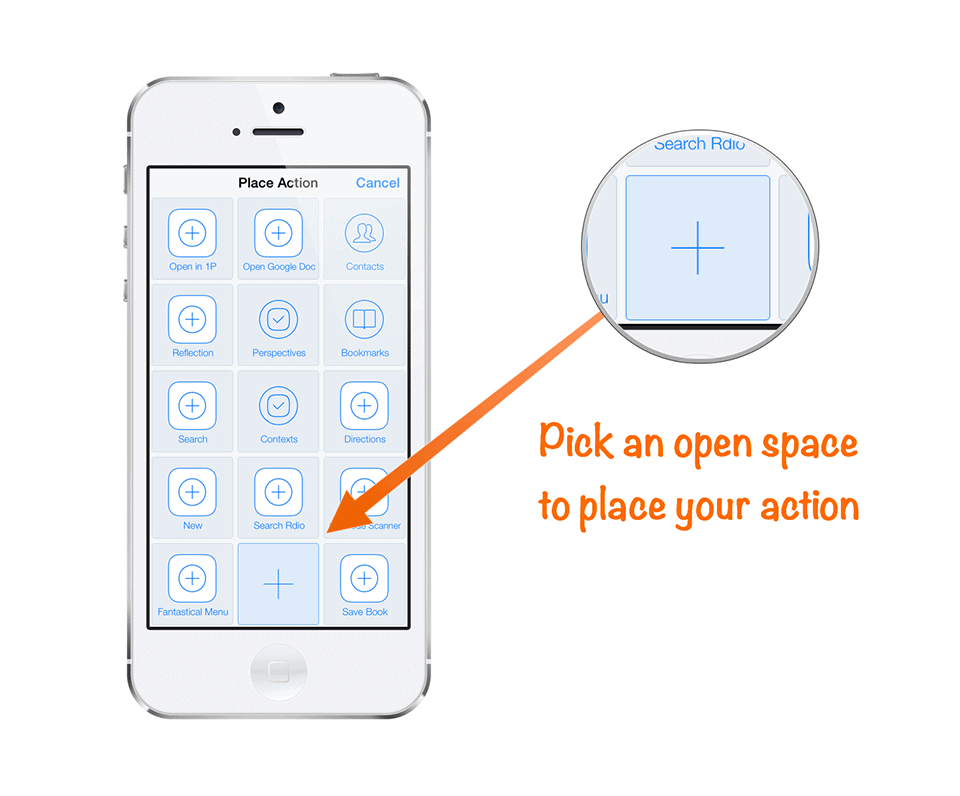
Fire up Workflow and you’ll see the “My Workflows” screen. Since we’ll be building this workflow from scratch, press the plus button or the “Create Workflow” button:
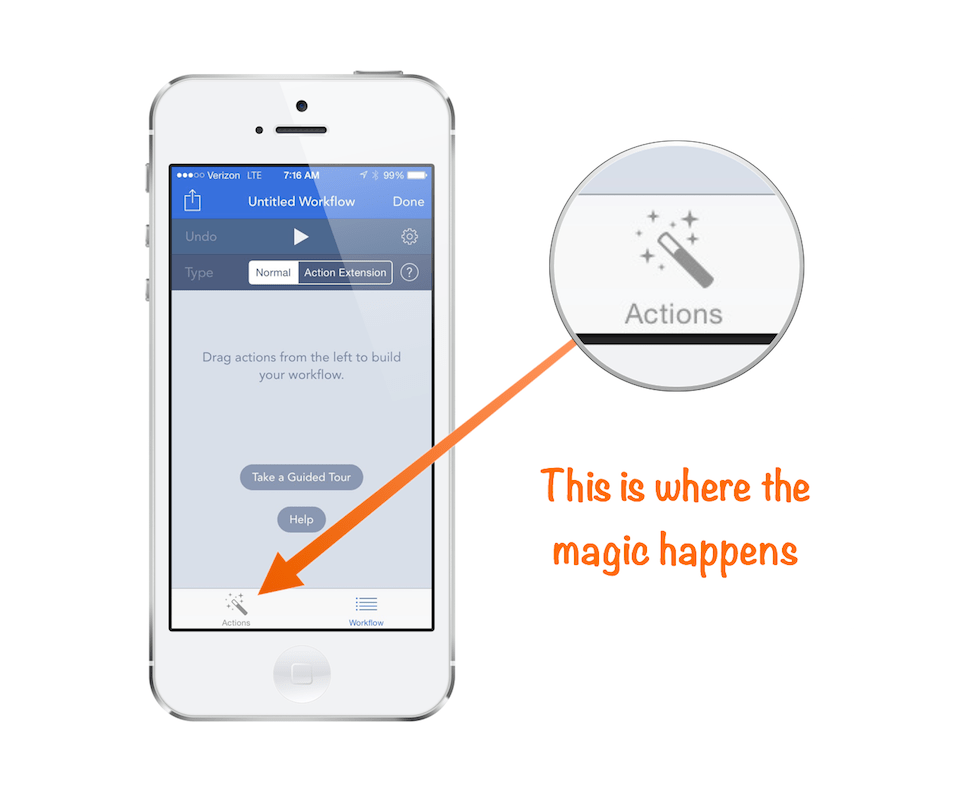
You now have a screen where there are 2 tabs on the bottom: “Actions” (where you’ll select the building blocks for the workflow) and “Workflow”, which is where we put things together. When you first press “Create Workflow”, you’re taken to the “Workflow” tab. The first thing you need to do is to add an Action, so press the “Actions” tab.
You’ll notice the actions are broken down into categories, so you may have to dig a little bit to find what you’re looking for.
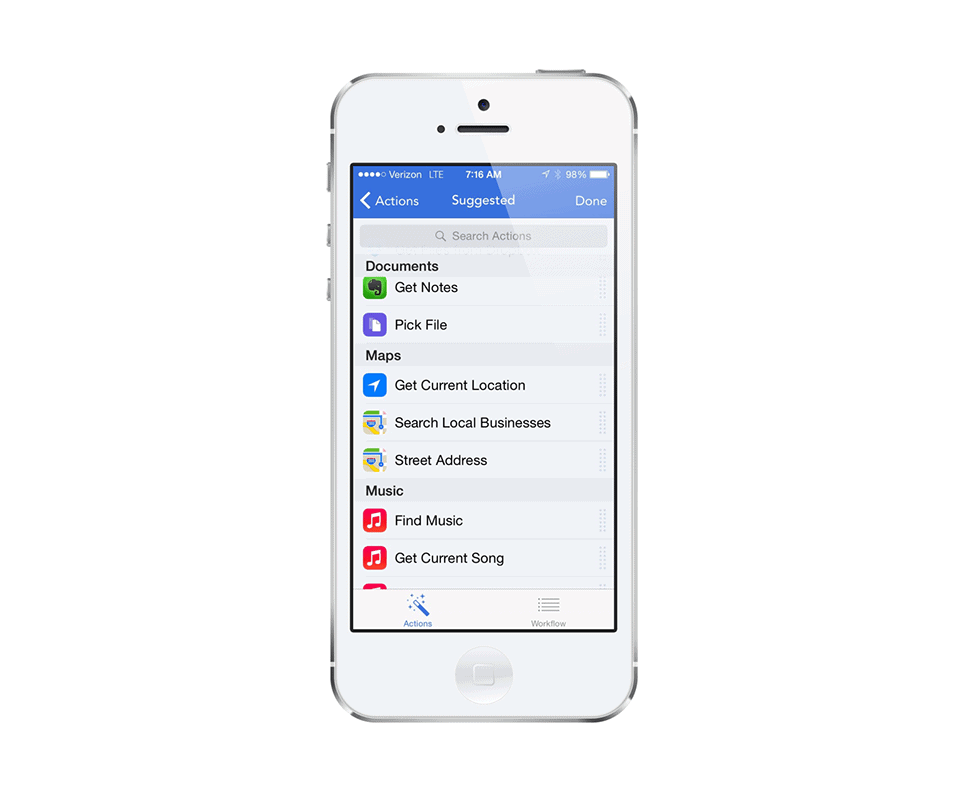
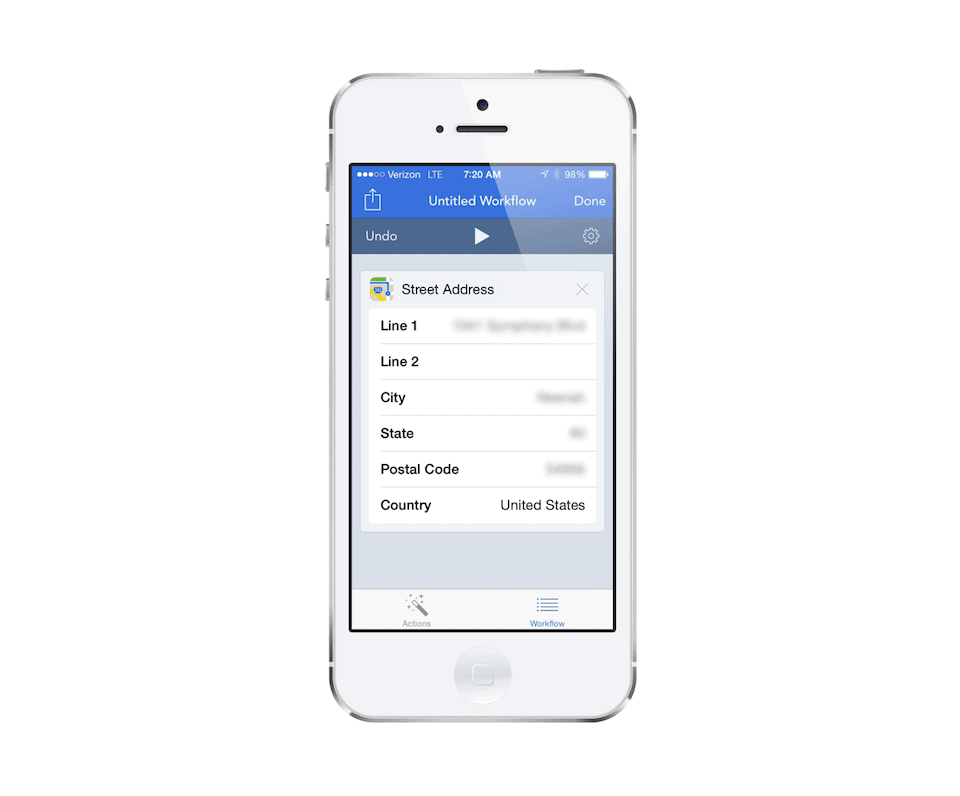
In our case, we want to set the address you want to get directions to so we will use the “Street Address” action under the “Maps” category. To add this action to your workflow, just drag it to the right of the screen and the app will automatically switch to the “Workflow” tab.
Once you’re back on the “Workflow” tab, fill in your home address:
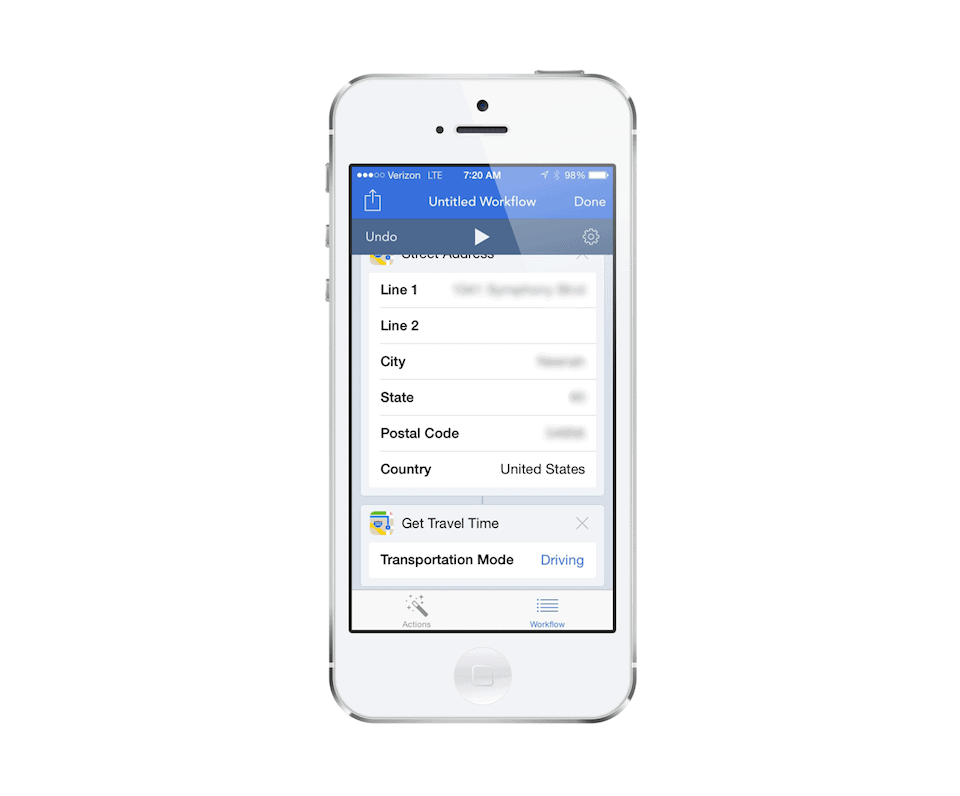
Once you have your address entered, go back and grab our next action, “Get Travel Time” (also under the “Maps” category) and drag it to the right to add it to our workflow. You can choose what transportation mode you want to use, but I’m going to use “Driving” for this example.
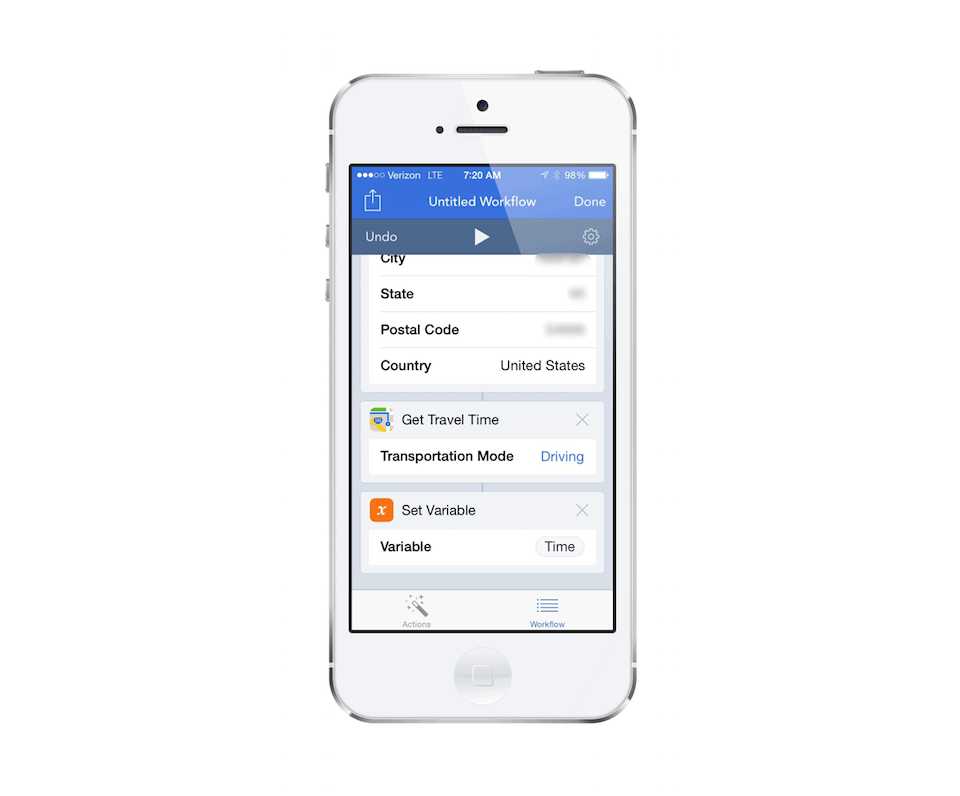
If we were to run our workflow right now we will get the travel time to our home from our current location, but we want to be able to do something with this information so we’re going to need to use another action to “save” this information. The way we’ll do this is by using the “Set Variable” action under the “Scripting” category (I know, I just said you don’t need to know anything about scripting. You really don’t, this is just the category it’s saved in. The Workflow developers are really smart and it can do some crazy scripting stuff, but you don’t have to dive in that deep for Workflow to still be useful for you).
Pick a name for this variable (I’ll use “Time”), and now we can use this information in our message. At this point, your workflow should look something like this:
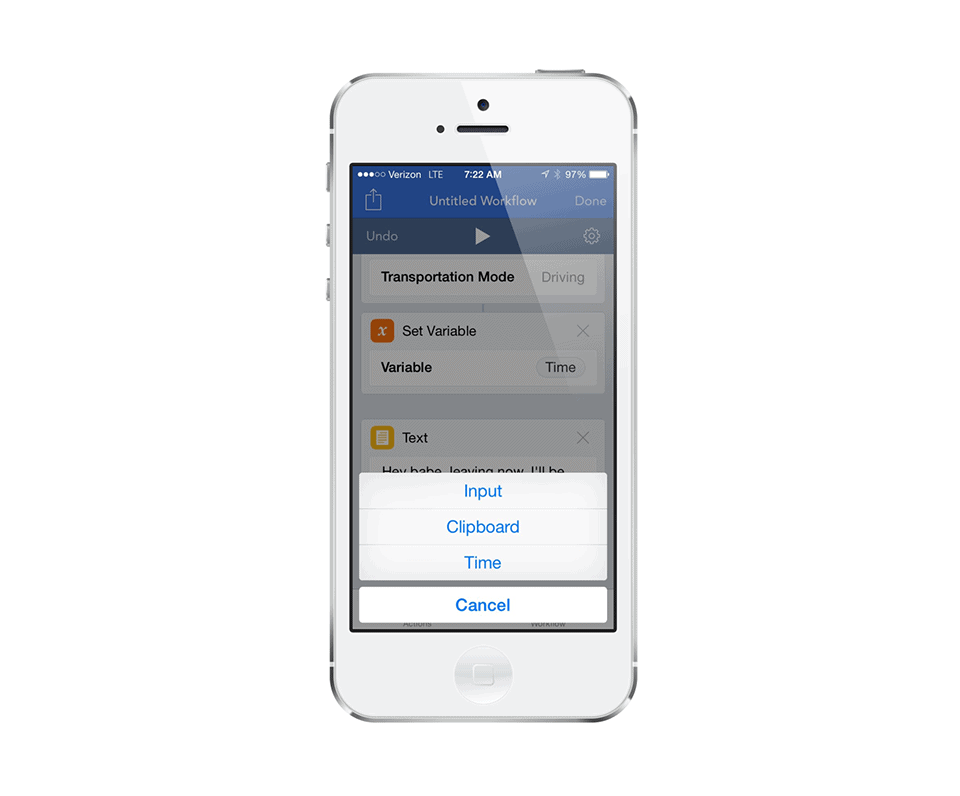
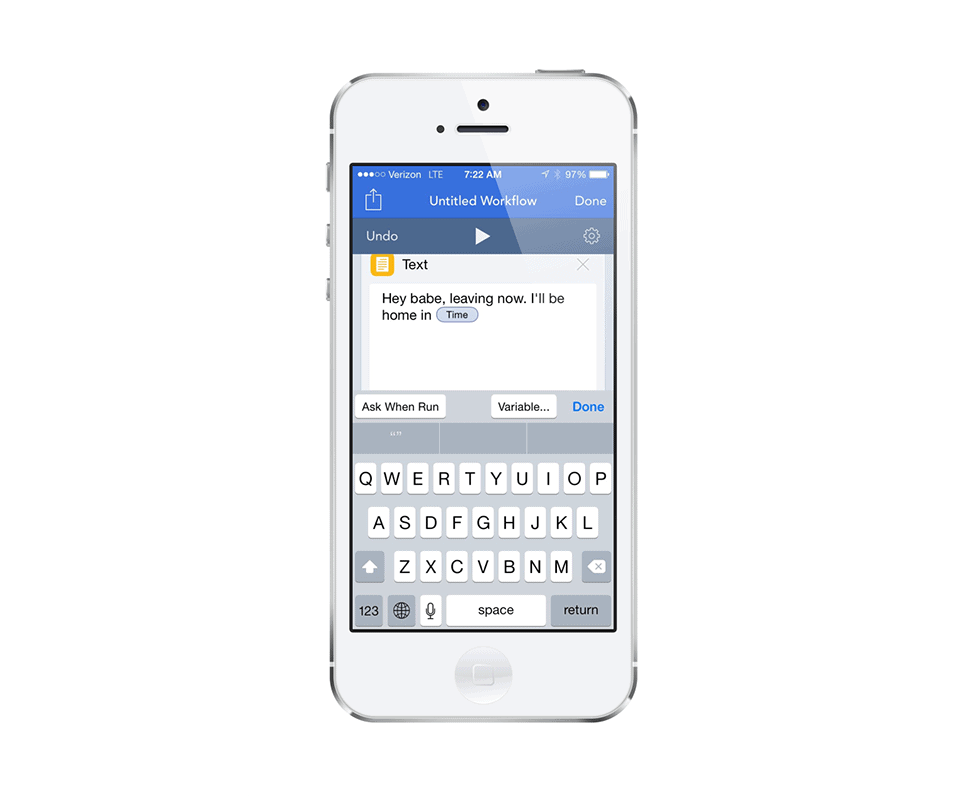
The next thing we need to do is compose the message with the variable in it, so we’re going to select the “Text” action (under “Text”, in case you were wondering). Type your message and select the “Variable…” button to place the variable information (travel time) in the appropriate place in your message.
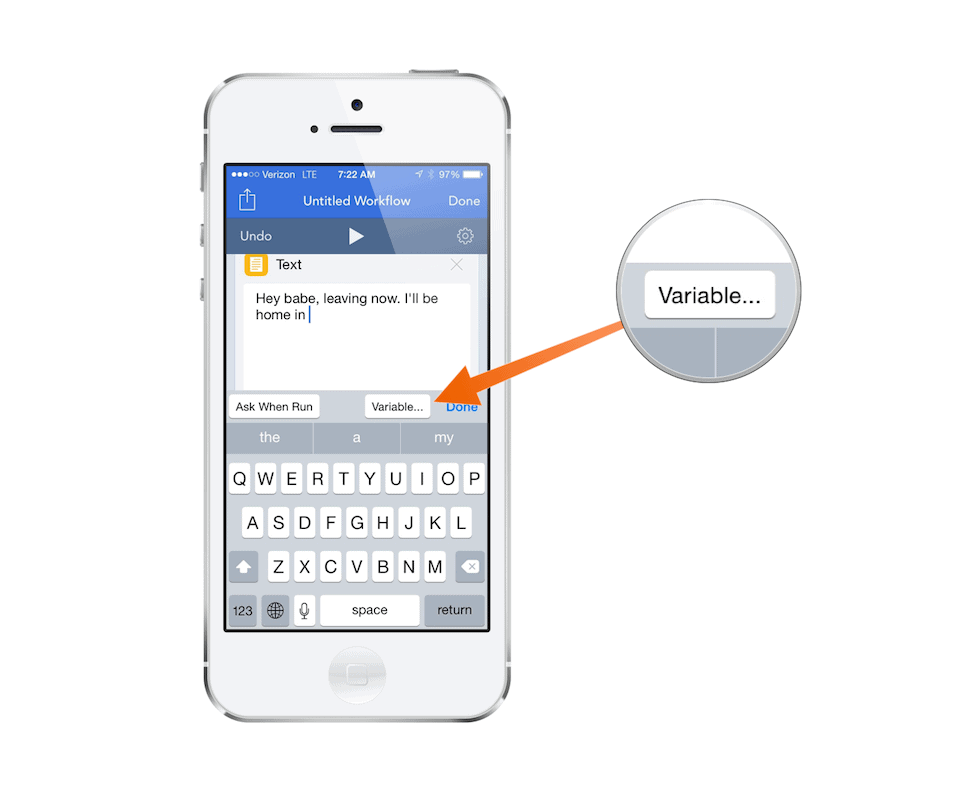
When you press the “Variable…” button, you’ll see the variable we just set (“Time”) listed as an option:
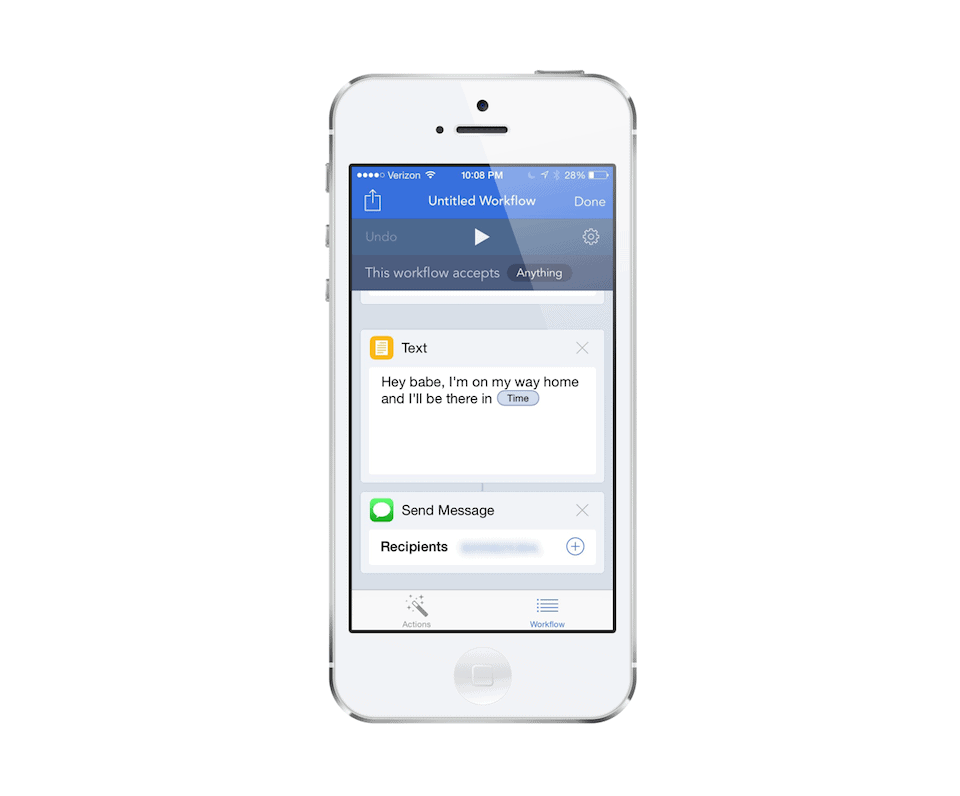
Select this and the variable will be placed in your message. The final message should look something like this:
Now the final step is to actually send this message to our significant other. To do this, select the “Send Message” action (under “Sharing”). Put in the recipients phone number or email and we’re done!
Go ahead and test your workflow by pressing the “Play” button at the top of the Workflow tab:
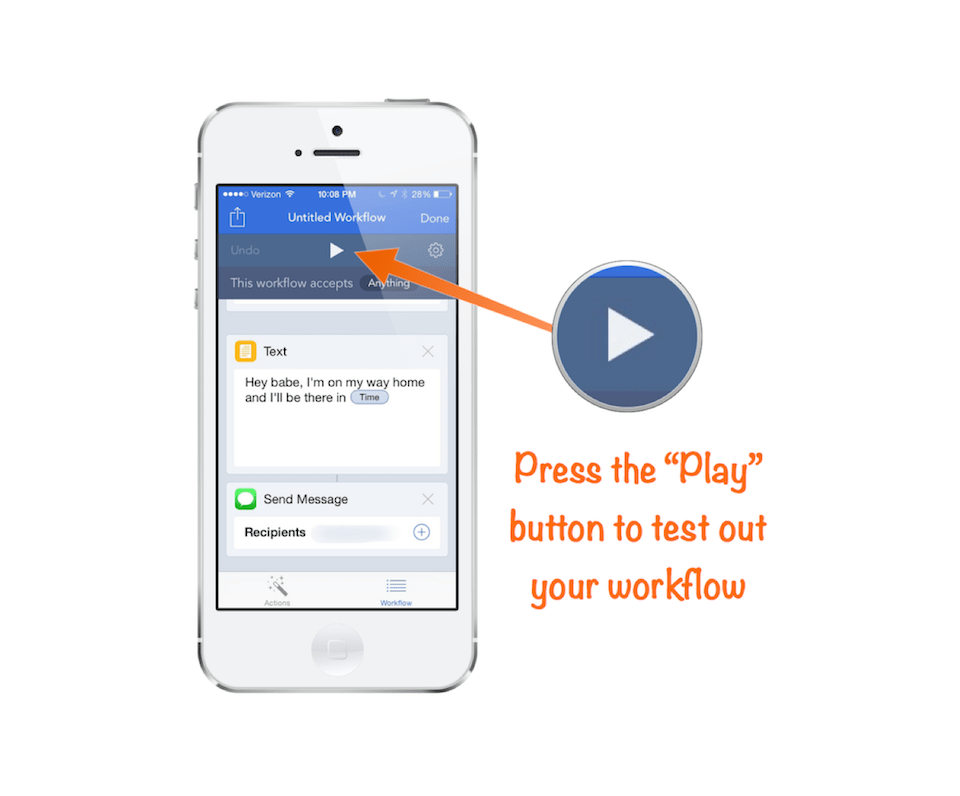
Your workflow should run and end up in the Messages app with a text message.
Now we want to save this workflow, give it a name, and put it in a place where we can easily access it later. To do this, press the “Gear” icon at the top of the “Workflow” tab:
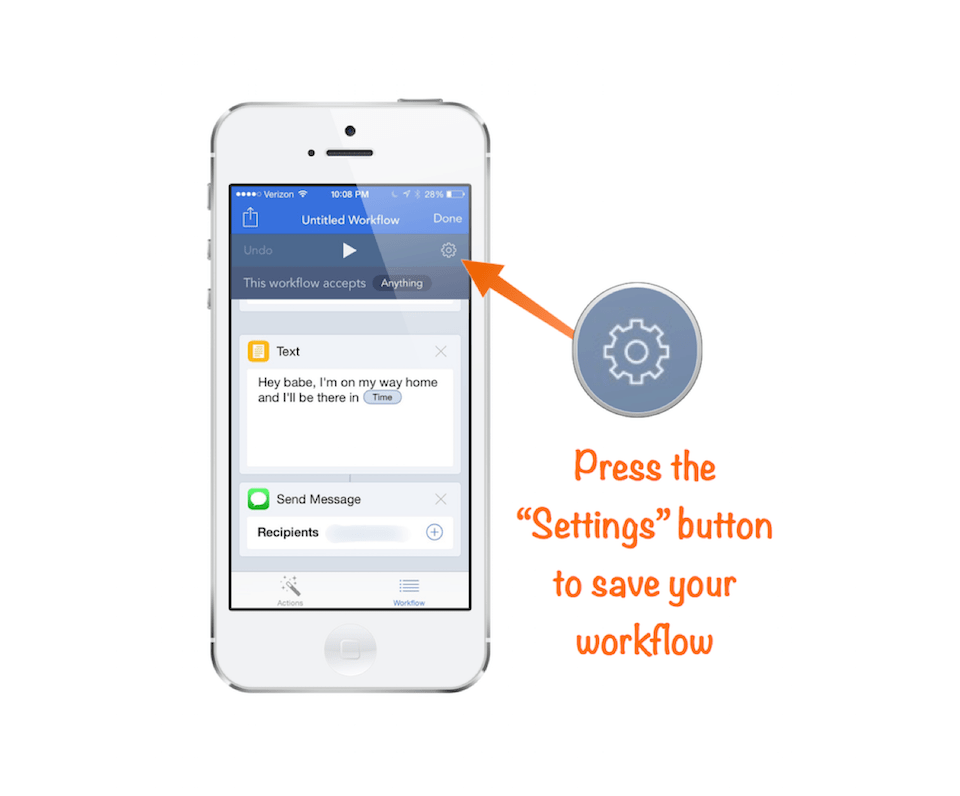
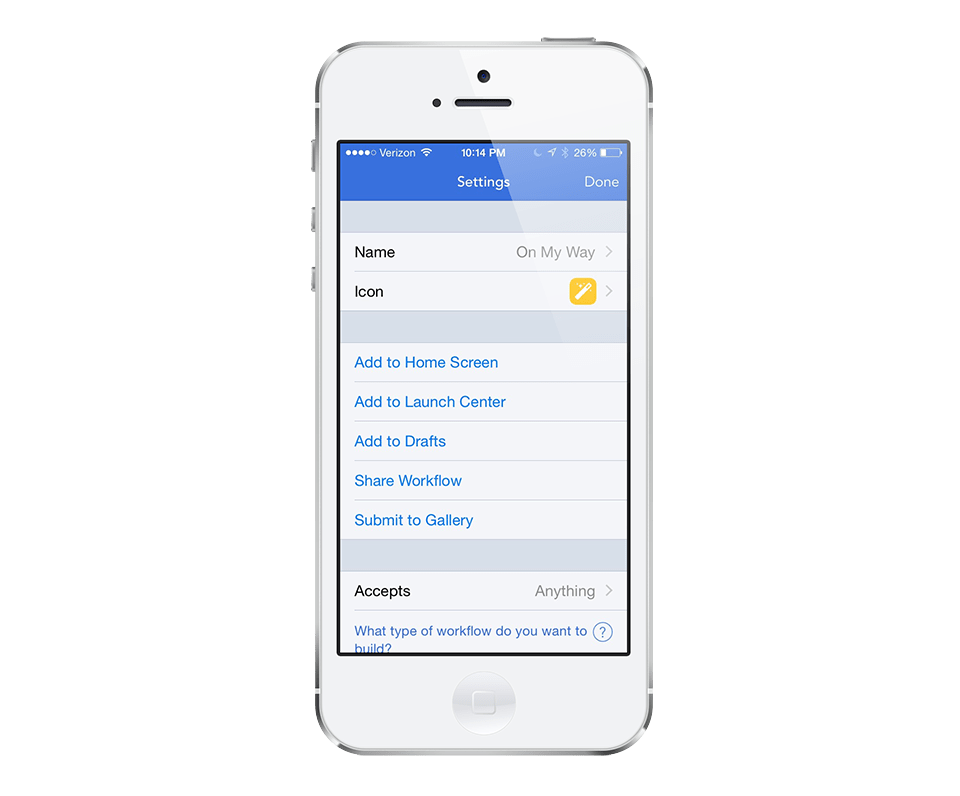
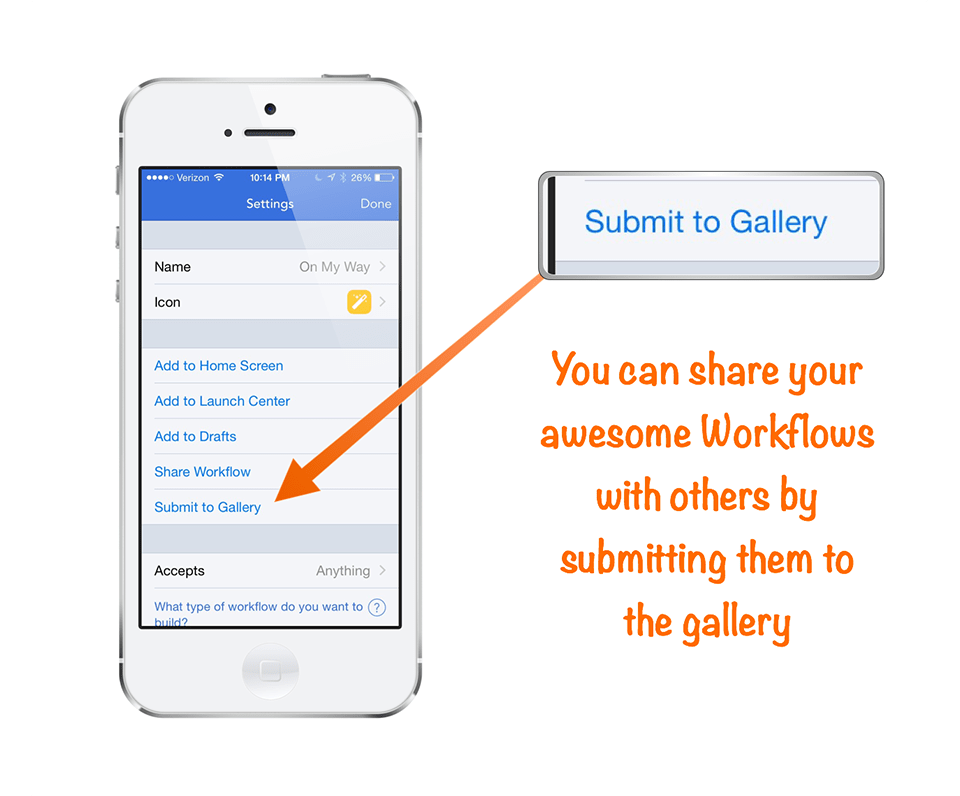
Type in a new name for your workflow (something like “On My Way”) and choose a new icon if you’d like. You can then see some options where we can Add to Home Screen (where we can run this workflow just like an app from our home screen), we can add it to Launch Center, add it to Drafts, or share it with someone else. You can even submit it to the gallery if you want other people to be able to use this workflow (might want to strip out your sensitive information first though).
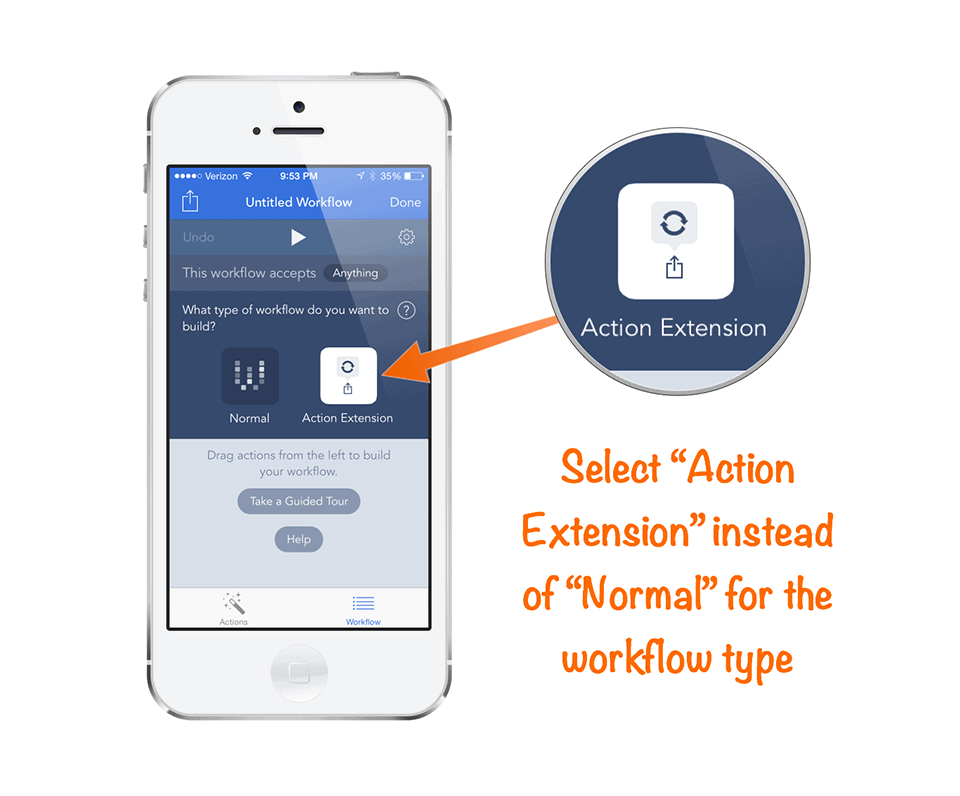
Lastly, you can select the type of workflow. There are 2 types available: Normal, and Action Extension. Normal is what we’ll use in this example, and allows the workflow to be run by selecting it from the content graph, running it from the home screen, etc. The Action Extension option allows the workflow to be run from the share sheet in other apps, eliminating the need to even open Workflow in order to launch it. This can be very handy when working with things like dates, contacts, email addresses, images, phone numbers, etc. because Workflow can recognize that information and do things with it.
Here’s an example image cropping workflow that works great as an action extension.
Let’s walk through how to set up this workflow.
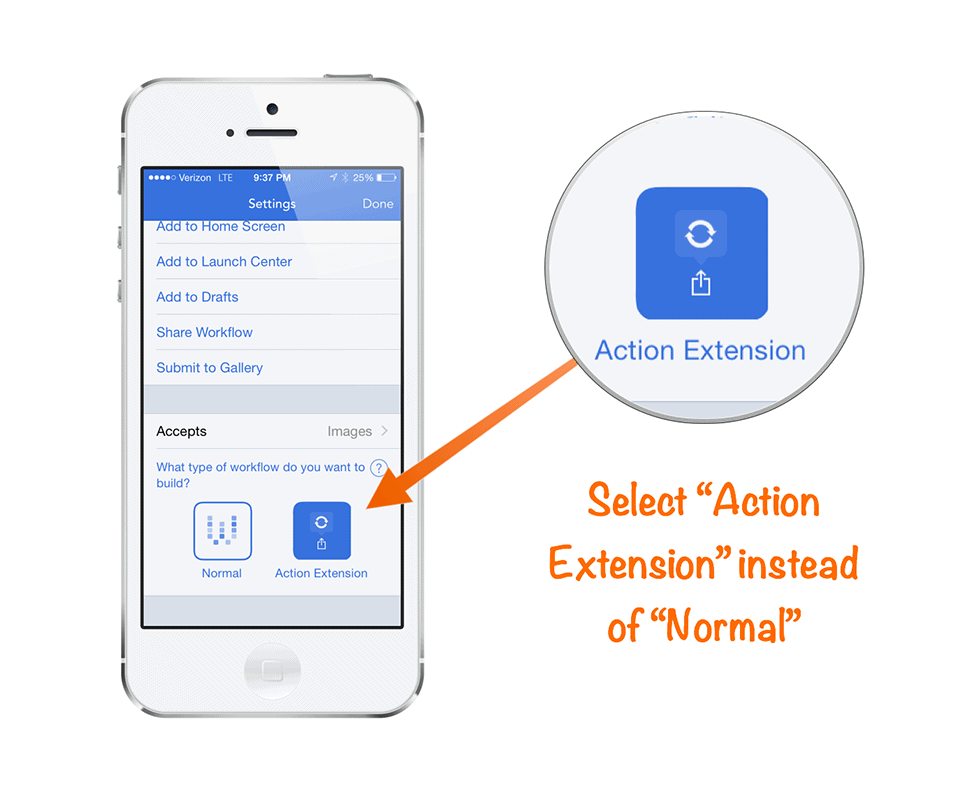
This time when you create a new workflow, make sure you select “Action Extension” instead of “Normal” for the workflow type:
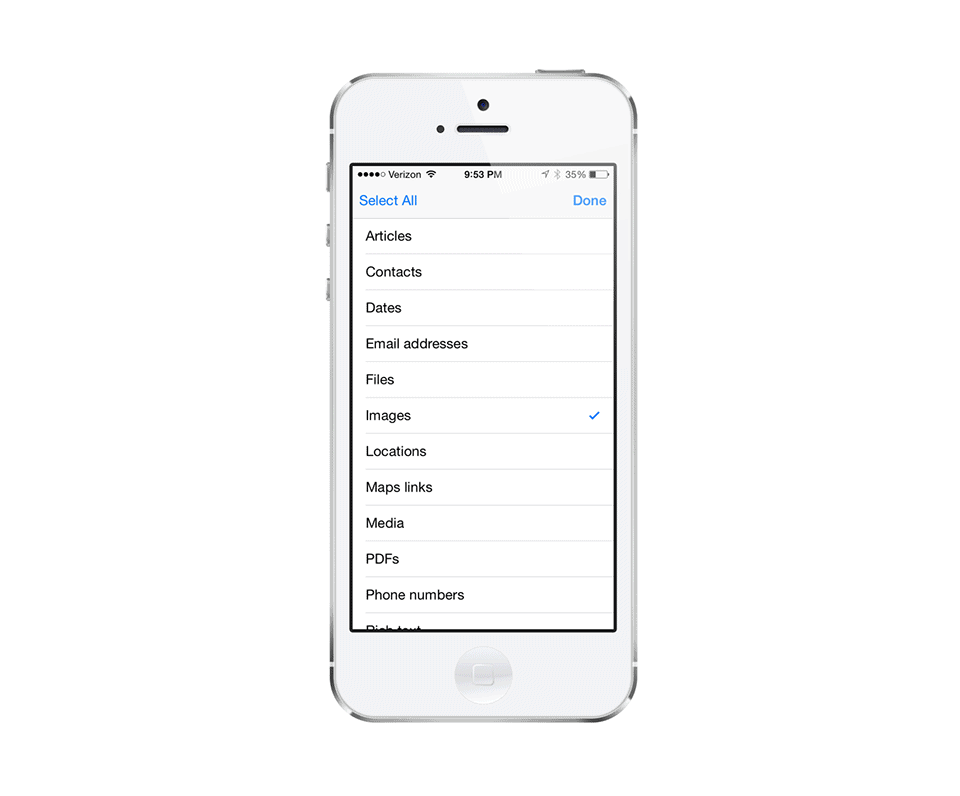
Next, select what type of file this workflow can accept. You can change this by pressing on “Anything”:
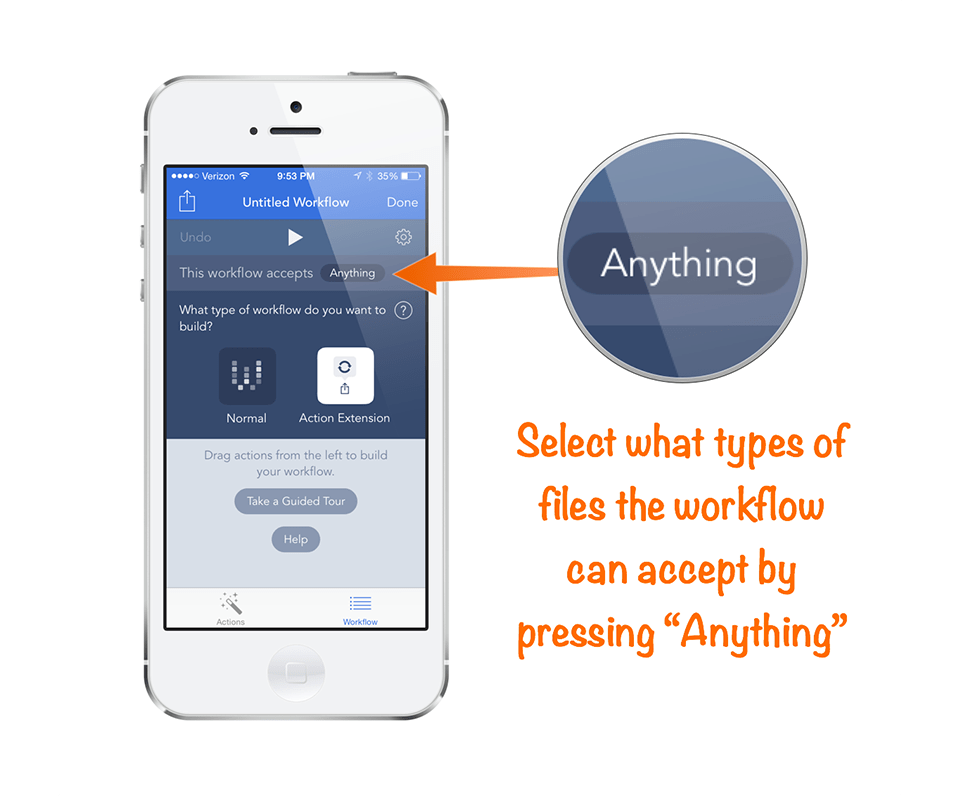
This will open a list where you can select the different file types you want this workflow to support. Since this is an image editing workflow, make sure that “Images” is selected.
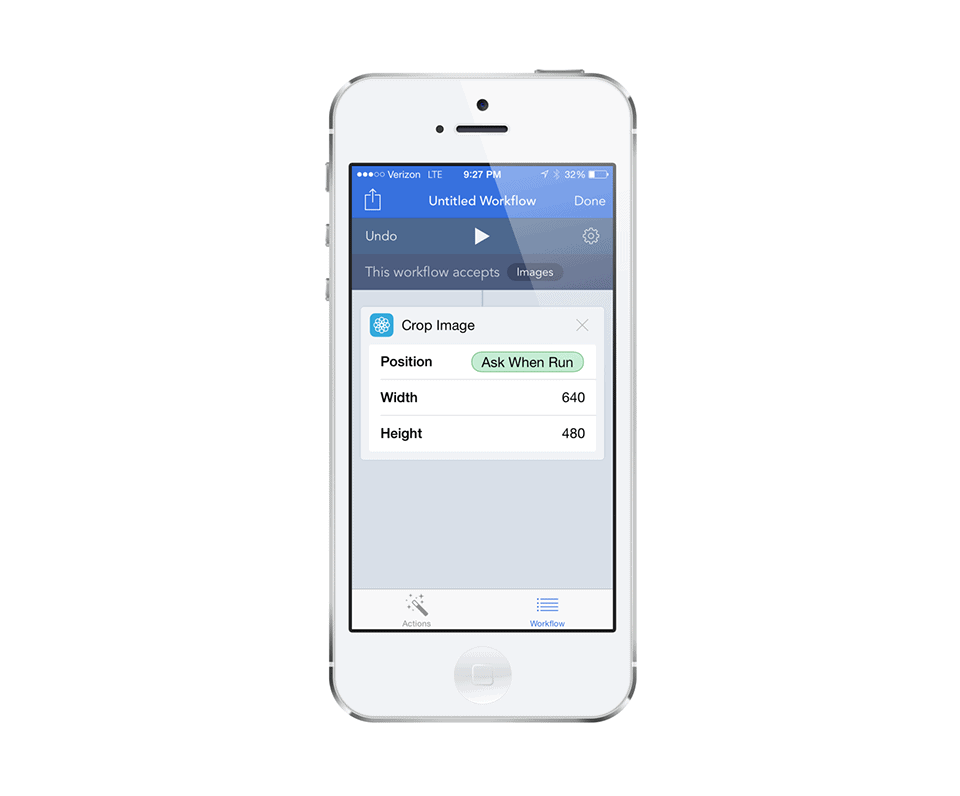
Now that we have everything set up, we can start building the actual workflow. The first thing you need to do is drag the “Crop Image” action from the Photo & Video category to the Workflow tab. For “Position”, put “Ask When Run” (which will allow you set the region to be cropped) and enter the Width & Height (I’m using 640 x 480 in this example):
Next we’ll want to do something with this cropped image, so select the “Save to Photo Album” action. You can even choose where to save it, which can be handy when putting together an article like this because I could keep all the images from my iOS device in a “Screenshots” folder, for example.
Go ahead and save this workflow as “Crop & Save”, and double check to make sure that “Action Extension” is selected instead of “Normal” under the “What type of workflow do you want to build?” section.
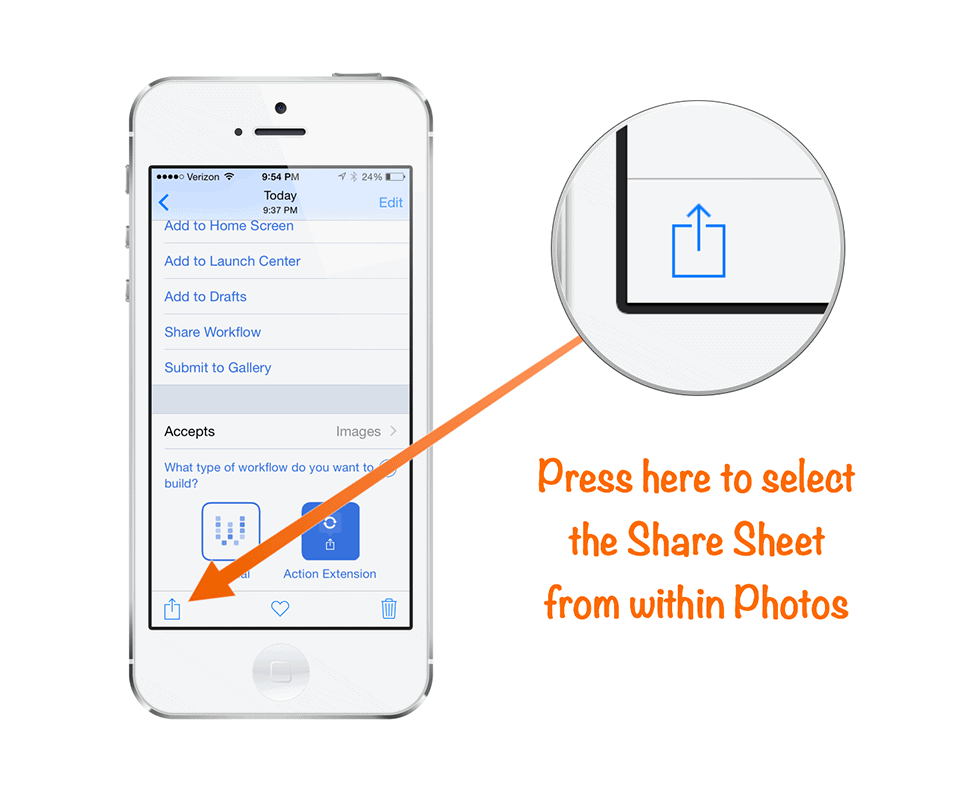
Because this workflow is an Action Extension, we need to run it from the share sheet inside another app (like the Photos app). Go ahead and open “Photos”, and find an image and open it. Now select the “Share Sheet” icon:
Once you select the Share Sheet icon, you’ll see a new option to “Run Workflow”:

Press the “Run Workflow” button and you’ll see the available options. Select the “Crop & Save” workflow we just created, select where you want the crop to take place, and your image will be automagically cropped and saved to the location you specified in the workflow.
A Whole New Level
Warning: You are now entering the Nerd Zone. This section is not for the faint of heart, and I will be covering some advanced features. If you’re not obsessed with maximizing your iOS productivity and efficiency, turn back now.
With that disclaimer out of the way, I’ve got a couple more really cool things to show you if you’re interested in tweaking Workflow to really make your iOS device Asian Efficient.
Drafts + Workflow
I love Drafts. It’s the app I use most often on my iPhone, and is one of the first productivity tools I recommend for people looking to get more out of their iOS device. Drafts brands itself as “the place where text originates on iOS” and it really has become that for me. The basic idea is that you enter your text in Drafts first and then use an export action to put that text in the appropriate place (text message, email, Facebook update, etc.). This takes a little getting used to because the natural inclination is to just start typing in the app where you think it will end up (like a text message), but when you start typing a text message that gets too long and you decide it really belongs in an email instead Drafts can save you the trouble of having to select the text (which is not easy on an iOS device) to copy & paste it in the correct application.
Recently, the developers of Drafts and Workflow got together and provided support for each other’s apps. This means that you can use Drafts content as actions in Workflow, but more importantly it means you can run workflows straight from Drafts. This may not seem like a big deal, but once you’ve been using Drafts for awhile you’ll get it. Let me give you a practical example.
Let’s say you’re meeting your friend at their new apartment. He (or she) gives you the address over the phone. There are a couple places this info could end up on your iOS device:
- The Maps app (so you can get there)
- The Calendar app (as the meeting location)
- A text message (for others who need to know where it is)
There are other things you can do with an address, but you get the idea. So you could enter the info 3 times into 3 separate apps, OR you could use Drafts, enter it once, and export it to 3 different places. I personally don’t like retyping things on my iOS keyboard because it’s not very efficient and the keyboard is tiny, so I’ll opt for the second option.
The reason this is even an option is because of Workflow. Drafts can export to many different services out of the box, but it can’t parse that information to be used in default Apple apps – that’s where Workflow comes in. You can take that same text out of Drafts and export it using different workflows (or combining them all into one workflow if you prefer). Let me show you how this works by taking just the first example, getting directions.
Let’s break this down step by step.
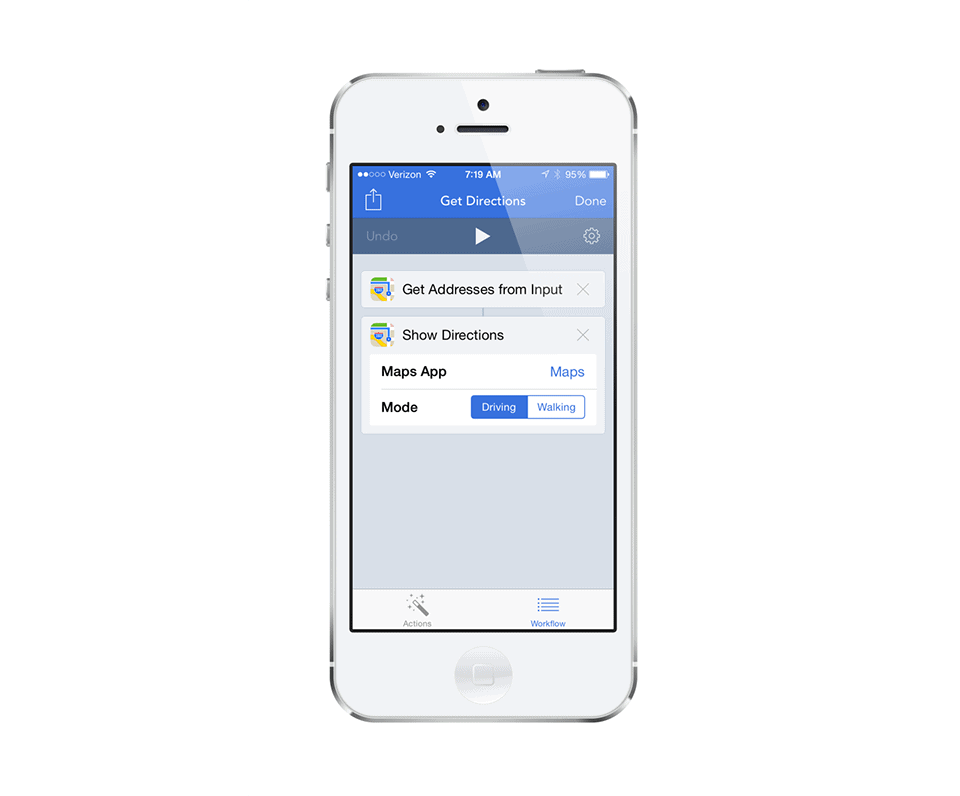
First, you need to set up a workflow in the Workflow app. I’ve created a real basic one that just uses the current text to find driving directions from my current location:
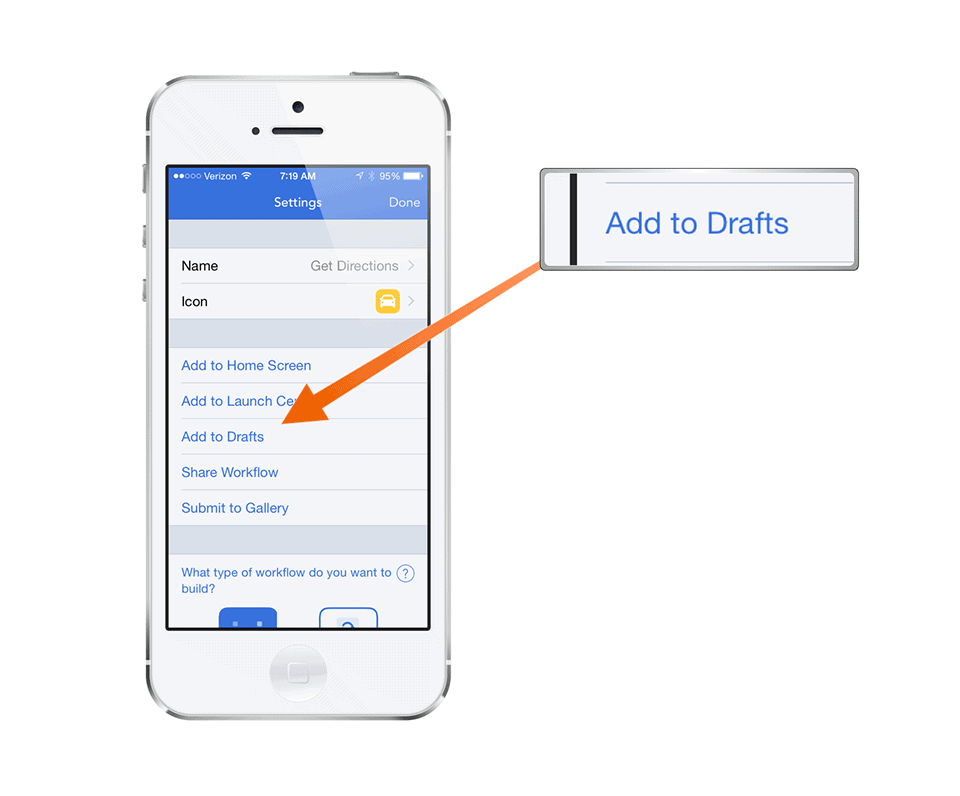
Press the gear icon to name and save your workflow, but this time select “Add to Drafts” from the Settings menu:
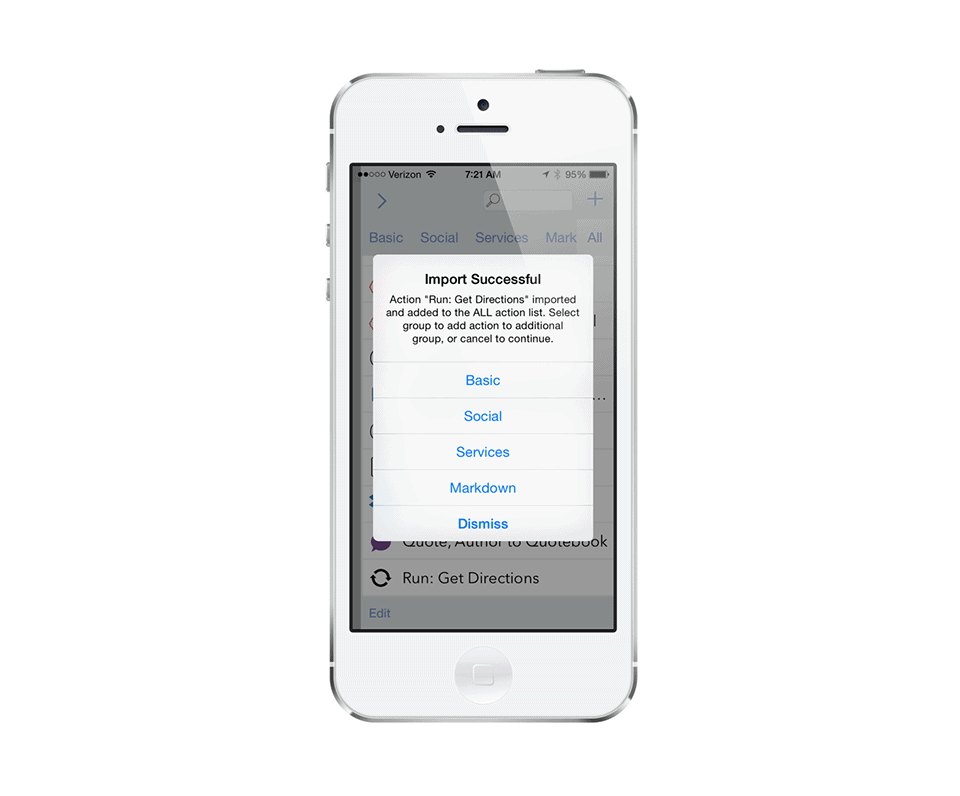
Drafts will open and show you an “Import Successful” screen and you’ll have to choose where you want to save your workflow action. Here’s what mine looks like:
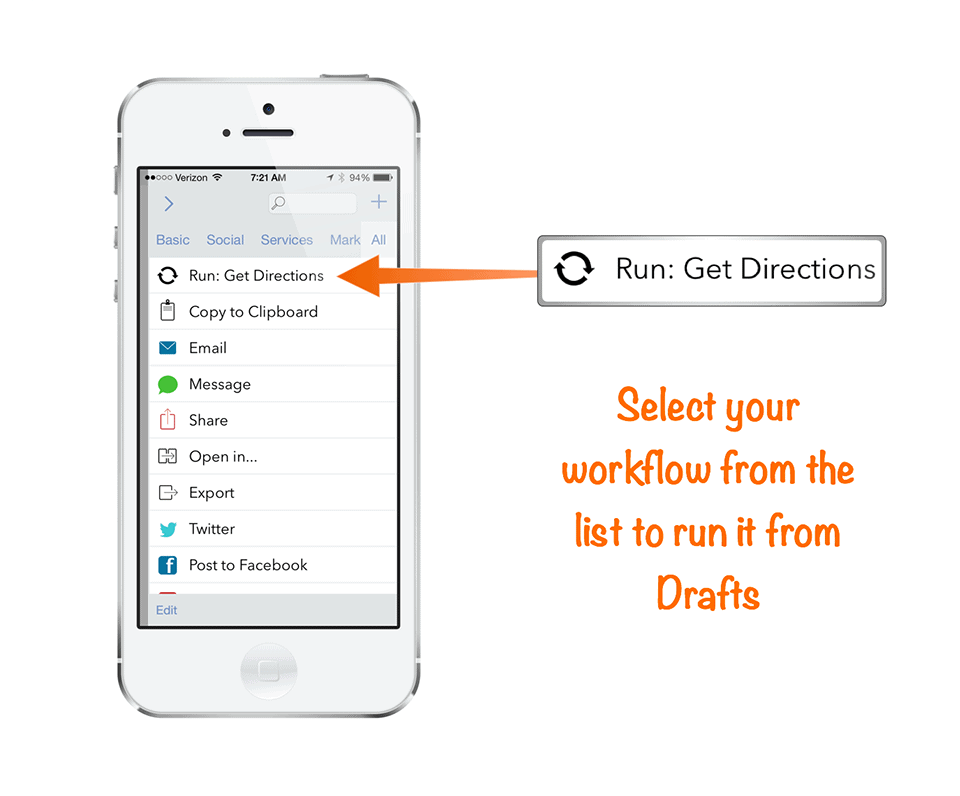
Your workflow is now saved and can be run from within Drafts. To do this, type in an address (I’ve used a fake one below) and select the “Export Actions” button:
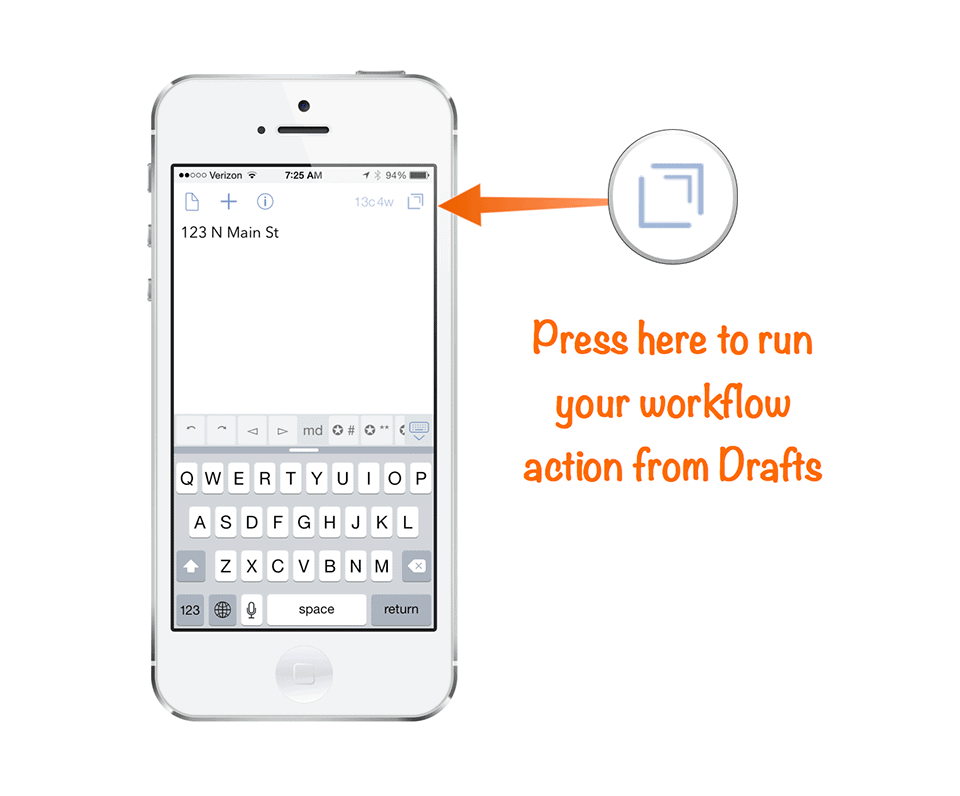
This will open the Export Actions menu. Navigate to the tab where you saved your workflow and select it from the list and it will open the Workflow app and run your workflow.
When you run this workflow, it will take your text (address) and enter it into the Maps app, then get driving direction from your current location. Best of all, the address is saved in a draft in Drafts (not in the maps app), so if you need to repeat the process later and export the address somewhere else it’s already there for you.
Launch Center Pro + Workflow
If you’re not familiar with Launch Center Pro, it’s an app that’s been around for awhile that basically operates like a speed dial for your iOS device. It was one of the first apps (if not the first) to support the x-callback URL scheme (here’s a great article over at MacStories if you want to learn more about it works), which was really the only way you could automate your iOS device until recently. As an example, you can check out this Day One Launch Center Pro action I created which allows you to answer a couple questions in LCP and then logs the answers as a table in a Day One journal entry (you can install it without understanding the code).
That took me a long time to put together back in the day, but fortunately you don’t have to know all that code anymore. In fact, Launch Center Pro has an Action Composer that allows you to build actions without knowing any code, but it’s limited to basic system actions and third party apps that built in support for this launcher utility. Where Launch Center Pro really shines though is as a quick launch interface for more complex actions. Here’s an example of what my main Launch Center Pro window looks like:
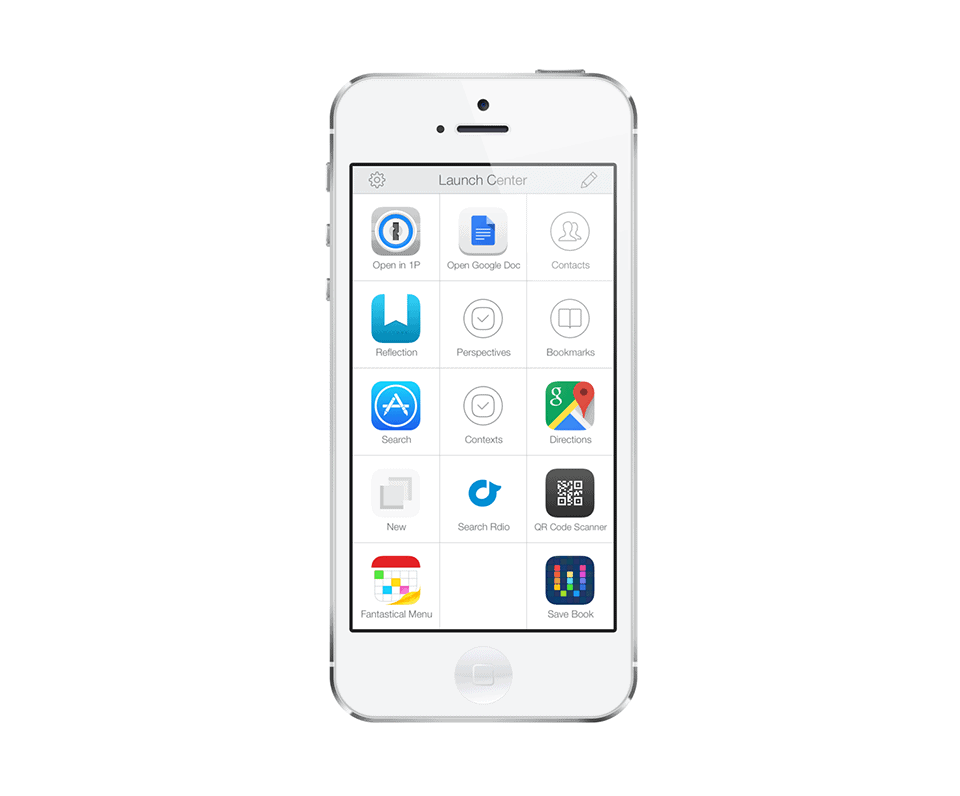
On the surface, it might appear that Workflow and Launch Center Pro serve similar functions, and that can be true to a certain degree. The main difference is that Workflow gives you much more granular control over the automation process, and Launch Center Pro offers a much cleaner quick launch interface. Workflow is for automating actions on your iOS device, and Launch Center Pro is for quickly launching those actions. For example, you might have noticed the buttons labeled “Perspectives” or “Contexts” on my Launch Center Pro screen – those are actually folders with quick links directly to my OmniFocus contexts & perspectives on my iOS device (here’s the Michael Schechter post that taught me how to do it in case you’re interested). I just select the appropriate item, it opens OmniFocus and takes me right to that context/perspective.
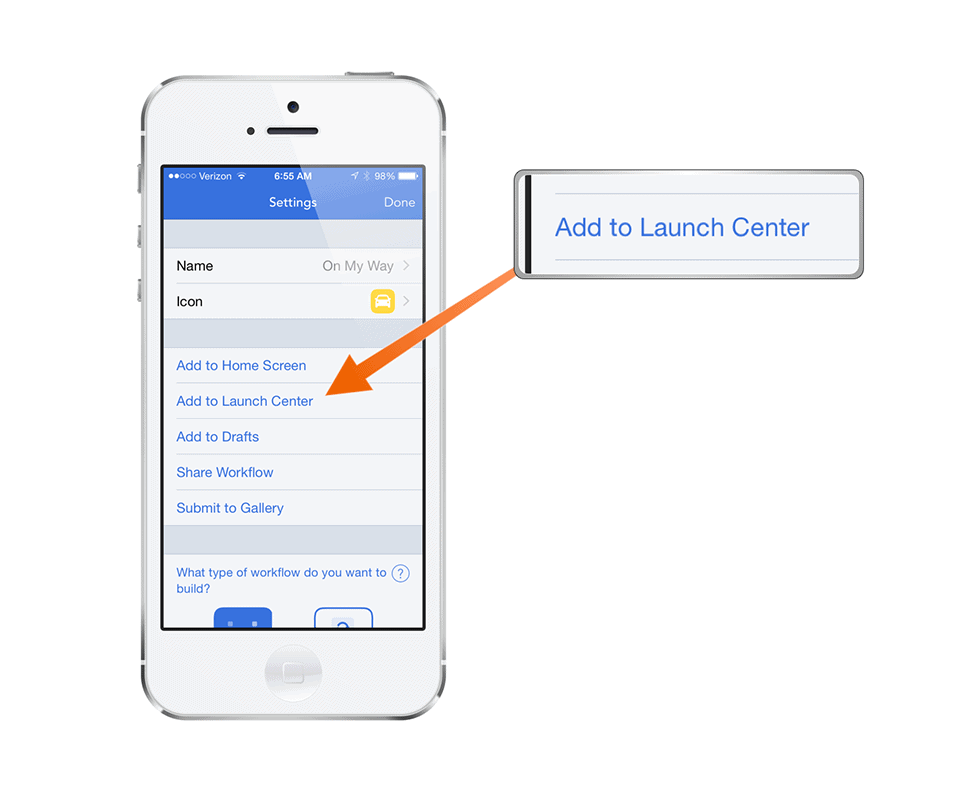
Now imagine that you have Launch Center Pro full of quick links to your workflows. That’d be pretty cool, right? It also sounds like it’d be a lot of work to set that all up in two places, but fortunately you don’t have to do that. Workflow allows you to export a workflow directly to Launch Center Pro – just select the “Add to Launch Center” option from the settings screen for your workflow:
This will open up Launch Center Pro and you’ll see an “Incoming Action” dialog:
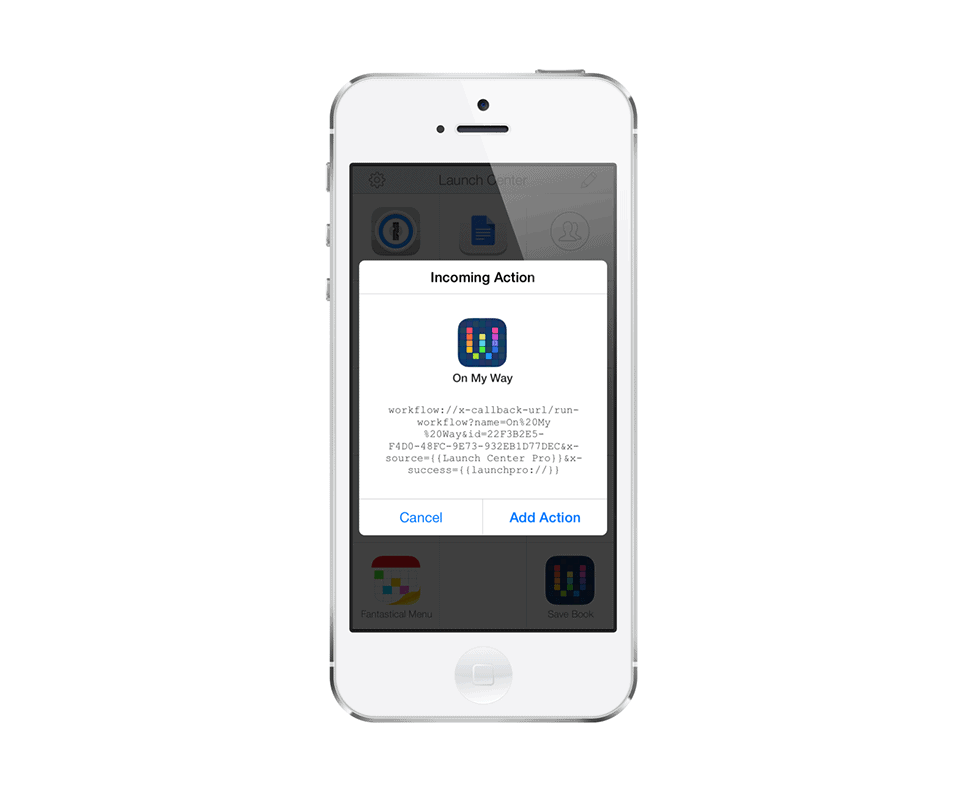
Just select “Add Action” and pick a place to put it and the workflow will automatically be saved to Launch Center Pro:
Now you can launch the workflow by selecting it from Launch Center Pro.
Sharing is Caring
One of the coolest things about Workflow is how easy it is to share your workflows once you create them. Just go to the “Settings” screen and press the “Share Workflow” button.
The share sheet will open with several options for sharing your workflow, the most basic of which is “Copy Link.” This creates a unique Workflow URL that you can share, and all you need to do to install a workflow like this is just open the URL (on your iOS device) and the workflow will automatically be installed.
This is great because you don’t need to understand all the specifics about how a workflow works in order to actually use it. Why reinvent the wheel when a lot of very smart people have been creating and sharing workflows on the internet already?
10 Useful Workflows to Get You Started
So with that in mind, here are 10 basic workflows to get you started. All you need to do to install these is open them on your iOS device.
- Upload Last Photo to Dropbox – this workflow takes the last photo taken and uploads it to your Dropbox account (you can pick the folder where it saves the image) and copies the URL to share the file to your clipboard.
- Tip Calculator – this simple workflow creates a handy tip calculator where you enter the bill amount and it tells you how much to tip (don’t be stingy!)
- Cloud File Picker – this workflow allows you to pick a file from iCloud, Dropbox, Google Drive, etc. and open it on your iOS device by picking the app you want to open it in.
- QR Code Reader – this is a basic workflow that allows you to scan and open QR codes.
- Make PDF – this workflow takes rich text or URLs and makes a PDF out of the selected content.
- Shorten URL – this workflow shortens the currently selected URL.
- Save from Instagram – this workflow allows you to download images from Instagram by selecting the 3 dots and selecting “Copy Share URL” then running this workflow.
- Airdrop & Delete Screenshot – this workflow takes your last screenshot from your iOS device and sends it to your Mac using AirDrop, then deletes the screenshot from your iOS device (keeping your photos clean).
- Open in Chrome – this simple workflow simply takes the current URL and opens it in Chrome instead of Safari.
- Get Lyrics From Currently Playing Song – this workflow takes the currently playing artist and song from the Music app and finds the lyrics via a Google search.
There are a lot of other great workflows available to download through Workflow’s built-in Gallery.
10 More Great Workflows From Around the Web
If you want some more awesome workflows, these are 10 of my favorites from around the web. These workflows are a bit more advanced, and I’ve included links to the author’s site where I could find them that offer more detailed explanations of what the workflows actually do. You might need to customize these a little bit, so if you need some help getting these up and running I highly recommend you check out the author’s site if you’re interested in really making these work for you.
- Append to Evernote Reading List (source: brettkelly.org) – This is the workflow that got me hooked on the Workflow app. Basically what it does is take the Amazon mobile URL for a book and strip out all the junk, then add the book title as a link (with the URL of the actual book) to an Evernote “Book Queue” list.
- Evernote Web Clipper for iOS (source: sayzlim.net) – this workflow works similar to the Evernote Web Clipper does on your Mac, by taking the page you are on and clipping the page as a PDF and adding it to Evernote.
- Record Expense (source: brettkelly.org) – This workflow will take some tweaking, but it’s pretty awesome. When you run it, it prompts you for the expense category, then the expense amount, then opens the camera so you can take a picture of the receipt, and finally sends ALL of this to Evernote.
- YouTube to HuffDuffer (source: 512pixels.net) – This genius workflow strips the audio from a YouTube video and uploads it using Huffduffer so you can listen to it in your podcast app.
- Affiliate Links on iOS (source: techedvance.com) – This workflow takes Amazon or iTunes links and adds your affiliate code. To run it, you must have Clean Links installed and you must copy the URL to your clipboard before running the workflow.
- Convert Spreadsheets to Markdown Tables (source: macstories.net) – I hate Excel with the intensity of 1000 suns, so I love this workflow because it allows you to get the data out of a spreadsheet and put it into a Markdown table. Very handy if you love Markdown as much as I do.
- Wayback a Dead URL (source: Workflow Gallery) – Ever visit a webpage and it’s been taken down? This workflow allows you to still find the page by using the internet’s Way Back Machine. Very handy.
- Send Pic Everywhere (source: discussed on Episode 243 of Mac Power Users) – We all have family members who aren’t on Instagram (or other social media sites) to see pictures when they are posted. While my mom and dad don’t care about the meal I ate last night, they do still like to see pictures of their grandkids. This workflow posts the picture to social media sites and also gives the option to send via SMS.
- Take a Note (Audio/Video/Text) (source: thoughtasylum.com) – I use Drafts as my quick capture tool of choice, but it’s limited to text. This handy workflow prompts you when you run it to select audio, video, or text and then opens up the appropriate capture tool, combines all the appropriate info (date, time, etc.) and saves everything to Evernote.
- Time Sensitive Dropbox Links: 1 Day | 1 Week (source: plobo.net) – This workflow will require you to set up some Hazel rules on your Mac. Basically what it does is move a file to a specific Dropbox folder (i.e. “1 Day”) and copies the share URL, but Hazel is watching the folder and removes the file after a specified period of time. Pretty clever.
Other Workflow Resources
If you’re looking to do more with Workflow, these are a couple excellent resources that can help you take your Workflow game to the next level.
- MacSparky Workflow Field Guide – An excellent resource with lots of examples. $9.99, but worth every penny if you’re serious about getting more out of Workflow.
- Workflow Review: Integrated Automation for iOS 8 – Great article by Federico Viticci. I don’t think anyone can do more on an iOS than he can.
- Workflow Tips for Beginners – Some great tips for starting out with Workflow.
- How to Create Your Own iOS Apps and Extensions with Workflow – The Lifehacker guide to Workflow. Includes some great workflows.
- Workflow subreddit – The “official” Workflow community. Lots of good stuff here.
- Workflow Unofficial Gallery – A cool site designed to look like the iOS app with lots of workflows.
If you create any awesome workflows, I’d love to see them! Feel free to post your workflow links in the comments.
Next Actions
Do you want to see more examples of our personal systems and workflows? We reveal them all on our Efficiency Systems seminar. It’s completely free and you’ll get to see the exact step-by-step systems and workflows that we personally use to be insanely productive. Register for the next available seminar here.
Recommended for you
Want the full system? 25X is the flagship productivity system we teach.
Explore 25X →
Great article and something I think everyone can find a use for – you might want to update the price on the article. It appears they have increased the price to $4.99 as that is what I see when I go to itunes store. Thanks!
Thanks for this. I’ve been using Workflow but this piece gives me some new ideas for making my own workflows.
I hadn’t used the drafts option though (and I use Drafts a lot so that’s great). When I recreated your directions workflow and tried to run from Drafts I get an error message.
“Invalid URL. The operation couldn’t be completed. Inappropriate file type or format.”
Any ideas? It looks the same as yours. Thanks.
Wonderful post, as we are actually used to from this source. It will surely lower the barrier to using this app for hopefully many of the regular attenders.
I just hope Frederico is not stopping by anytime soon, at least not until you made him a guy again ;-)
Cheers!
Haha! Fixed the typo :)
Great to see this featured – it’s in daily use for me. I use it in conjunction with Launcher to have my most frequently used worflows as widgets in the today dropdown.
Most used on my iPhone is the ‘running late one’ but altered to send an email to the meeting attendees. On my iPad is meeting notes – allows you to select a meeting from the calendar, pulls out the attendees, agenda, and prefills text to send onto drafts. Then have some drafts actions, one is to automatically pull out the actions into a separate note and another to push through to omnifocus. Lastly one to email the notes/actions to the attendees – most usually before everyone has left the meeting room :)
I was wondering how this never made your list of must have apps. Will there be any updates to the Omnifocus Premium Posts with possible shortcuts or workflows that could make our lives easier?
Possibly :)