The Productivity Show was launched January 1, 2015. With high hopes (and no experience), we struck out on an audio production journey that has led us to connecting with and interviewing some of the very best productivity minds out there. People like David Allen, Rory Vaden, and Jamie Tardy have shared their best tips, tricks, tools, and techniques to help the productivity community at large do more and be better.
The podcast has been extremely successful, both in terms of impact and downloads (1 million in a year), and we've been thrilled with the results so far. But how did we get here? In this article, we pull back the curtain and share with you the complete story of how The Productivity Show was launched and show you step-by-step how we produce it so that you don't have to make the same mistakes we did. If you're not careful, you'll end up wasting a lot of time producing a podcast that's totally inefficient. But we'll show you how we went from 10+ hours of podcast production to….just 3 hours per episode (thanks to documented processes and automation – which we reveal in this post).
At the end of this article, you'll have a better understanding of the Asian Efficiency development process and a production blueprint that you can follow to make and launch your own podcast. Plus, at the end we'll give you our SOPs (Standard Operating Procedures) that reveal the step-by-step instructions and settings you need to efficiently produce a podcast.
We want to pull back the curtain for you and share what we learned through the launch of The Productivity Show, as well as how we were able to automate just about every part of the podcast production process. By the end of this article, you'll have all the knowledge you need to publish your own successful podcast (results not guaranteed). To make it easier to digest, we'll break this comprehensive guide down into three distinct sections:
- Investigation – the story of how we figured everything out through self-study (and a little bit of trial and error)
- Documentation – the process we used to record everything so we could pass along our knowledge to others
- Automation – how we delegated and outsourced much of the tedious post-production with some awesome partners to make the whole process #AsianEfficient.
When we decided to launch the podcast we didn't really know what to expect, but we've learned a lot along the way and we want to share that with you here. We knew that many of the Asian Efficiency team members were big podcast fans, but we didn't really know much about the production process. But in true Asian Efficiency fashion, we decided that if we were going to launch a podcast we wanted to do it right.
Investigation
The very first thing we had to figure out when we launched the podcast was what we were going to call it. We didn’t really have to decide what it was going to be about since we knew it was going to become Asian Efficiency’s official podcast, and we wanted to continue to deliver quality content to our fans using the (new to us) podcast medium. We knew we wanted to keep the episodes fairly short for the most part (roughly 30 minutes) so that they could be listened to on the average daily commute. We also wanted each episode to help people learn how to do more and be better and provide actionable information they could use to make progress on their goals. But what we did need was a name. We kicked around ideas like Eat That Frog, The Asian Efficiency Podcast (original, I know), and eventually settled on “The Productivity Show.”
Picking a good podcast name proved to be a much more difficult task than we initially anticipated, but we also made a few mistakes and learned a lot along the way. Looking back, the first mistake we made was that none of the options in our initial round of podcast names were very good. We came up with a few different names and even polled our blog readers before we really understood the key elements of a good podcast name:
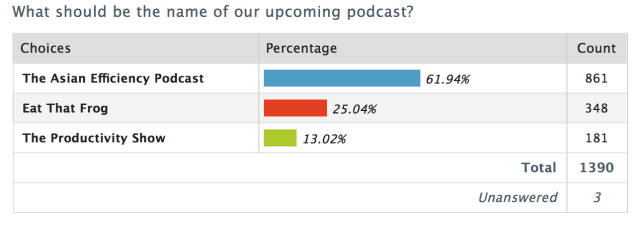
Obviously, we didn't go with the outcome of the vote. Technically speaking, we didn't go with any of these and instead listened to some very helpful feedback we received from people who really understood this stuff. They told us that the keywords we used in the title were extremely important, and we quickly realized that we had a lot more work to do. We started by systematically eliminating the bad options. Since eating frogs is not a popular search term, that one didn't make much sense. And since one of our core values is #datadrivendecisions, that meant that we needed to start over and pick a name that would allow us to reach as many people as possible. However, we did end up incorporating elements of both the other options into the official podcast directory listing:
- Title – The Productivity Show | Getting Things Done (GTD) | Time Management | Evernote
- Author – Asian Efficiency: Productivity, Time Management, Getting Things Done (GTD), Habits and Systems Experts
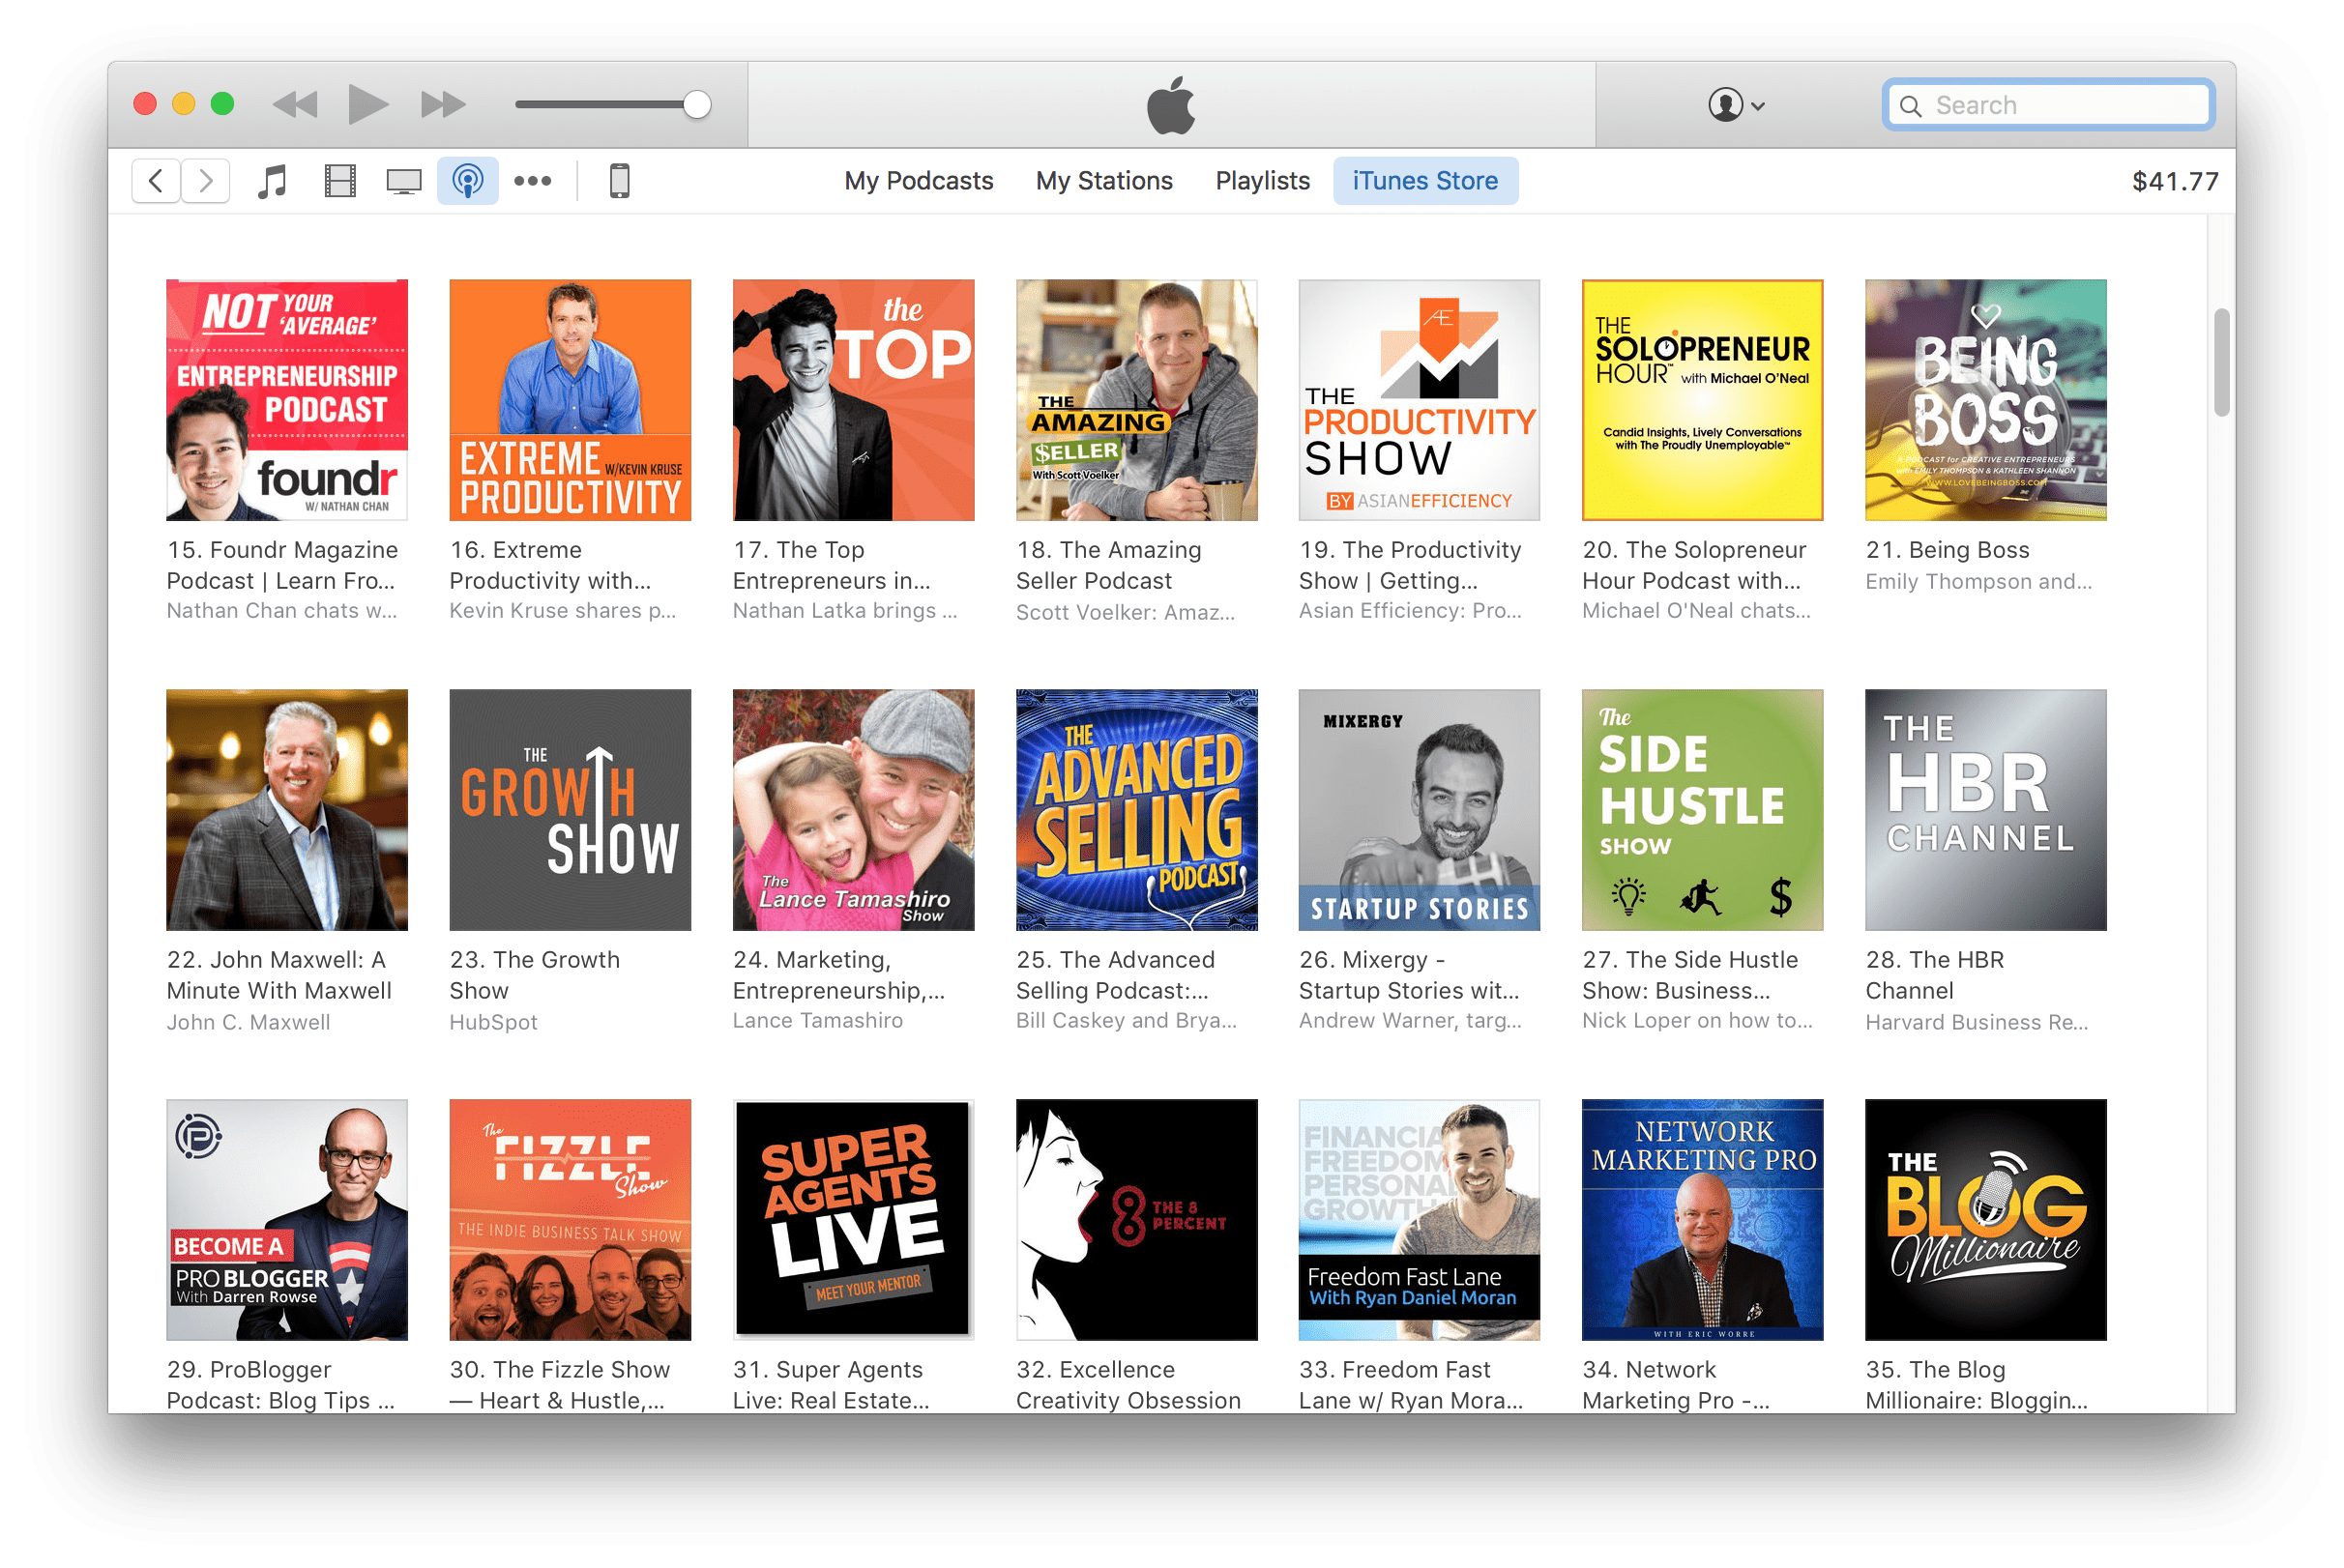
This may seem like a lot of filler, but it's really important. A lot has been written about how broken iTunes search is, but the data is clear – stacking keywords is the best way to improve your search ranking results. Some people even deliberately use the names of competitors in their podcast name so that they show up when people search for the other podcast or app and a few people told us we should do that as well, but we refused to go that far as it's not in alignment with another one of our core values, #pullothersup.
Next, we needed someone to help us out with the artwork. We decided it would be efficient to work with someone who had experience creating podcast artwork and could make all the different versions of the artwork we would need (iTunes, Facebook banner, etc.). We tried 99designs , but weren’t thrilled with the results. Eventually, we found Jenny H Designs and liked her style, so we had her create the artwork for us. The process was simple, and we were very happy with the results:
Now that we had the name and the artwork done, it was time to dive into the technical side. Before we could edit, though, we needed to actually record something.
Recording
Ultimately it doesn't matter how great your podcast looks; what matters is that the content you deliver is good and the audio you deliver to your listeners' ears is top-notch. Content is king, but it's also important that your podcast sound good. There's a phenomenon called “listening fatigue” where people actually get tired and have their willpower drained when listening to bad audio, and as productivity experts who talk a lot about willpower we obviously want to make sure that doesn't happen. It took some experimentation, but here's what we learned in regards to recording.
Use a scheduler for booking guests
Most podcasts are not monologues and include either a co-host or a guest, which means before you can even record you have to coordinate schedules. This can potentially be a huge time suck if you're not careful. One of the major reasons for that is the back and forth emails that are typically required in order to nail down a time to record. This is not only a waste of your time, but also your potential guest's time as well. We recommend that you use a scheduler like Calendly or ScheduleOnce which eliminates many of these ping-pong emails as it displays your availability and your guests can just pick a time slot and instantly book an appointment. This is more efficient and results in a much higher chance of your guest actually picking a time to record with you.
Get ready
Once your guest books a time, you'll want to make sure they have all the information they need prior to recording. You also want to make sure that you are prepared for the interview and have done proper research prior to recording. We have a checklist of items that we go through for each podcast episode:
- Create a folder in DropBox /Dropbox (AE)/content/podcast/ called ###_Guest Name
- Add headshot and create a text file of bio from ScheduleOnce to DropBox folder
- Put the folder in correct recording bin e.g. 038_Patrick Hart goes in Recordings 31-40
- Create an interview template in Google Drive in the TPS Interview Folder
- Add guest name, Twitter handle, release date, and episode summary (if known) to Master Episode List in Podcast Home (our internal wiki for podcast episodes)
- Create a Podcast issue for the episode in JIRA using our standard acceptance criteria
- Add the guest's contact name in Skype
- Research the guest prior to recording (e.g., read their book, listen to other podcasts they were on, watch videos they've created, etc.)
- Add interview questions to the document in Google Drive
All this prep work is important! There are a lot of factors that go into a successful interview that are somewhat outside of your control as a podcaster, so you want to do everything you can to be prepared and set yourself up for success. Especially if you have a big-name guest, chances are they won't be willing to just re-record when the episode doesn't turn out because you weren't quite ready.
Get good hardware
Once you have the interview set up, you want to make sure you do everything you can to make it sound good.
It's easy to record audio a number of different ways, but if you want to sound professional, you need to invest in some good equipment. The single most important hardware decision you have to make is what microphone to use. Here are a couple of different options we would recommend as a starting point:
- Blue Yeti – this is a very affordable USB condenser microphone. A condenser microphone picks up more background noise, but if you're able to find a quiet place to record, the Blue Yeti is a great option. Jason Snell (The Incomparable, Upgrade, Clockwise, etc.) uses a Blue Yeti.
- Rode Podcaster – this is a USB dynamic microphone, which means it does a better job of blocking out background noise than a condenser mic. That doesn't mean you can leave your air conditioner running in the background, but a dynamic mic will make your job easier when it comes time to edit.
When you're just starting out, a USB mic is perfect because you can just plug it in and it works. It's the simplest and easiest way to start recording good audio. If you want something that will sound a little bit better (but will require an additional recording interface), there are a couple options that are widely used:
- Heil PR-40 – this is the professional dynamic mic used by people like Pat Flynn and John Lee Dumas. It's pricey, but is a very nice microphone that provides a big boost in audio quality from the USB options listed above.
- Shure SM7B – this is another great dynamic mic that will provide great audio quality, but the sound pattern is slightly different. That means that if you use the Heil and don't like the way you sound, the Shure is probably for you based on your voice type.
If you use either the Heil or the Shure, you'll also need an audio interface to connect to your computer. We recommend the Focusrite Scarlett 2i2, an affordable option that provides excellent sound quality thanks to the superior preamps that are built into this amazing little red box.
Whatever microphone you decide to use, make sure you get a pop filter. This will make sure that your voice doesn't sound harsh when you say words that use sharp consonant sounds (called “plosives”). These are usually relatively inexpensive and sometimes even come with your microphone.
If you really want to geek out about audio equipment, Dan Benjamin put together an excellent gear guide over at podcastmethod.co.
Use good microphone technique
It doesn't matter how good your microphone is if you don't have good mic technique. It's important to talk into your microphone in a way that allows the hardware to capture the absolute best sound possible. While you can fix some things in post-production, you will make your life much easier if you record the highest quality audio possible on the front end.
Generally speaking, you want to talk into the top of the microphone and you want about two inches between your mouth and the pop filter in front of the microphone like so:
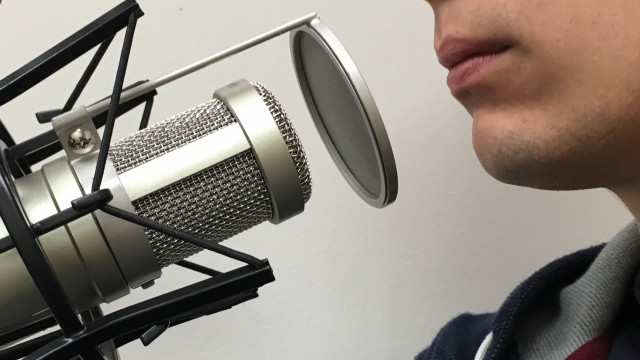
This will allow the microphone to pick up the broadest audio range and not sound too “boomey” (the result of being too close) or “distant” (when you are too far away). There's a great video on mic technique by Dan Benjamin over at podcastmethod.co.
Separate your audio
It's very important that you have a separate audio track for each person talking on your podcast. When the audio is combined, it is virtually impossible to edit out any mistakes. It's also impossible to balance the audio if one person is louder than the other. So unless you are going to just hit record and post the entire conversation completely untouched, you need to figure out a way to separate audio tracks.
Since most podcast conversations take place over Skype (it's free, many people already know how to use it, and it's pretty reliable compared to the other options that are currently available), the easiest thing to do is use an app called eCamm Call Recorder for Skype. This is a plugin that actually installs on top of Skype, and all you have to do is hit the big red “record” button when you connect. It records your audio into the left channel and the guest audio (or other co-host) into the right channel, which enables you to split the audio file in your audio editor of choice later into two separate audio files. We've used this in the past, and while it works well, there's another application widely used by podcasters called Audio Hijack by Rogue Amoeba that we use currently. Audio Hijack gives you many more options, but also has a bit more of a learning curve (and you have to play with it to make sure there's no “latency” or delay). Here's a screenshot of how we have it set up:
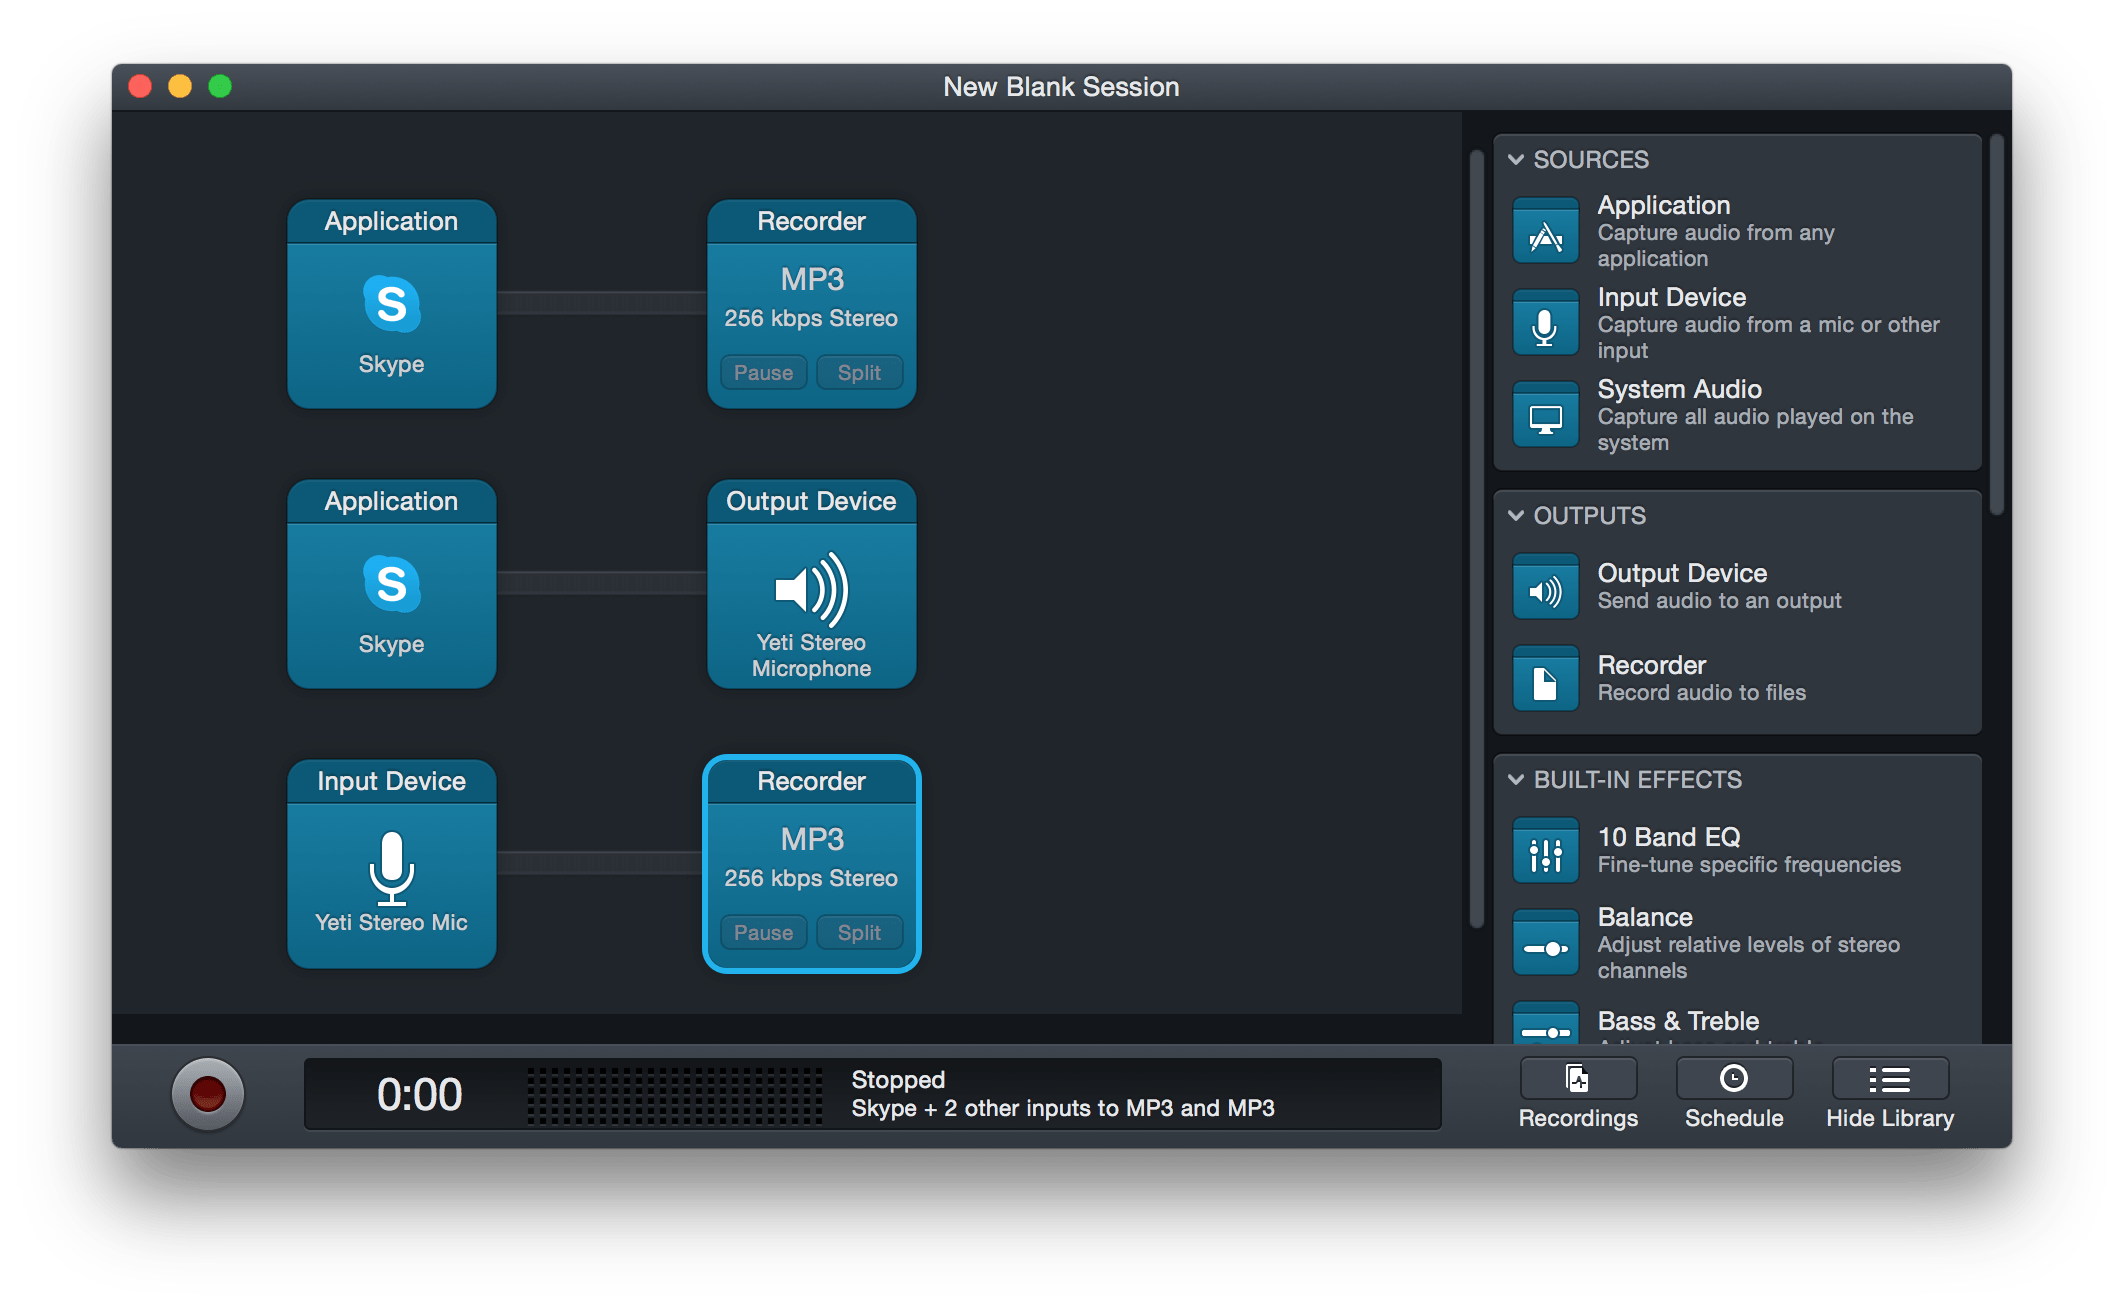
Here's what is going on in this picture:
- The audio from Skype is being recorded as a 256 kbps MP3 file. What you don't see here is that there is a setting for Skype which allows you to split the channels just like Call Recorder, so this first process results in an MP3 file with the host audio on the left and the guest audio on the right, which can then be split into separate audio files inside an audio editor.
- The Yeti has a microphone jack, so by sending Skype audio back to the Yeti the host is not only able to hear the guest speak but it also pipes back the host's audio as well (being able to hear yourself in your headphones can be very helpful).
- The audio coming straight from the Yeti is also saved as a 256 kbps MP3 file, which results in a perfectly clean local file. Ideally, we will get a similar local file from the guest to use during editing, but the Skype process at the top provides us a usable backup – just in case.
By the time it's all said and done, we have the following audio files:
- The intro (this never changes)
- The host local
- The guest local (if possible)
- The host Skype (backup)
- The outro (recorded after the interview)
If all this sounds too technical and something you don't want to mess with, we totally understand. Not all of us are tech savvy. Fortunately, there's a better and more efficient way to deal with this (which we'll show you to in a second).
Keep your files organized
You may not put much thought into where you store your recorded audio files, but you'll want to make sure that you have a system for this so you can find everything easily when you need it. Here's what our Dropbox folder structure looks like for podcast episodes:
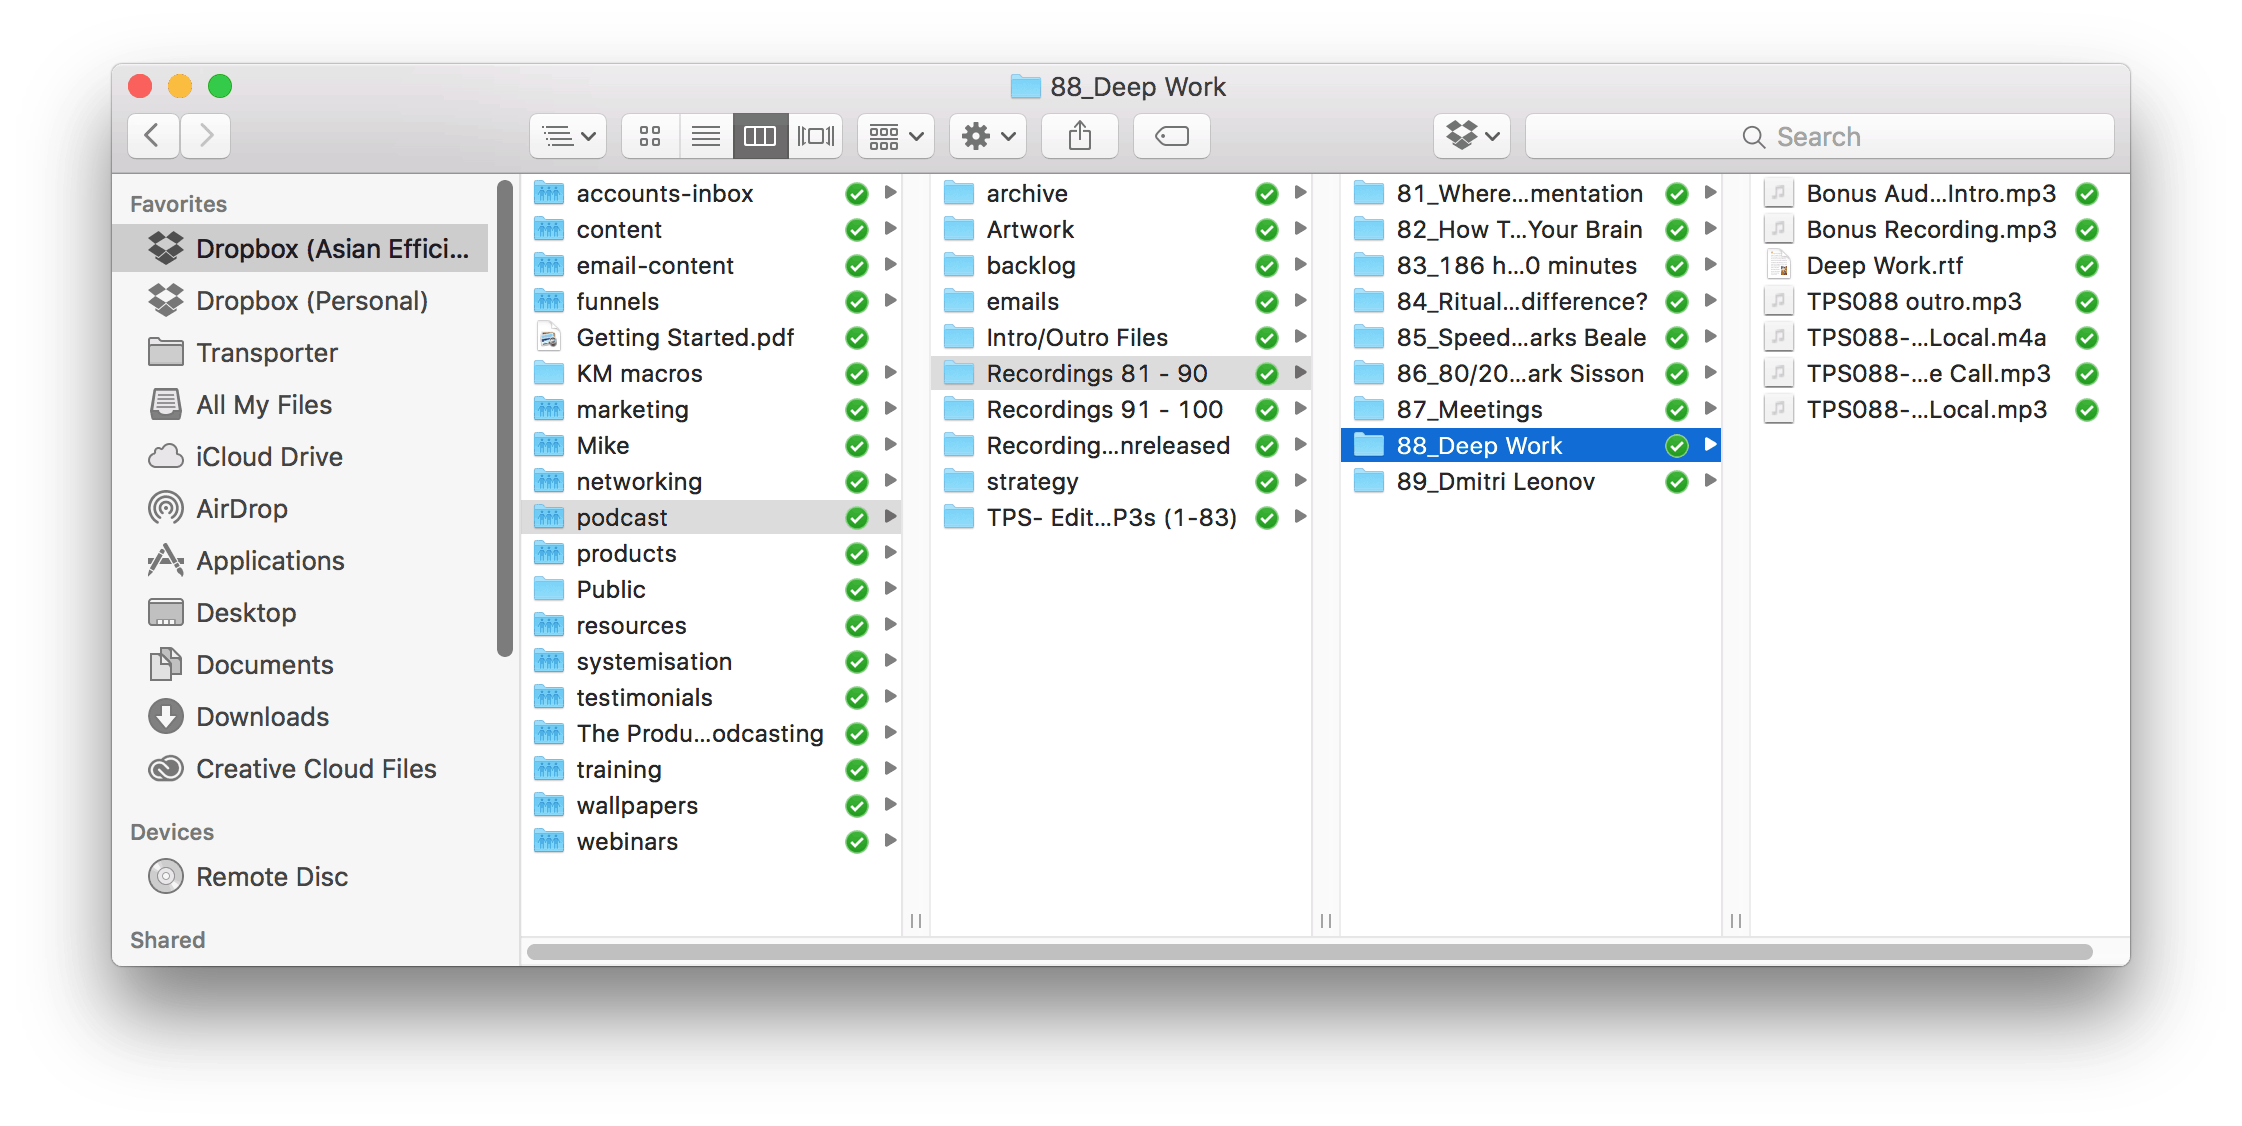
We keep a root level folder for everything podcast related (podcast), then keep actual episodes in groups of ten (i.e. Recordings 81-90). This is so that we can keep one folder synced to our computers using selective sync and not have to have all the podcast episodes eating up all our hard disk space and also reduces the amount of time we have to spend updating selective sync settings because we can essentially do ten at a time. Inside the recordings folder, there is a separate folder for each individual episodes which follows the naming convention of XX_Name where XX is the episode number (i.e. 88_Deep Work). Inside each folder are the individual files I mentioned earlier with the TPSXX descriptor at the beginning (i.e. TPS88-Zack Local.mp3).
Editing the audio files
Now that we have audio files, it's time to edit them. I had some experience editing audio in Logic, so I was the default option for figuring this part out since I had a basic idea of how this would work. Turns out I still had a lot to learn, though. I studied EQ, compressors, microphone technique, recording processes, and de-noising plugins until I was blue in the face. I learned as much as I could from people like Marco Arment, John Gruber, Dan Benjamin, John Lee Dumas, Pat Flynn, and anyone else I could find about making the audio sound good and exporting a high-quality audio file.
There are a number of factors I would focus on when trying to get your podcast to sound as good as possible. They are:
- Understanding basic EQ
- Understanding basic compression
- Understanding your tools
Here's a warning: the next couple of sections are really technical. If you love editing stuff yourself, these next couple of settings will change the game for you. However, we know most of our readers don't want to mess with editing audio (it's too difficult to learn and VERY time consuming). If that's you, skip the next couple of paragraphs and see the solution we recommend at the Automation section.
Understanding EQ
Equalization (or EQ) is important because it helps the voice sound smooth and polished, making it easy and pleasant to listen to. Some voices have distinct characteristics that make them sound harsh, shrill, or booming, and adjusting the EQ for these audio files can make a huge difference in the quality of the listening experience.
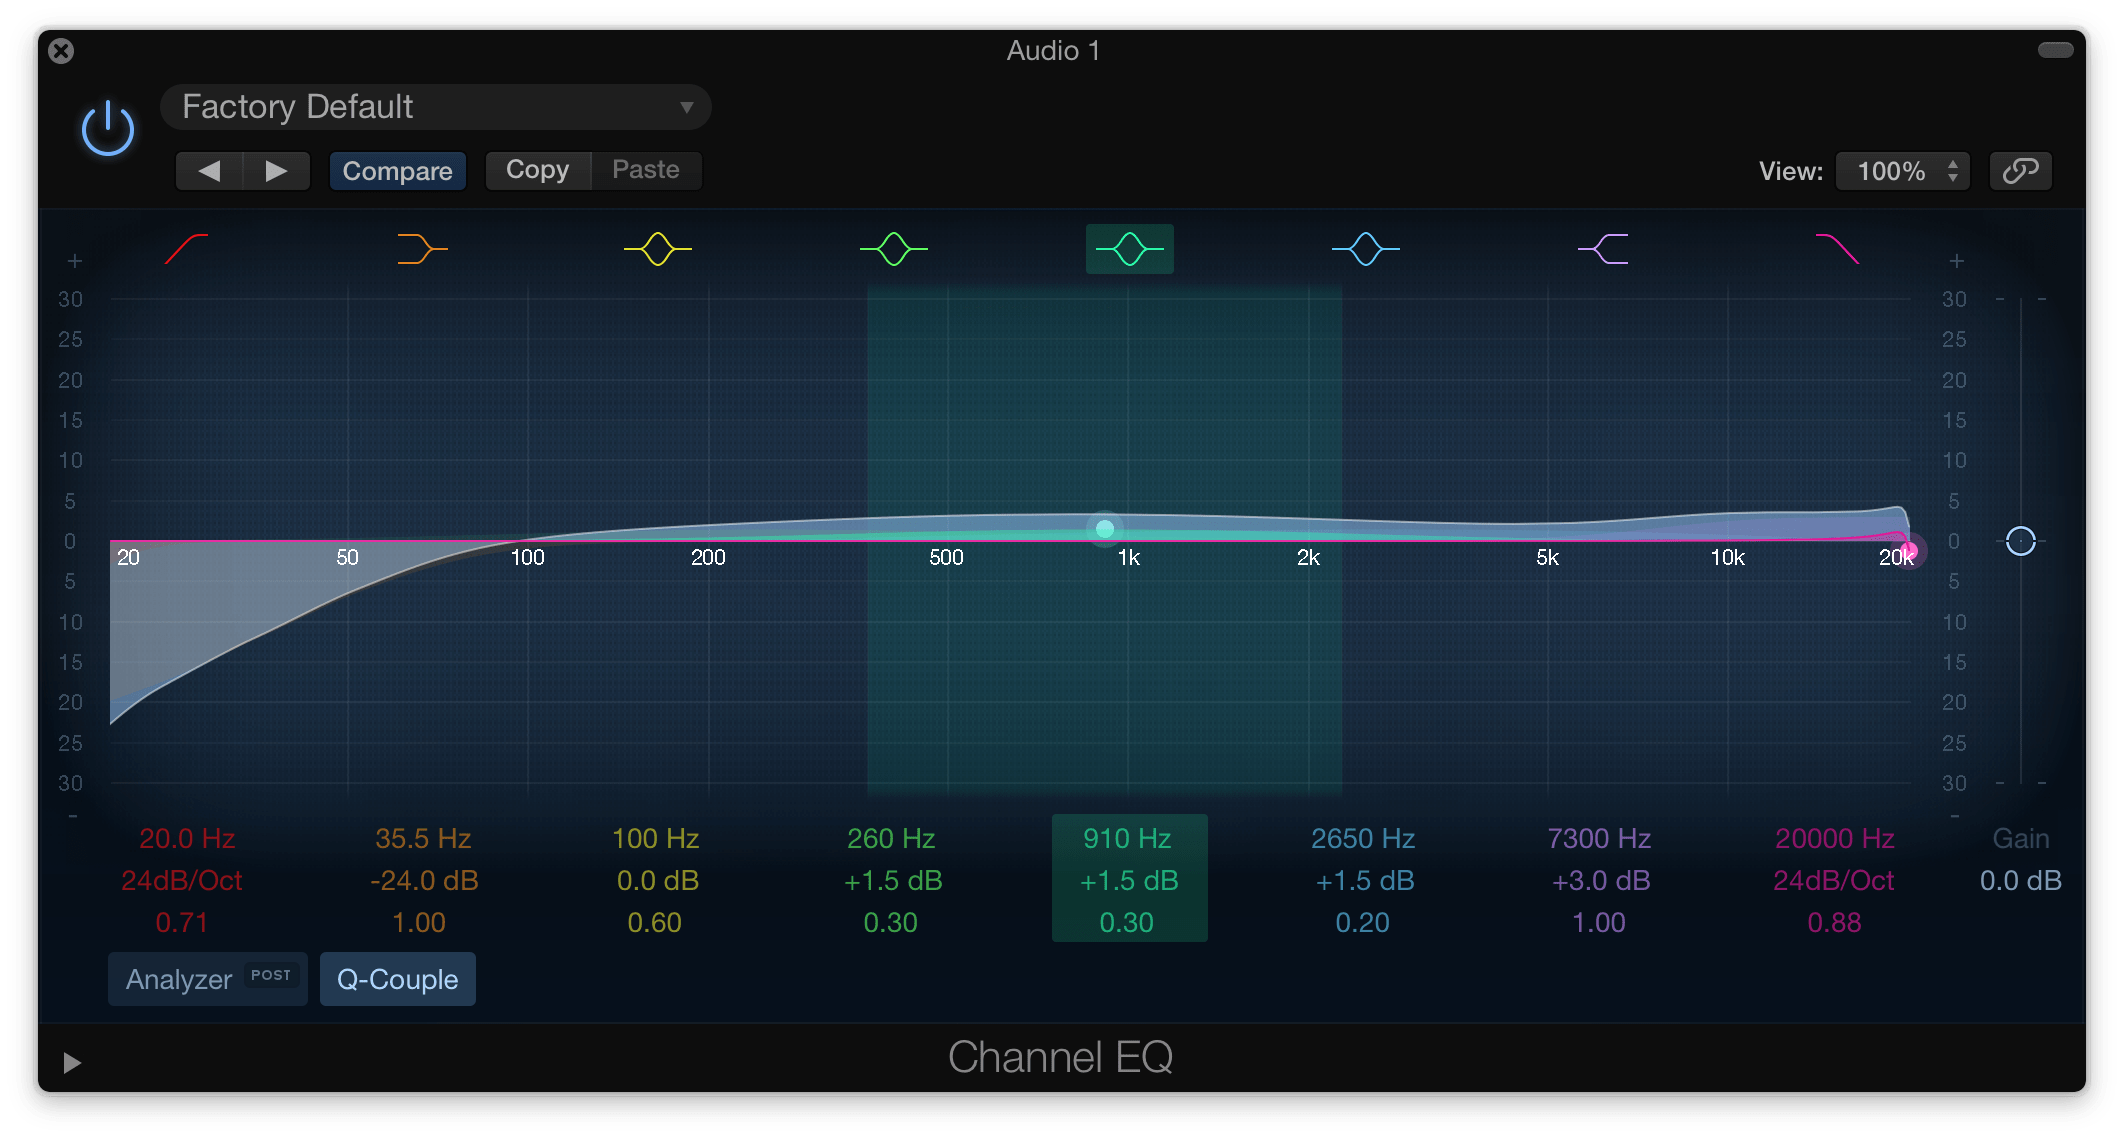
There are many different plugins you can use in a digital audio workstation (DAW) like Logic or Audio Audition, but I personally just used the built-in one in Logic. There are a bunch of presets you can choose from, but I wouldn't recommend you use these as they adjust the sound too much. A general rule of thumb is to make small adjustments, almost to the point where you can't really hear the difference. Make very minor edits in the areas you know need a little help, but the minute you can really hear it with your naked ear (not side-by-side), you probably went too far and should dial it back a little.
This of course requires that you understand what adjusting the different frequencies is actually doing. A great resource for this is this vocal EQ cheat sheet by Ultimate Vocal Formula, which helps you identify the typical problem areas. There's also a great podcast episode by Ray Ortega of The Podcast's Studio where he discusses EQ with professional audio engineer Rob Williams.
Understanding compression
Compression is one of the most important settings for podcasts as it takes the full range of the audio volume and smoothes is out to make it easier to listen to. Essentially what it does is make the soft parts louder and the loud parts softer so that everything is much more “even” sounding.
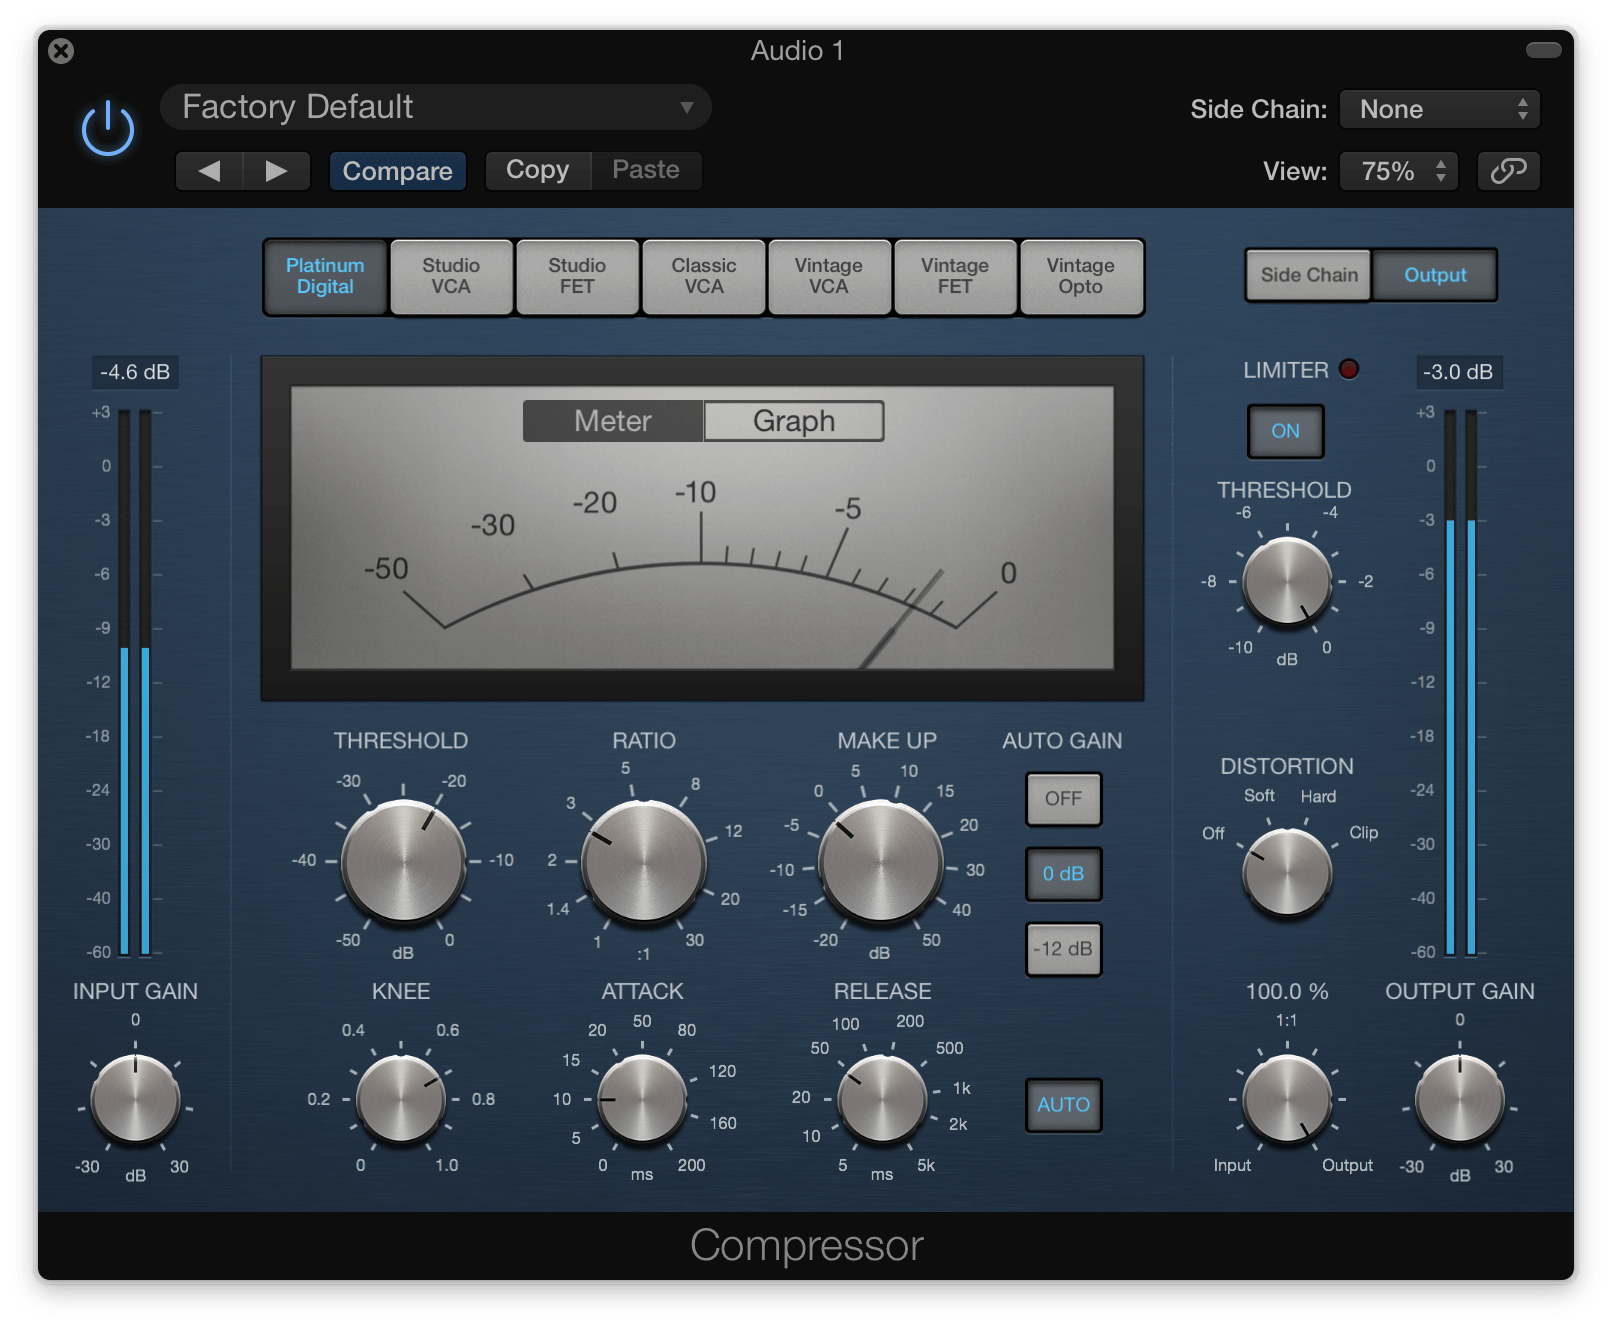
Compression can be tough because you want it to be invisible. You don't want it to sound compressed, but the reality is that if you don't use any compression you will have a hard time hearing certain parts of the podcast and others will seem very loud. Since a lot of people listen to podcasts while at the gym or on their commute, adjusting the volume as you go is not alway possible. You want to make sure that you nail this as much as you can.
If you need some help understanding compression, there's a great episode of The Podcaster's Studio with Randy Copping that addresses the topic.
I personally wouldn't recommend that you do all the research I did. Fizzle has some great resources on launching a podcast that will point you in the right direction, even if you’ve never recorded or edited audio before. One thing you want to look out for, though, is clipping. This happens whenever the gain (how loud the input is through the microphone) is set too high. Here's what it looks like when a recording is clipping and you're losing audio quality:
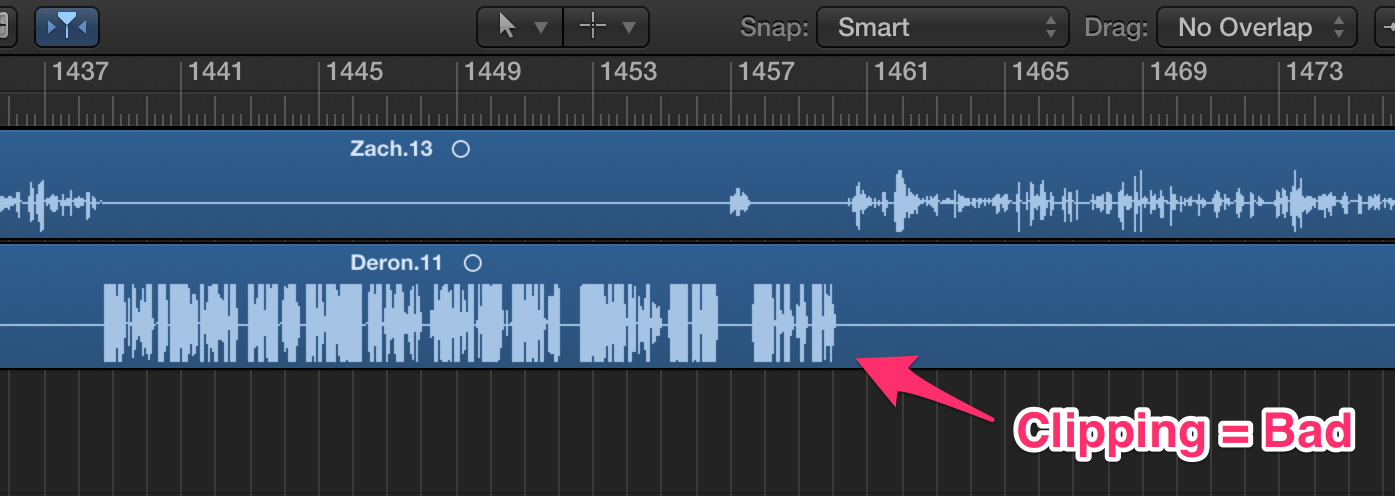
The reason this is important is that if you clip when you are recording, you lose part of the audio that you can never get back. Part of the audio (the top and bottom) is completely gone, never to be recovered. When this happens, there's nothing you can do in post-production. It's better to err on the side of being a little too soft because you can always increase the gain (how loud it is) in post-production.
Understanding your tools
While audio editing is still a very manual process, if you understand how to use the tools you have at your disposal it can make your job take significantly less time. For example, one of the great features of Logic Pro X that I use for every single episode is the Strip Silence feature. This feature alone makes Logic Pro X a worthwhile investment, as it automatically detects what is audio when you or the guest is speaking and eliminates everything else. That means that if there is a slight hum in the background of your audio while your guest is speaking, you don't have to manually cut the track – Logic will do it for you. If you use Logic Pro X to edit podcasts, you can activate Strip Silence by pressing Control + X. Here's what it looks like:
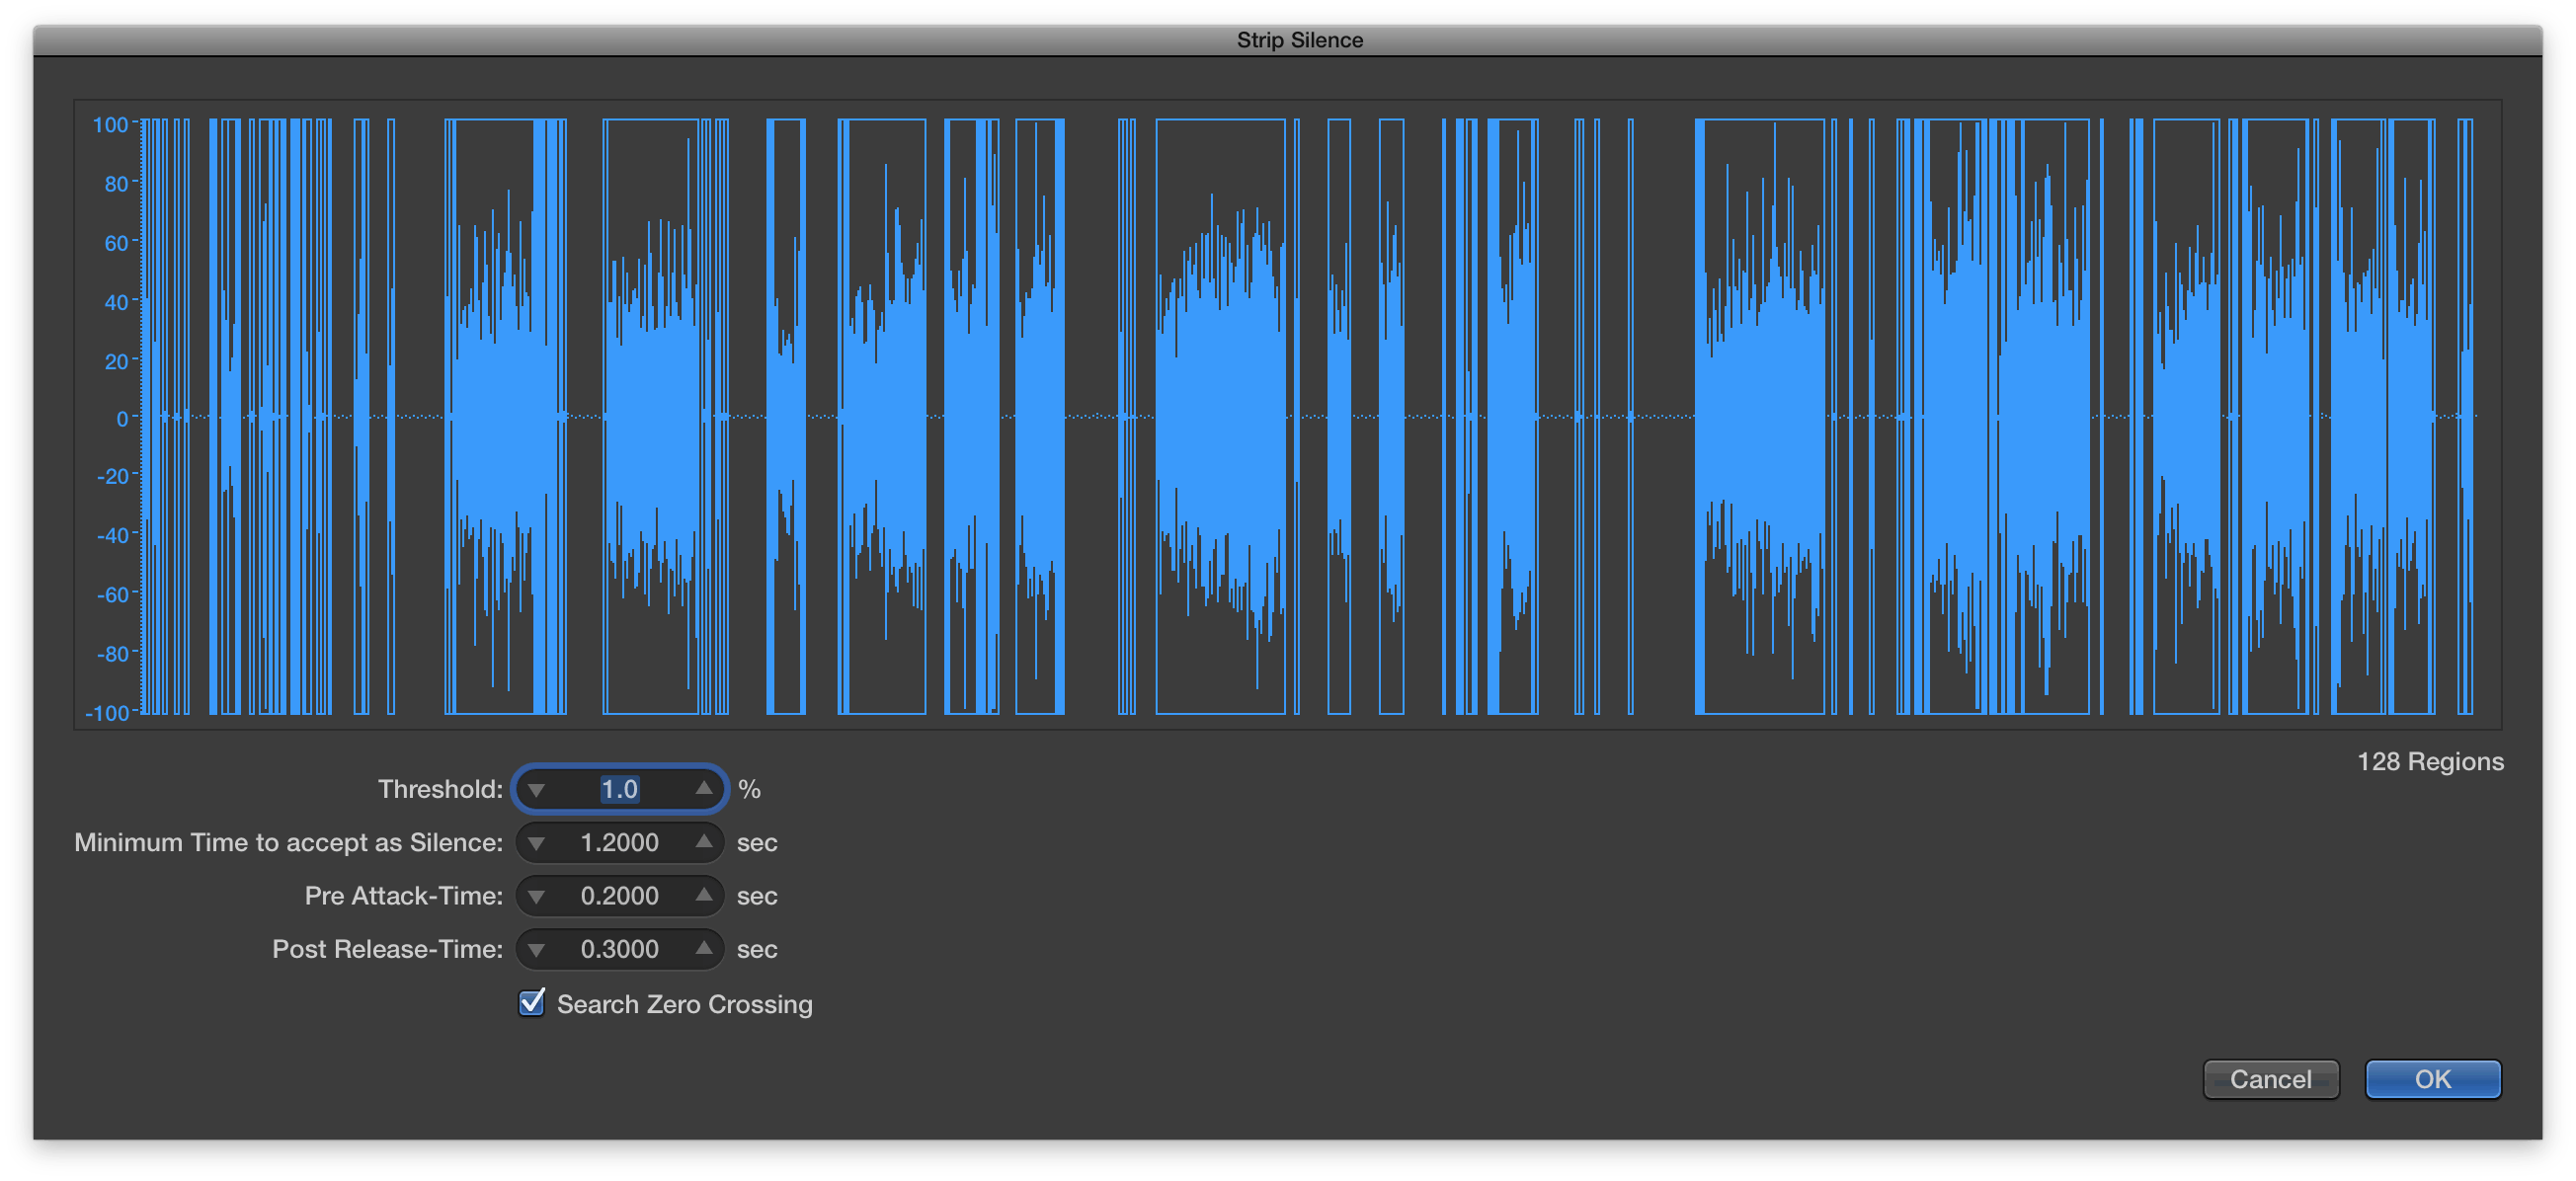
One word of caution when using Strip Silence: you have to be careful not to make it sound artificially cut off when someone is speaking. It may take a little bit of practice to dial in the settings just the way you like them. Here are the settings I personally use:
- Threshold: 1%
- Minimum Time to accept as Silence: 1.2 sec
- Pre Attack-Time: .2 sec
- Post Release-Time: .3 sec
Another phenomenal tool is Soundsoap, an audio plugin from a company called Soundness. Soundsoap is a little pricey ($149 USD), but if you edit a lot of audio it's a lifesaver. With Soundsoap, all you have to do is click the “Learn Noise” button and it will automatically identify the current sound as noise and remove it from the rest of the track. This is extremely useful if an audio track has background noise (like an air conditioner or traffic outside).
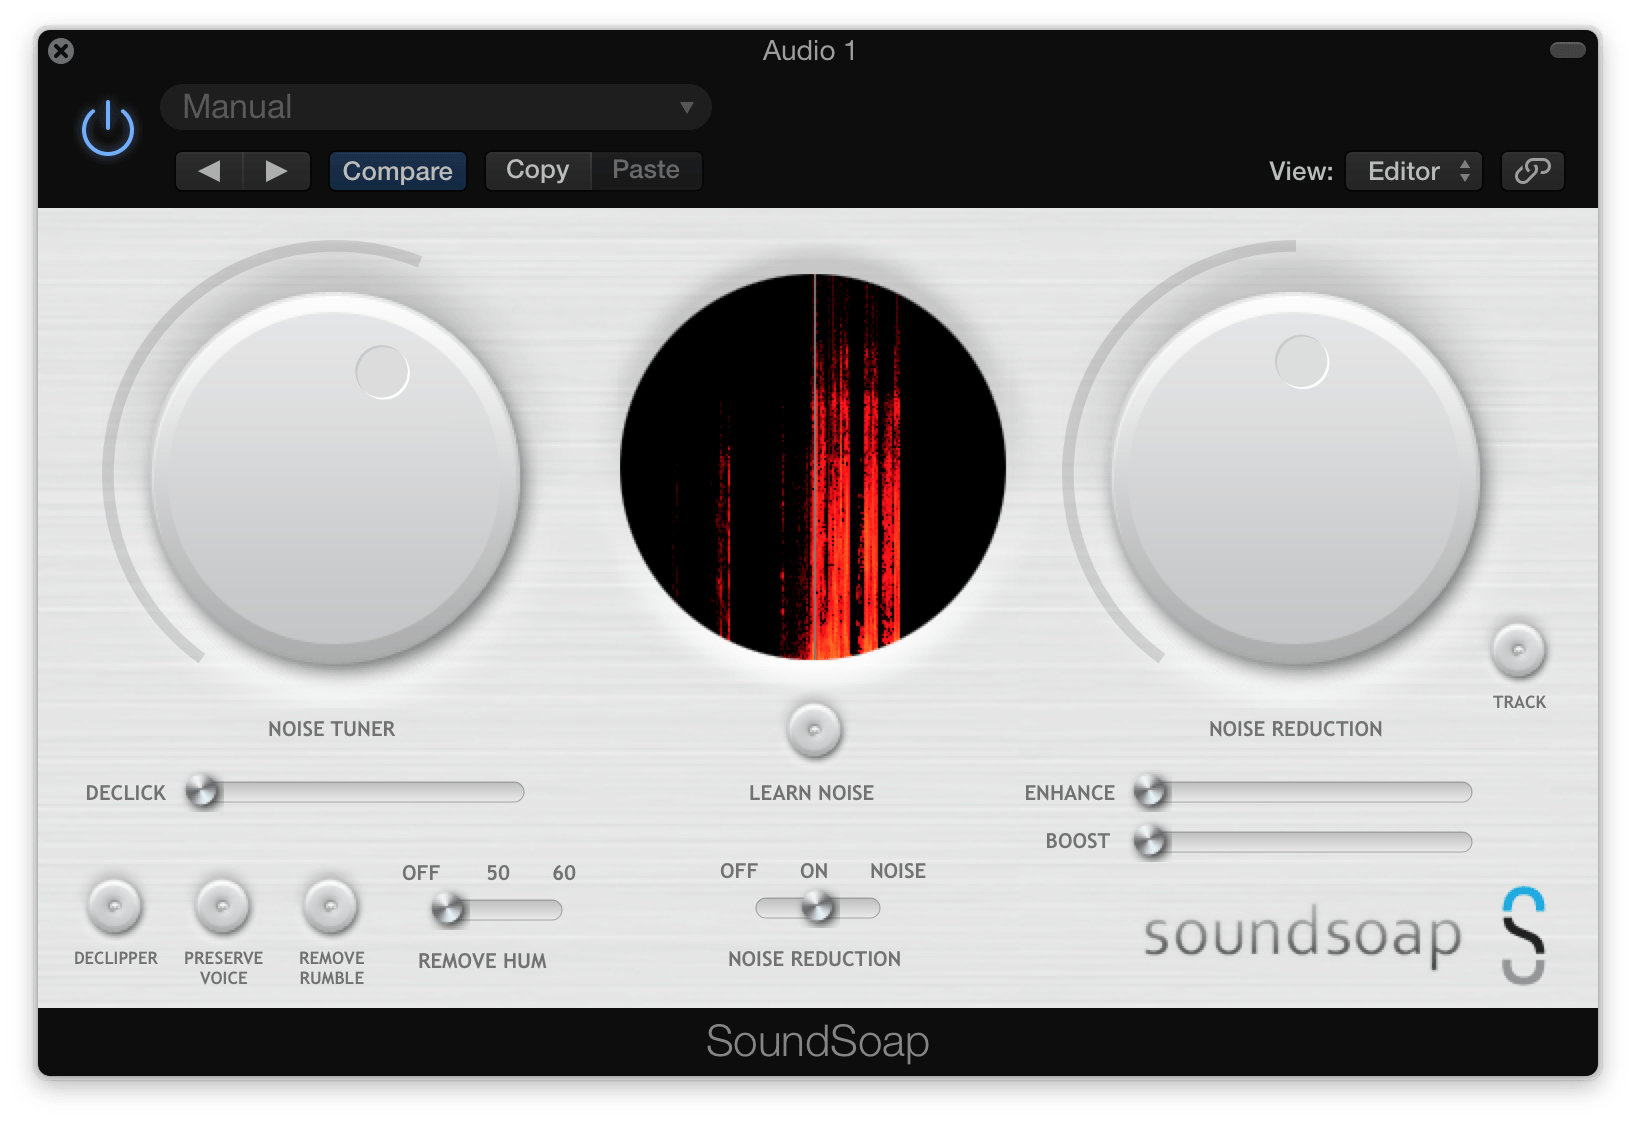
This plugin does in seconds what I used to spend hours doing: cleaning up bad audio. It's a painstakingly manual process to dial in the specific frequencies of background noises and remove those frequencies from the audio track, and honestly Soundsoap does a better job than I ever did. It's audio magic.
Exporting the finished audio
Once we're done editing the file, we have to export it as a compressed MP3 so that it can uploaded to the server. Because the file will be downloaded by podcast listeners who may not have a super-fast internet connection, we want to make the files as small as possible but we still want them to sound good. An MP3 file allows us to retain almost all of the audio quality while creating a much smaller file (and a much faster download) than a standard .WAV file.
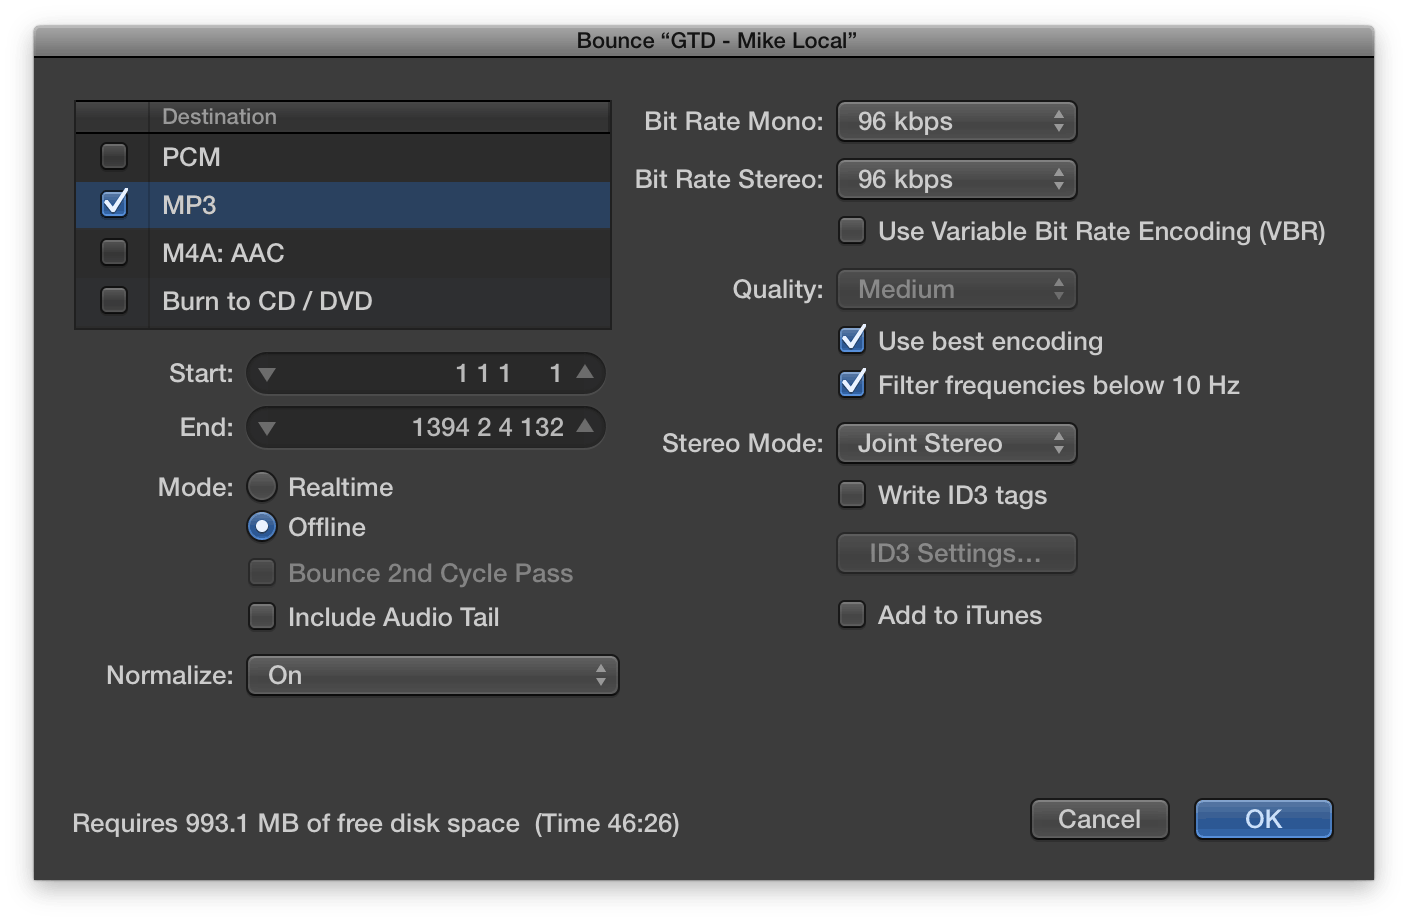
Here are the settings we personally use for The Productivity Show:
- Bit Rate: 96 kbps
- Variable Bit Rate (VBR) Encoding: Off
Tagging your exported files before uploading
Once the file is exported as an MP3, we need to write ID3 tags before we upload it to our podcast server to make sure that the correct meta data displays. This makes it much easier to find the podcast and makes sure that it displays correctly in podcast players.
The application we use to apply ID3 tags to our podcast episodes is called ID3 Editor by Pa-software. It's a very basic application, but it allows you to apply ID3 tags easily to your podcast files. Here's what it looks like:
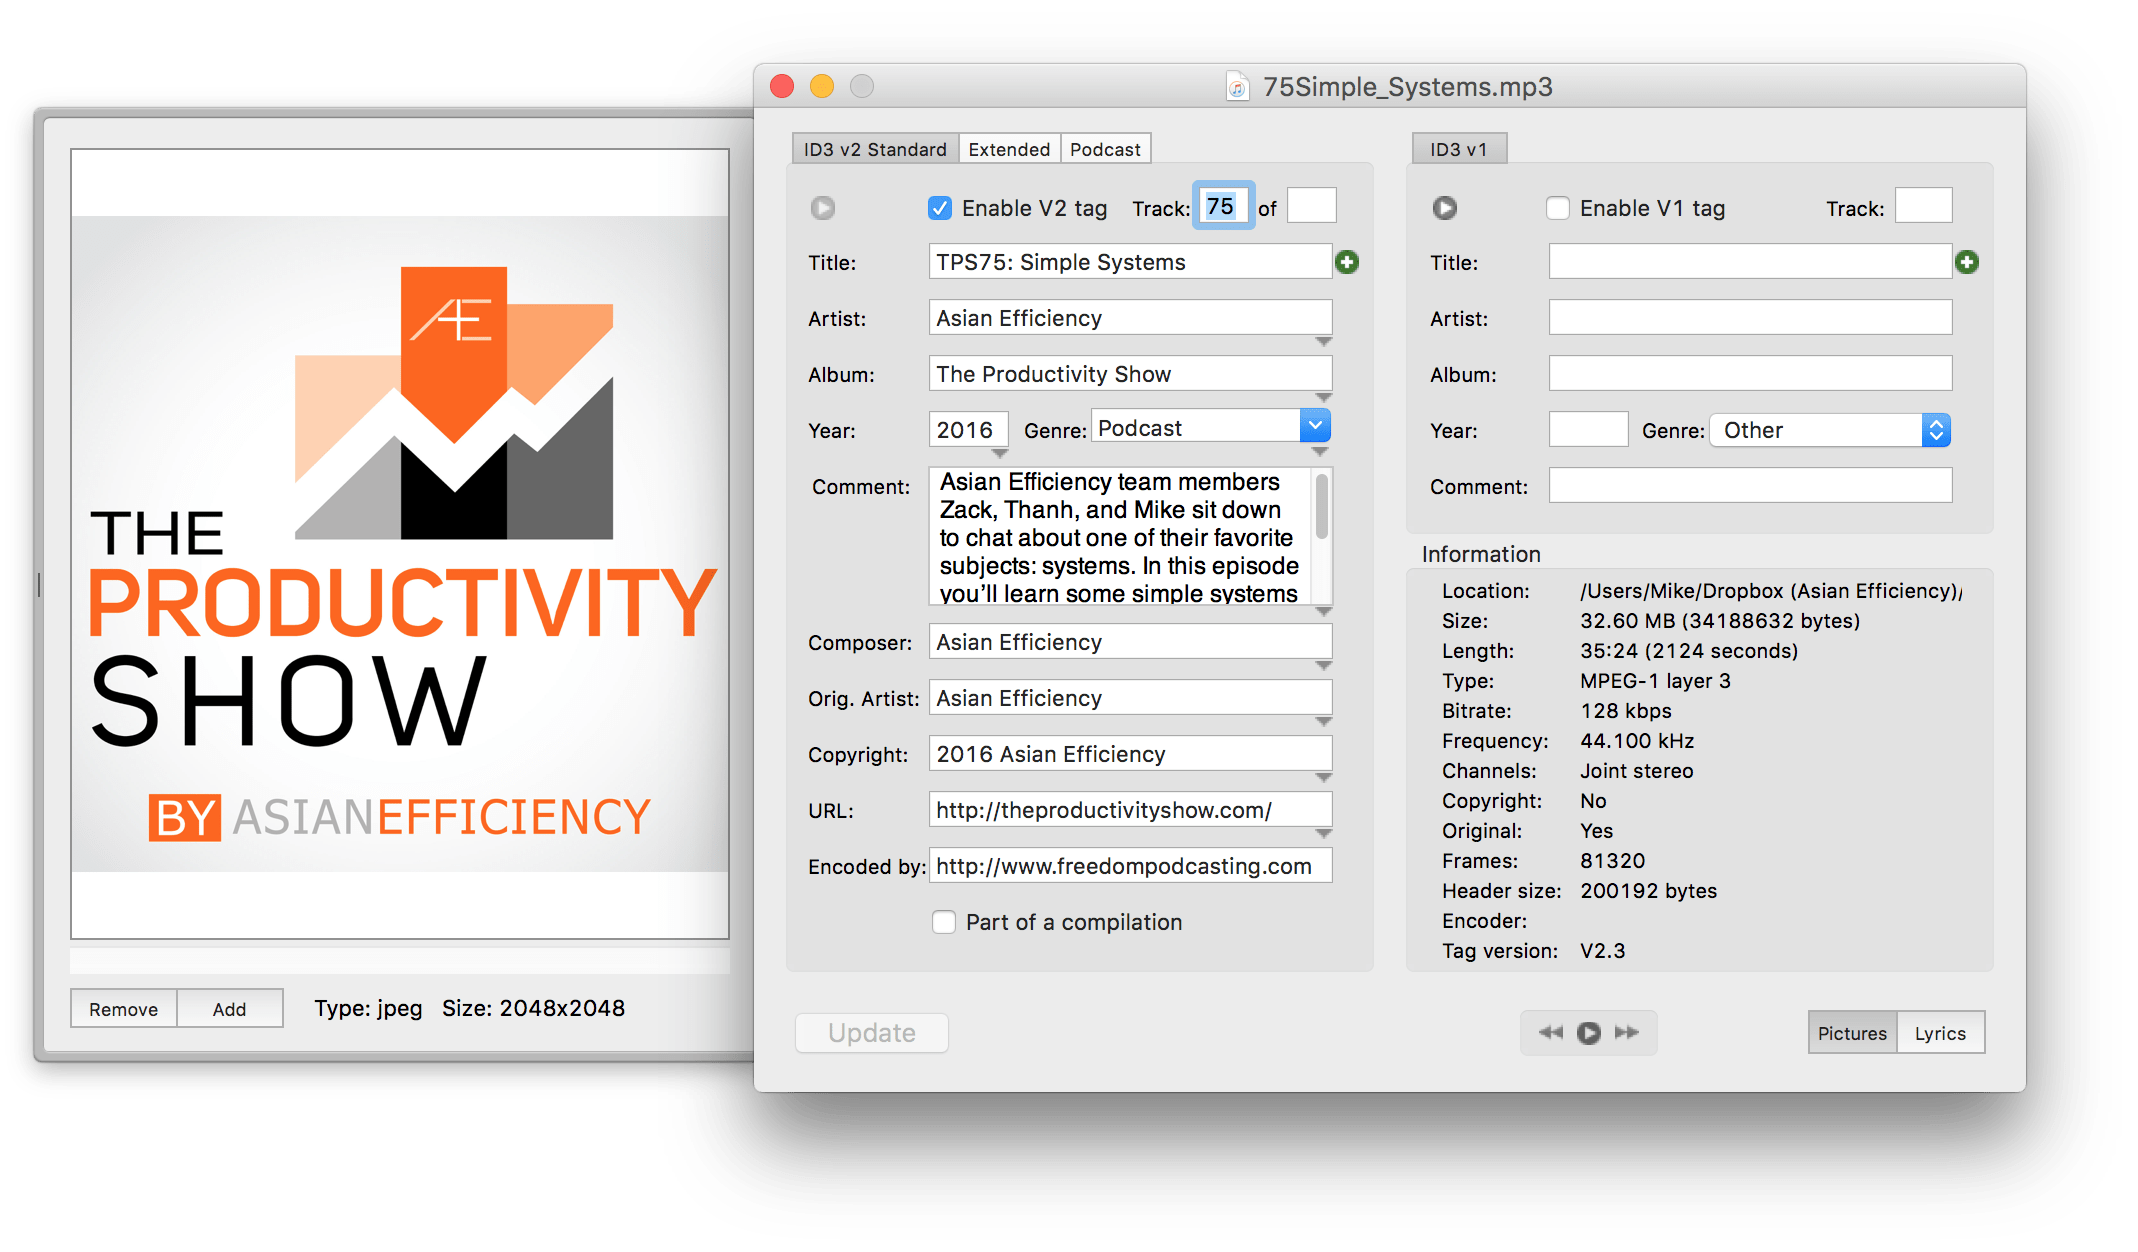
Once you're done editing your MP3 file in ID3 Editor, just click the Update button to save your changes, and your file is now ready to be uploaded to your server.
Uploading the files to your podcast server
This part was pretty easy, as there is a rock-solid hosting company called LibSyn that is used by many podcasters (assuming you’re willing to pay for it). LibSyn also offers some great analytics so you can see your download numbers by date or by episode:
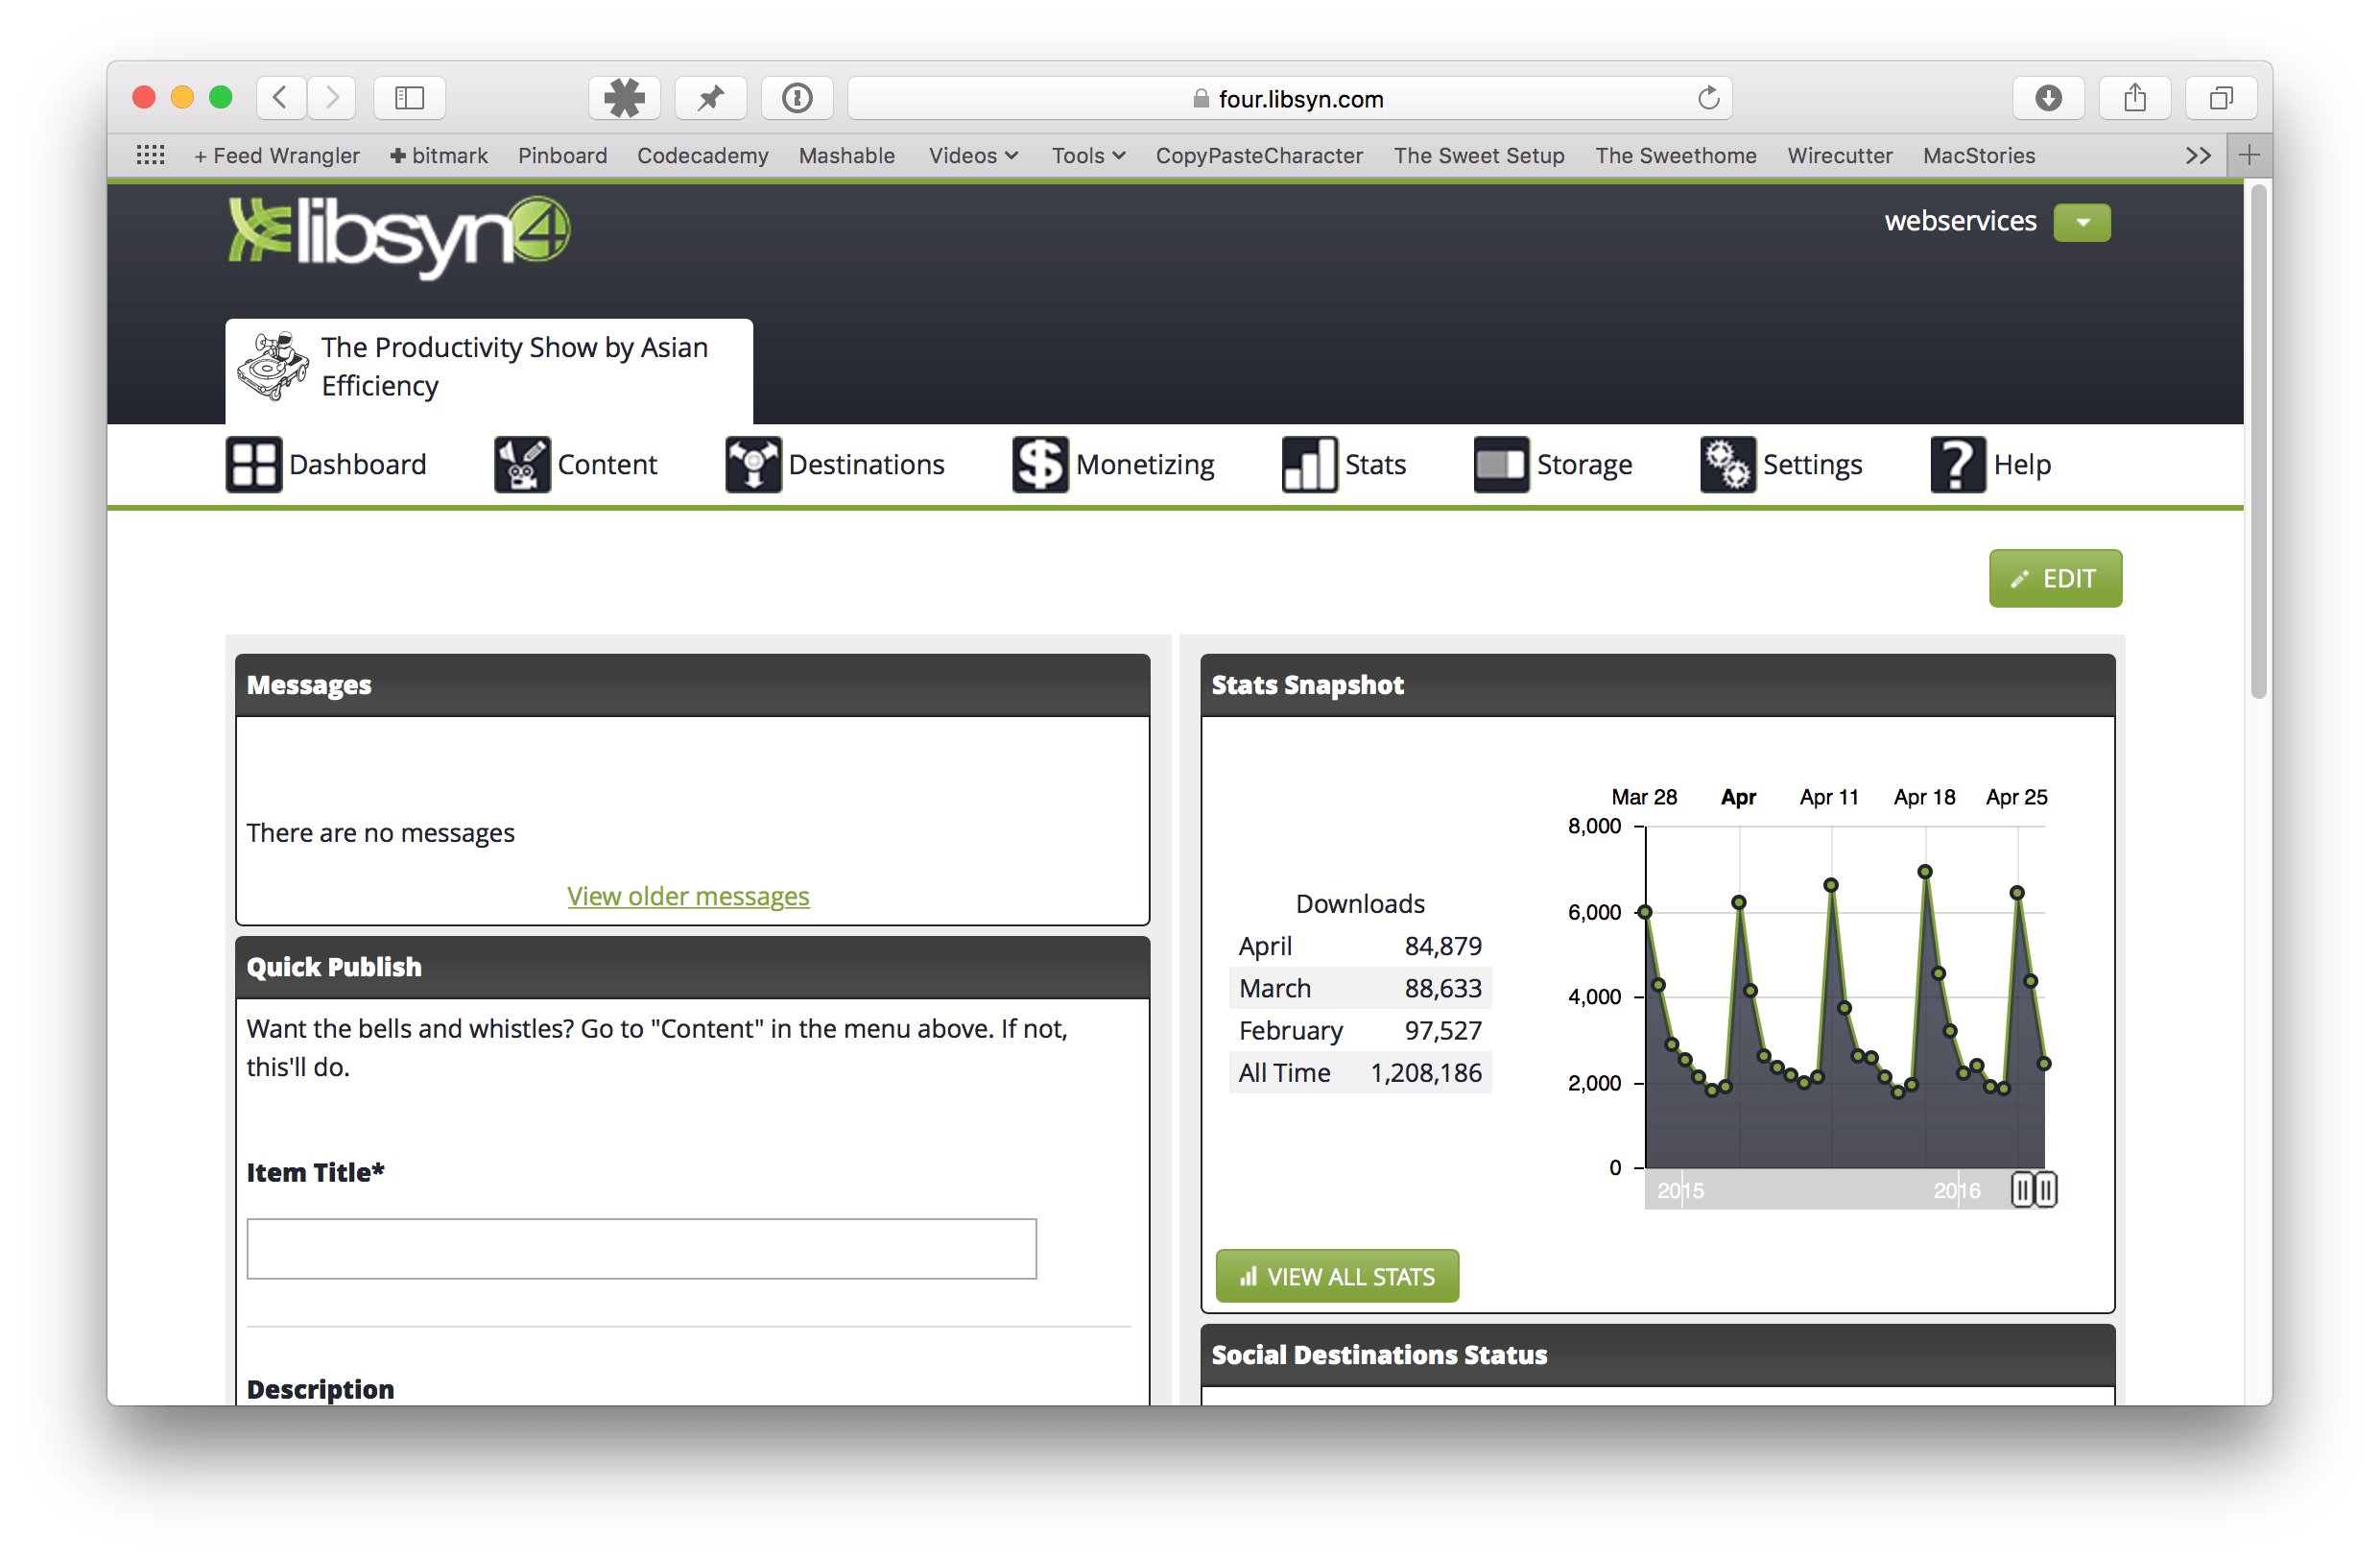
You can figure out other cheaper alternatives, but in our experience, it’s not worth it. You don’t want to take the chance of your podcast going down because you’re using shoddy servers somewhere. LibSyn is reliable, and that peace of mind more than justifies the cost.
Posting the episodes to our site
To post podcast episodes to our WordPress site, we use the Blubrry PowerPress plugin. This plugin enables the attachment of the LibSyn direct download URL to a post and helps create the feed for submitting to podcatchers and directories (like iTunes and Stitcher) automatically.
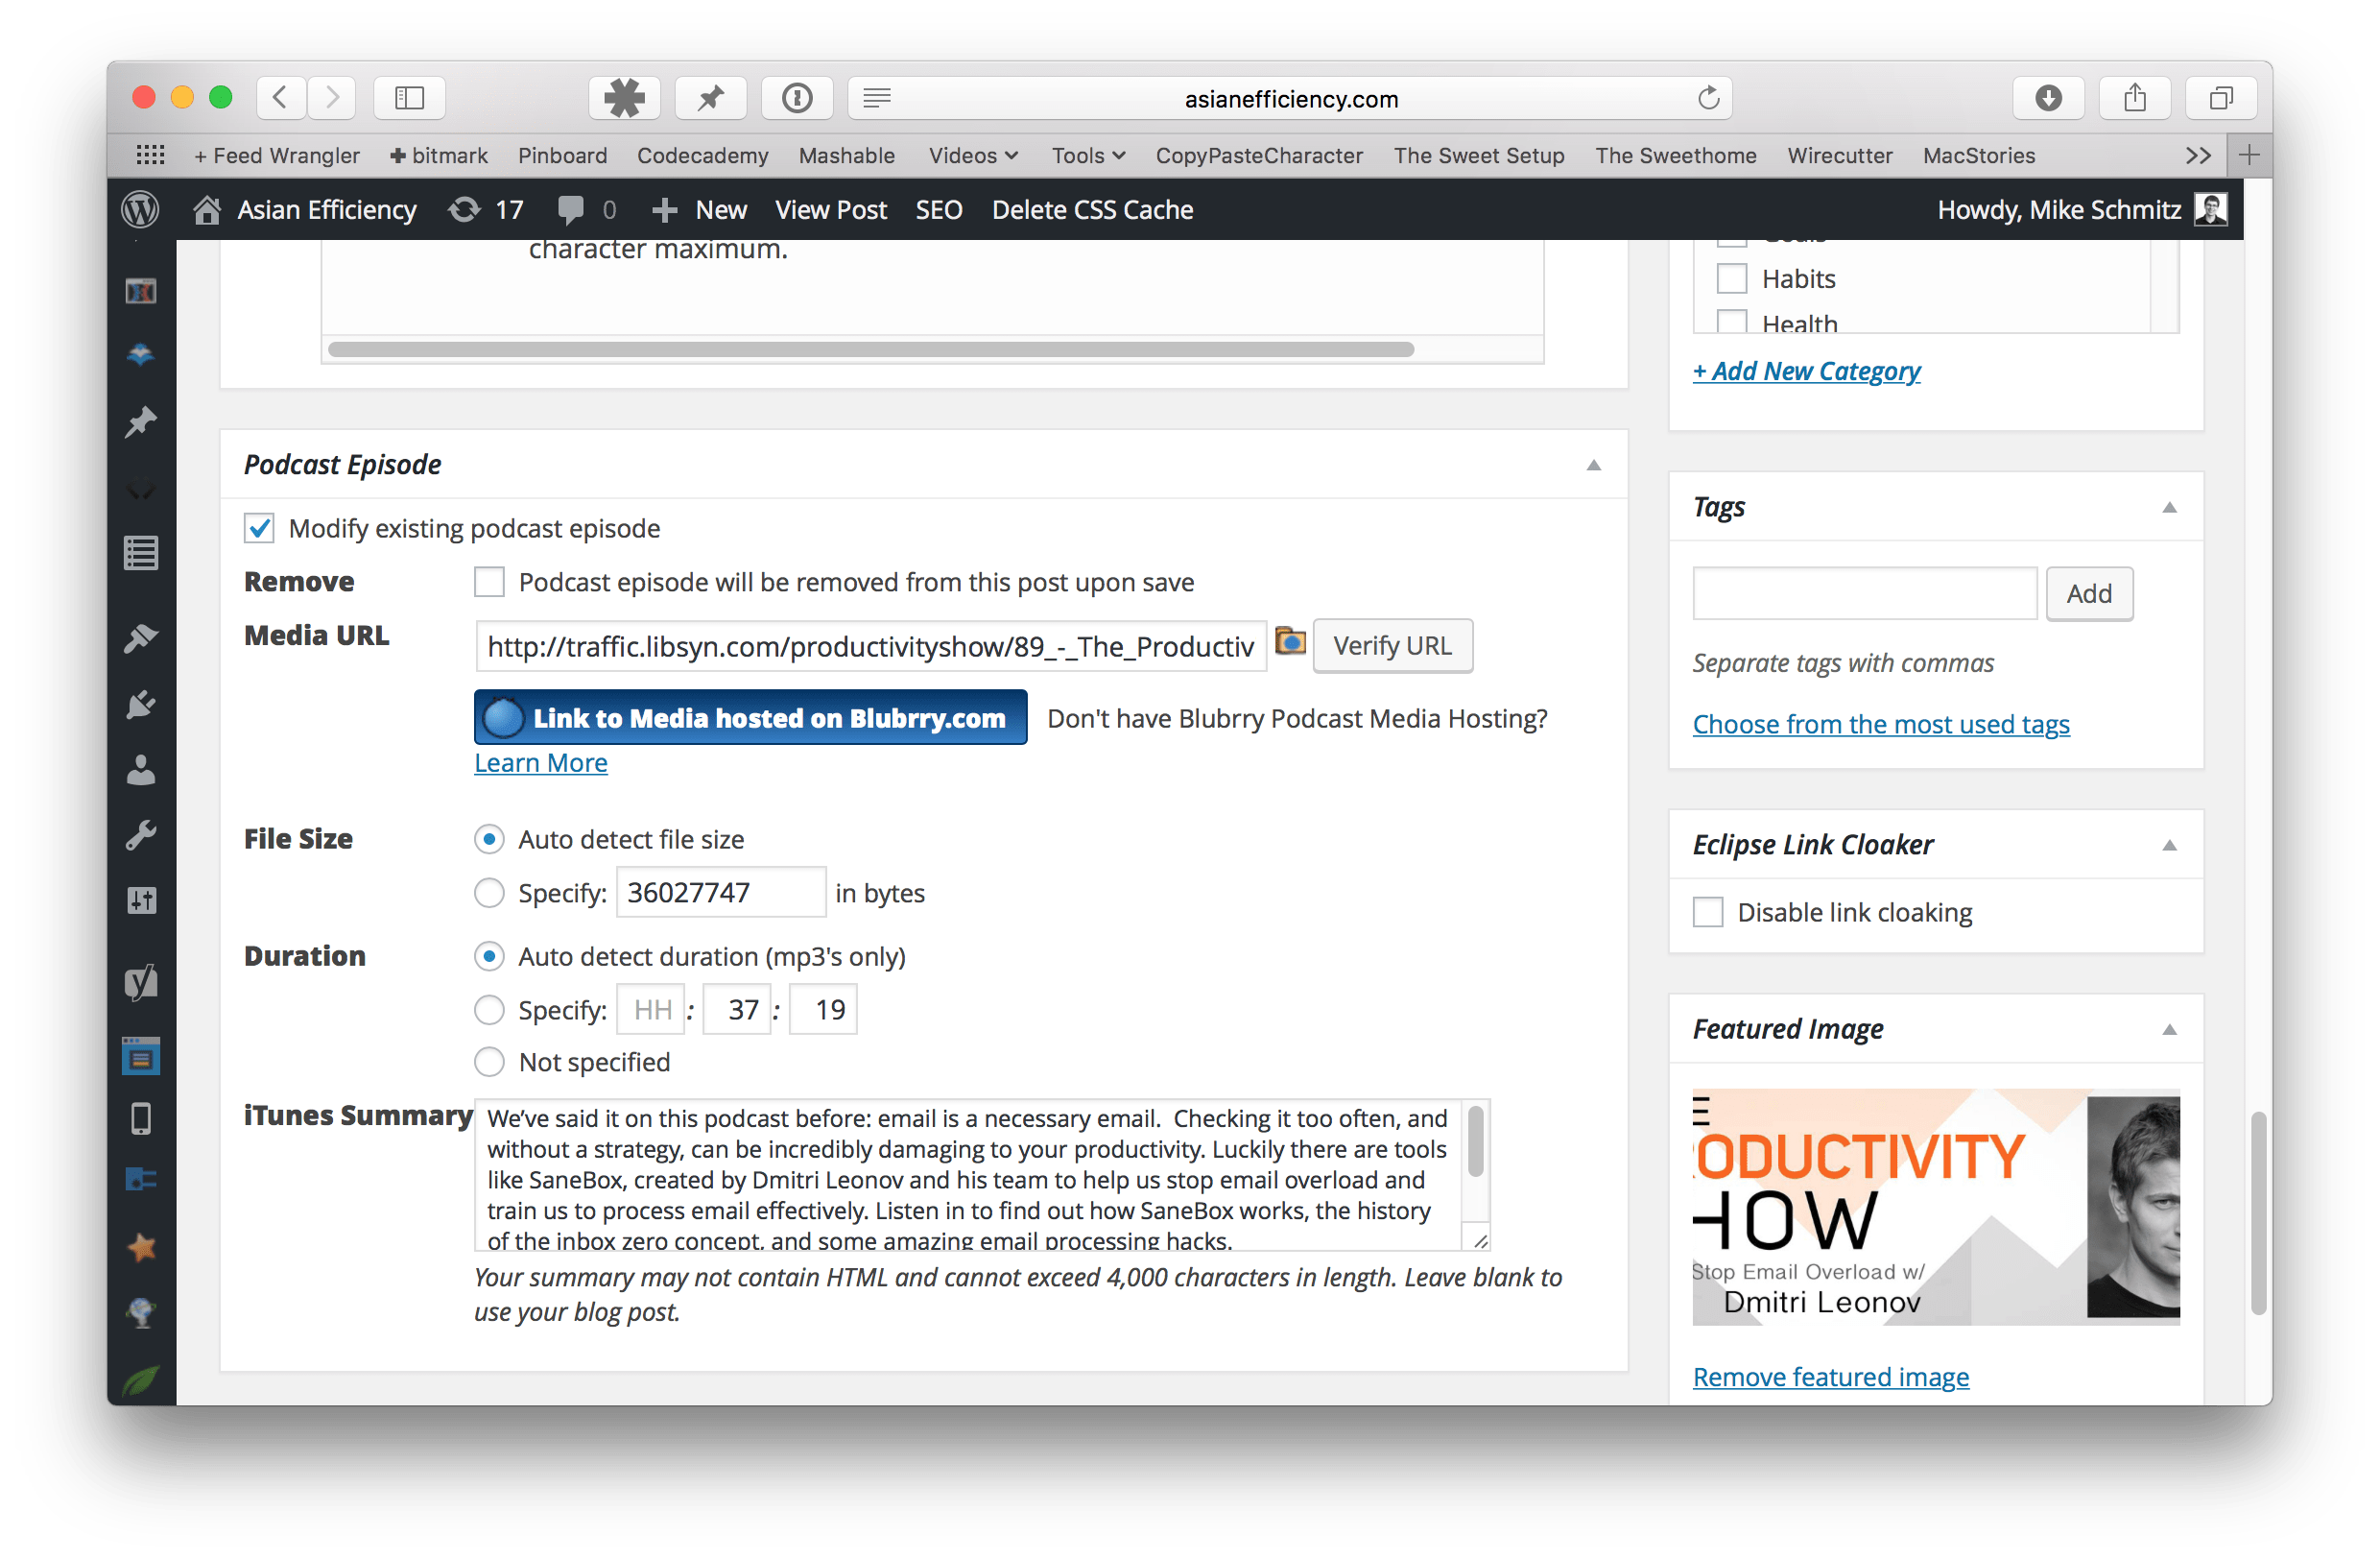
This makes publishing podcasts incredibly easy, as all you have to do is plug in the LibSyn URL for the audio file in the Media URL section and type in the iTunes summary. This is technically all you have to do, but we also create a very detailed WordPress post which has the following components:
- A custom banner image with the guest's profile picture and episode name
- A description of the actual podcast episode
- A podcast player so visitors can play the episode in their browser if they want
- A cheat sheet of what we cover in the episode
- Links to everything we discuss in the episode (books, apps, etc.)
- Contact info for the guest (if applicable)
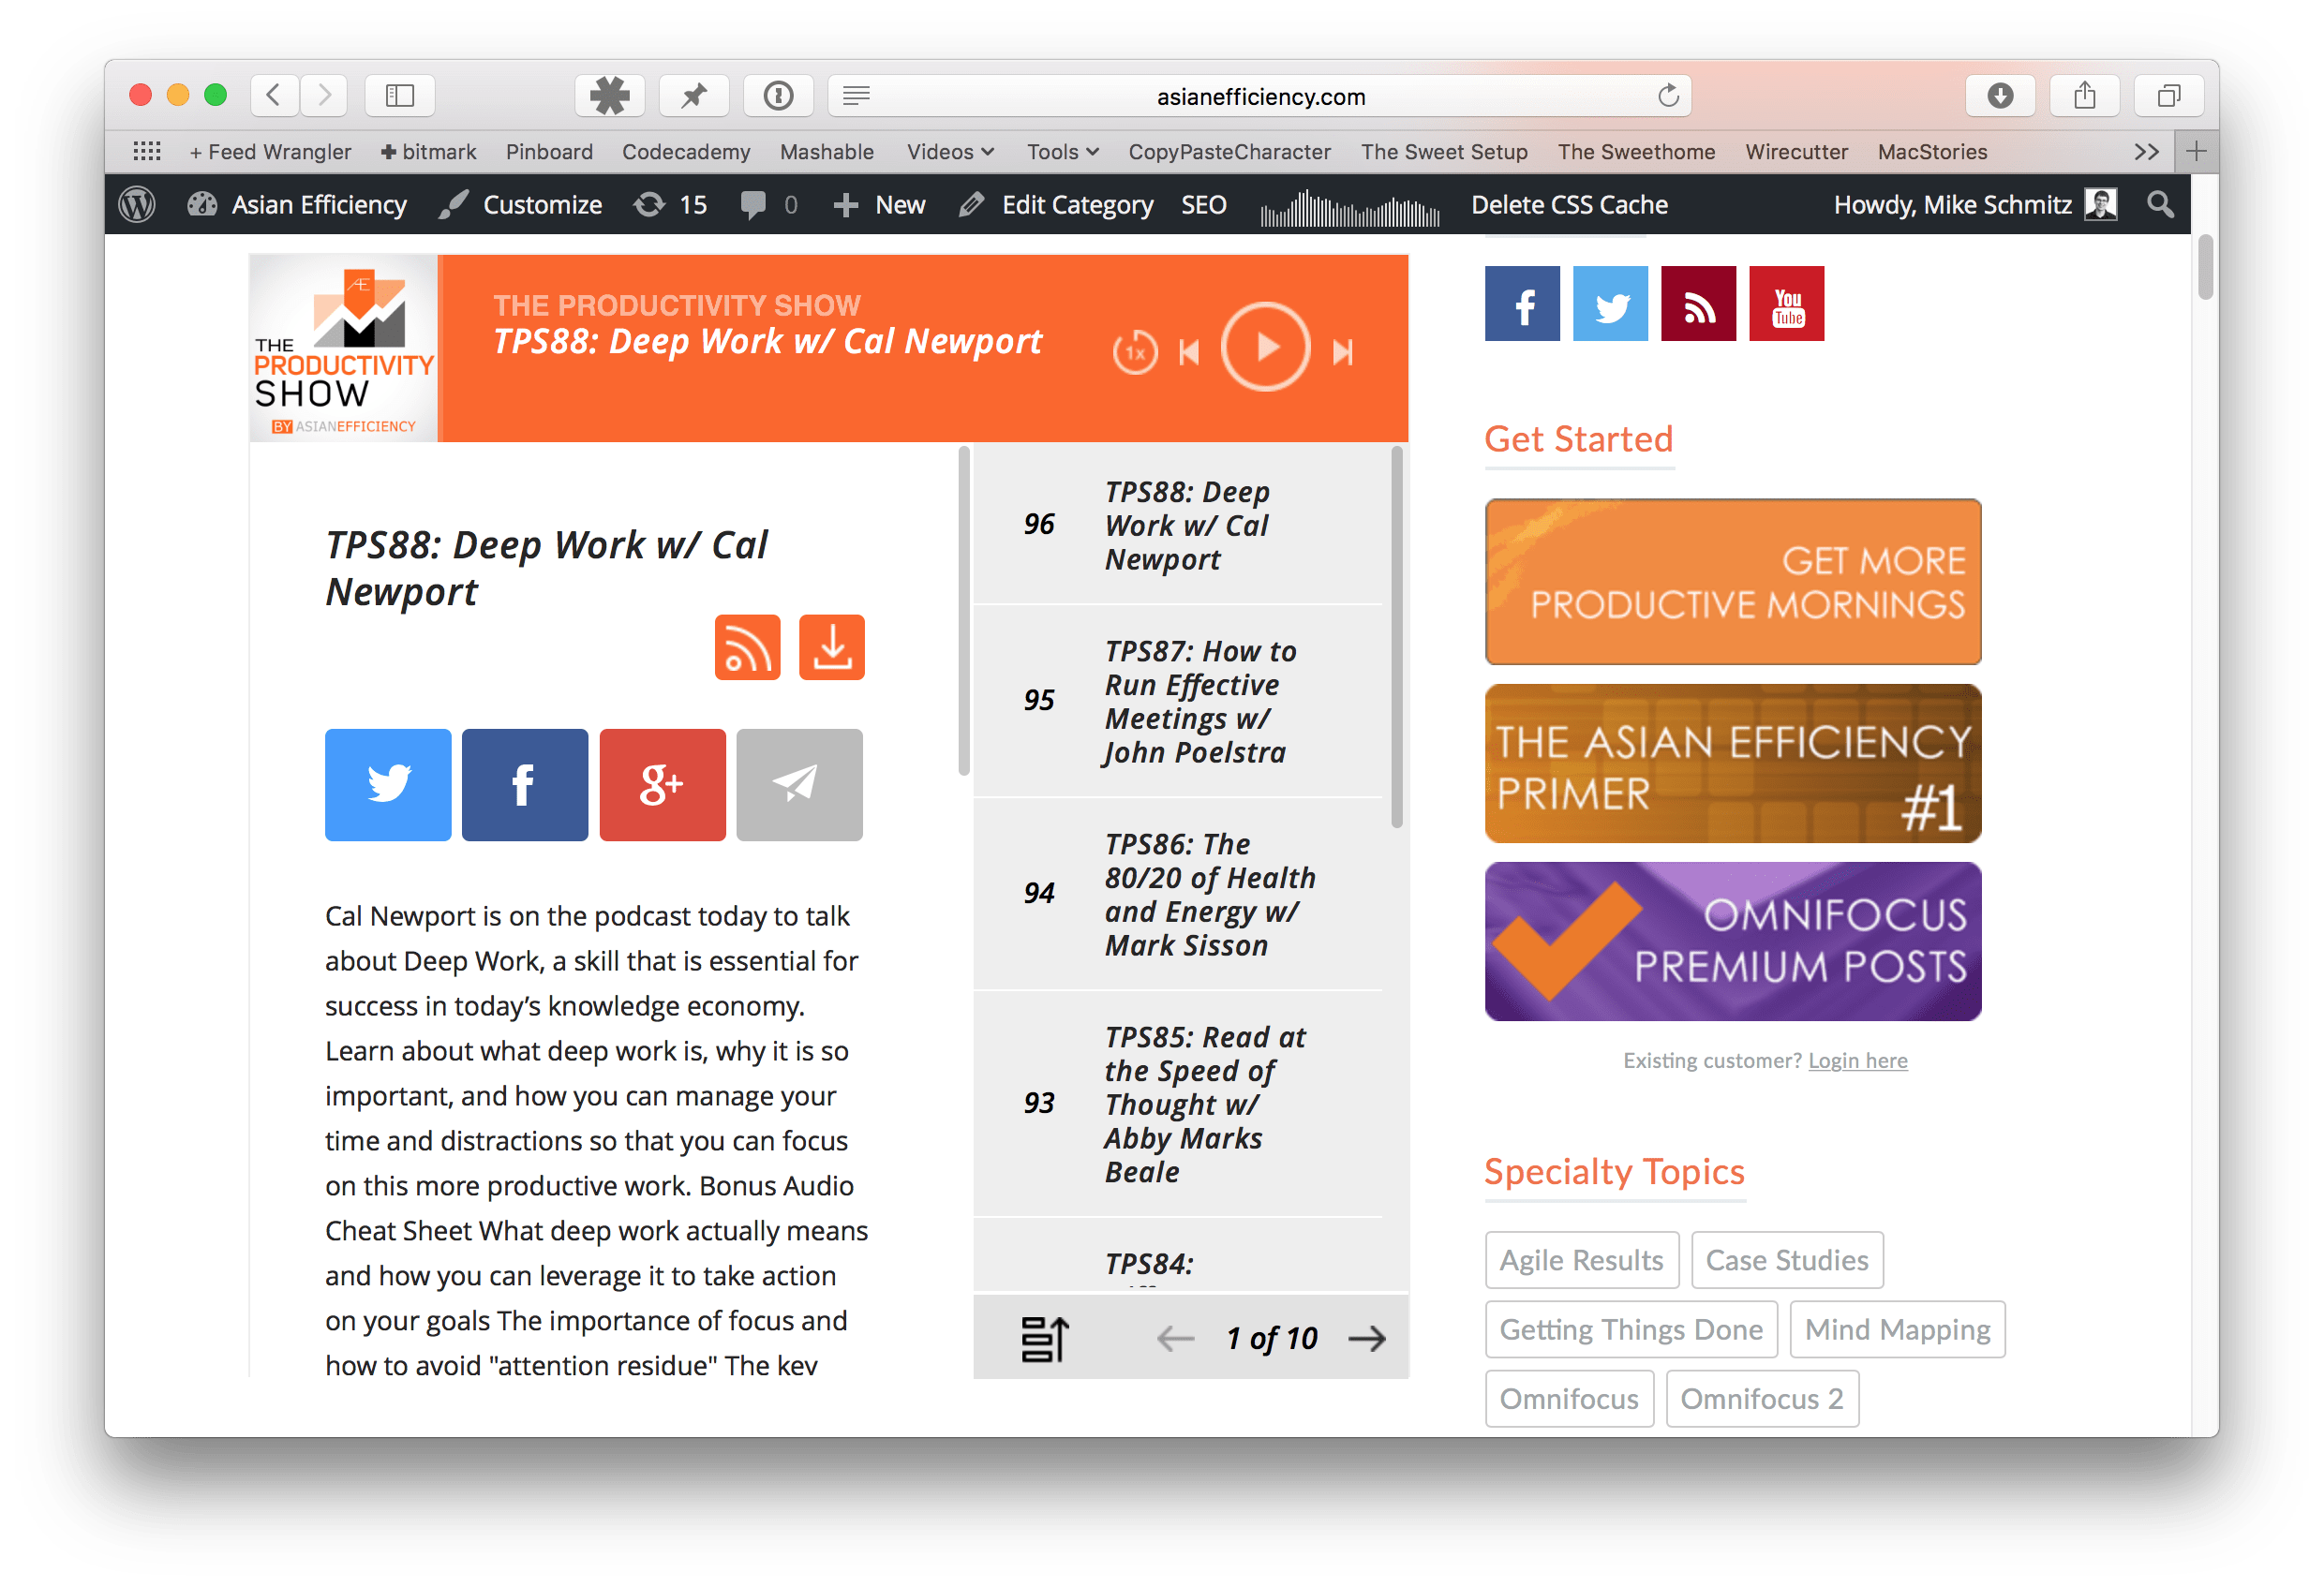
If you want to see what our show notes look like, check out this page for episode 88.
Fizzle has a great podcast tutorial that walks you through installing the plugin and getting the settings just right, which drastically accelerated the learning curve and made sure that we were good to go for our January 1st launch date. This is important because you only get one shot at being new in iTunes, and the human-curated approval process means you’ll never be quite sure when your podcast listing will go live, so you need to have all your ducks in a row.
Embedding the podcast player on the page
While the Blubrry PowerPress plugin handles the feed, we also use Pat Flynn’s Smart Podcast Player both for episode posts and on the main podcast homepage. This plugin is significantly better than the built-in LibSyn player (although it got upgraded not too long ago), and it provides a nice user interface for podcast listeners who prefer to listen in the browser. Here's what it looks like on the post page:
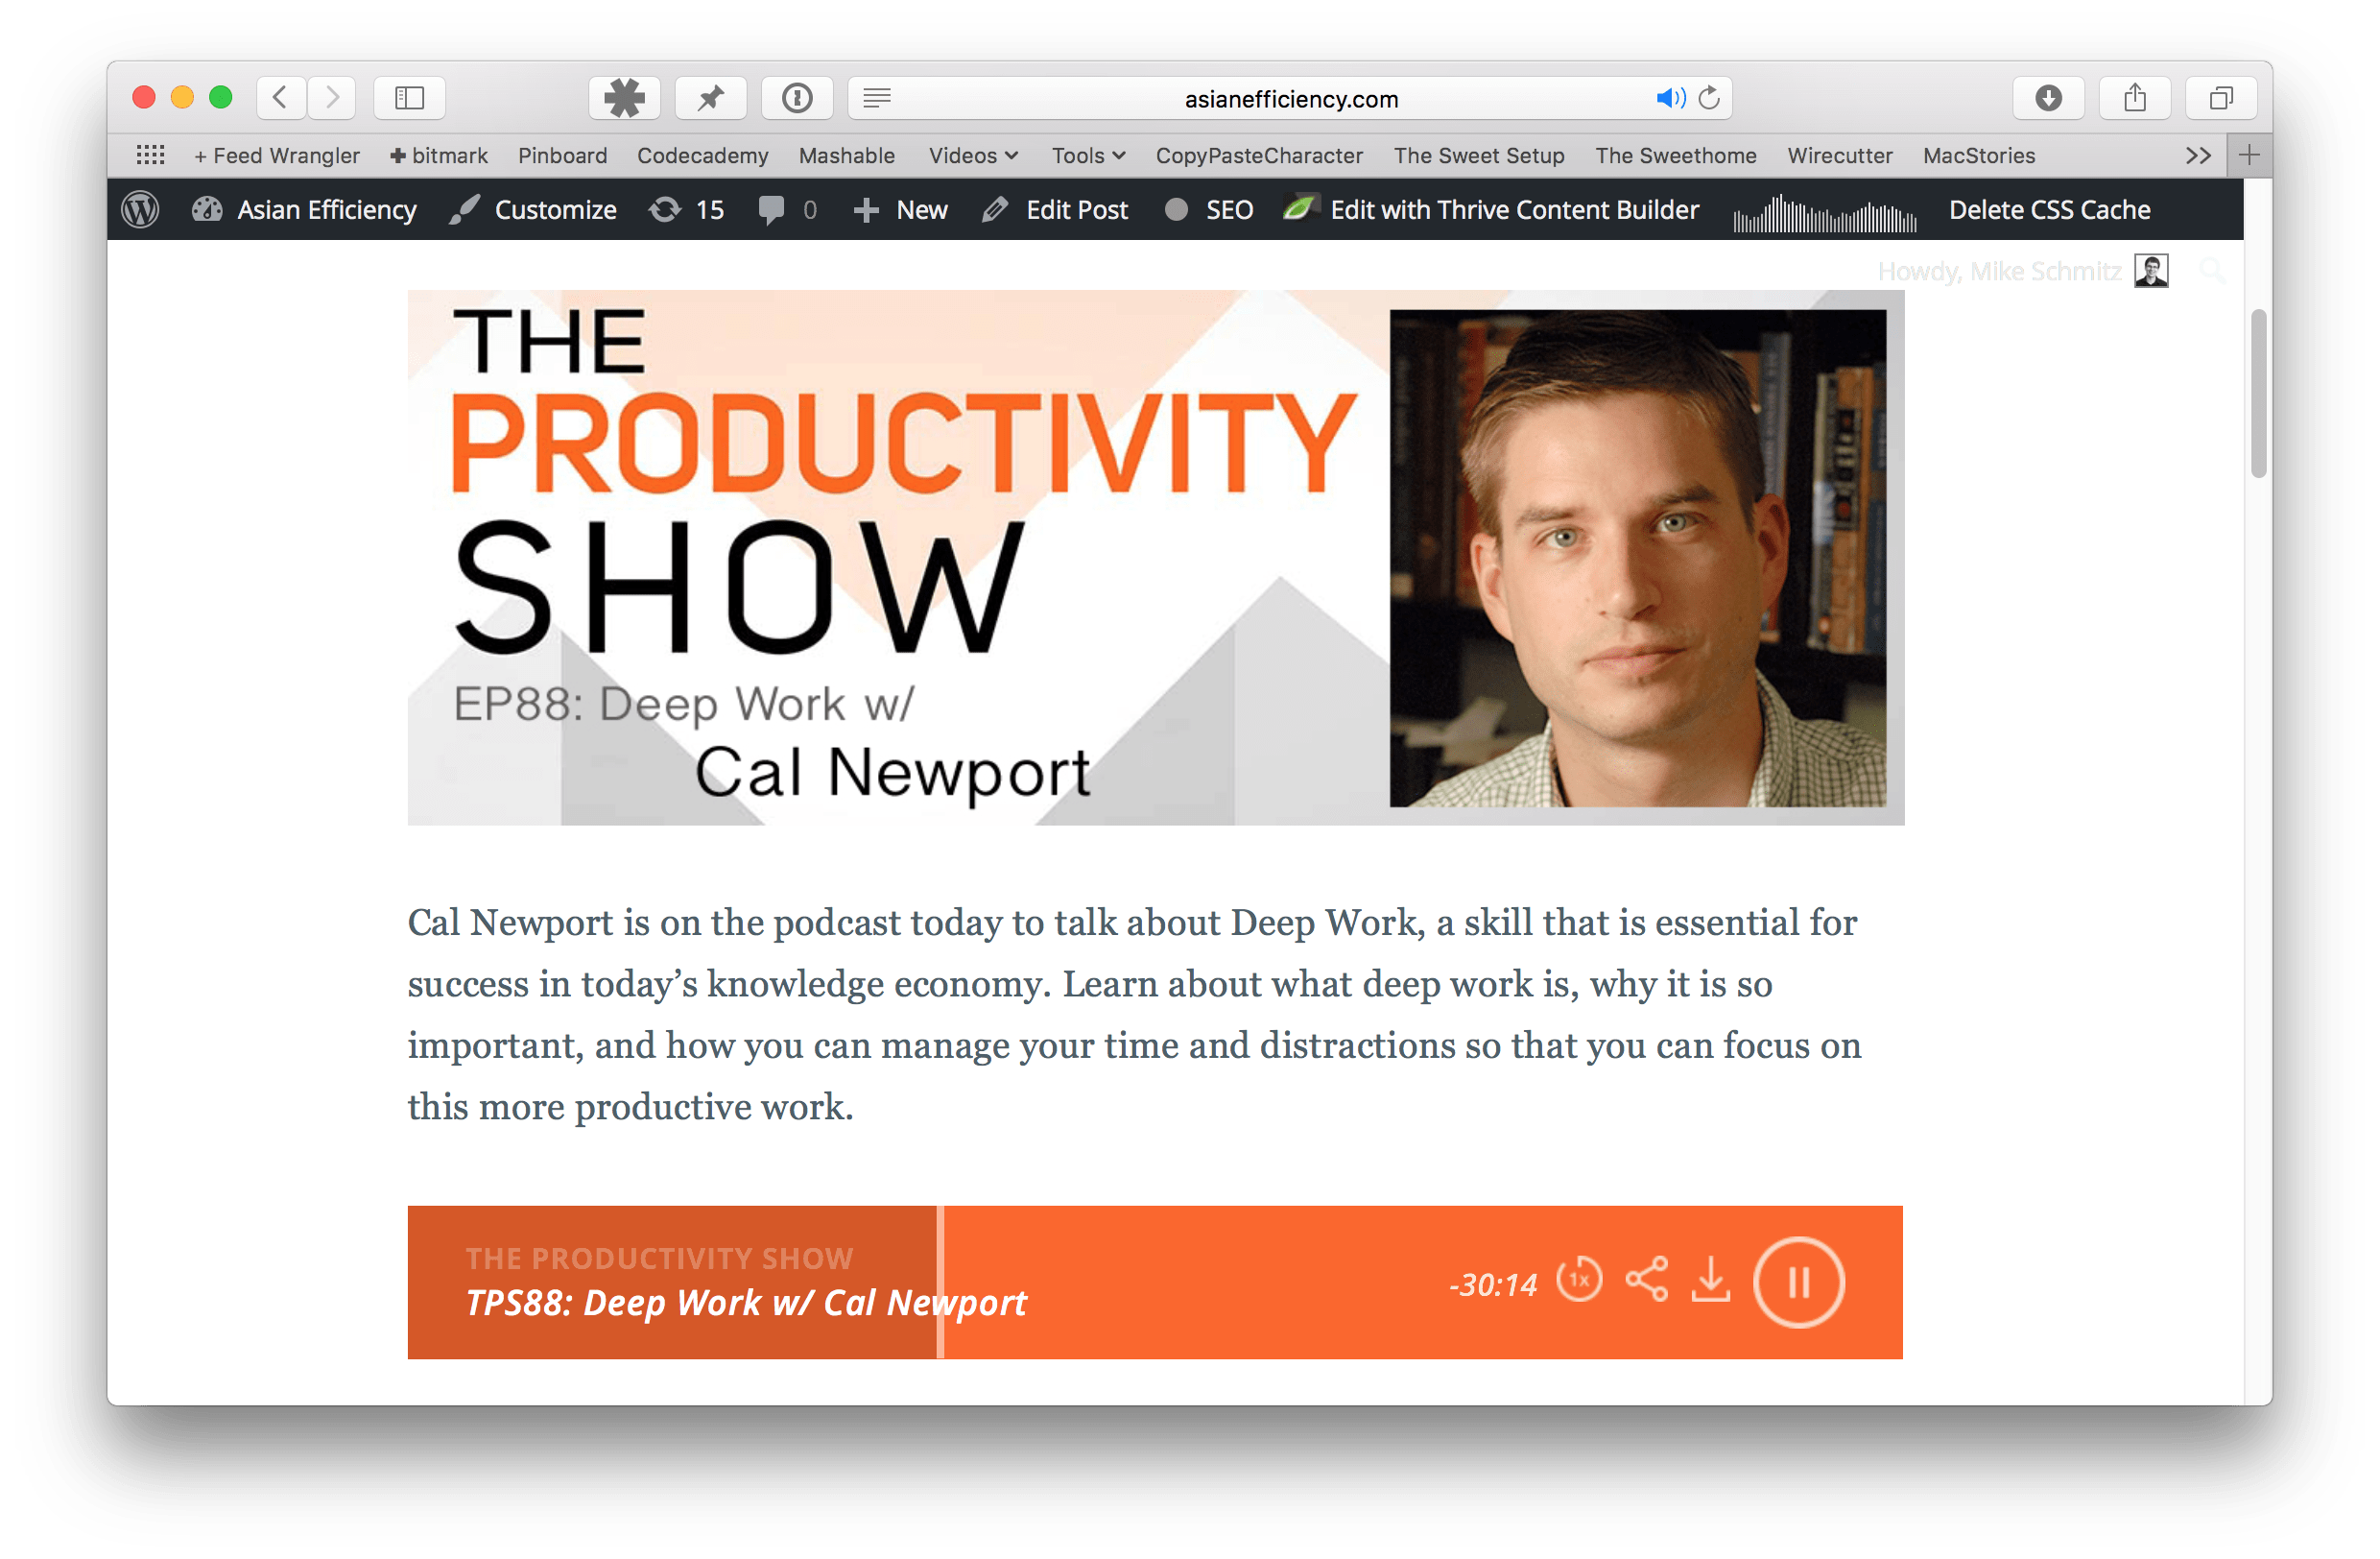
This is called the “Smart Track Player.” It has several great options for listeners like variable playback speed (up to 3x), a social share widget, a download link, easy scrubbing, and fully customizable colors so it looks great with your blog's design.
The Smart Podcast Player also provides a widget that enables the visitor to not only play an individual episode, but navigate to any published episode they want on the podcast home page. Here's what it looks like:
Connecting to podcast directories (e.g., iTunes)
While there are many benefits to listening in the browser, many people prefer to listen to podcasts on the go via a mobile podcast app. There are many good “podcatchers” available (including Overcast & PocketCasts), but iTunes is by far the world's largest podcast directory (love it or hate it) and is what most of the world uses to listen to podcasts. So it’s really important that you do everything you can to maximize your exposure during launch and leverage that publicity when you can. And if you do a good job launching your podcast on iTunes and get enough attention at the beginning, you will be able to maintain that momentum (assuming your product is any good).
While just submitting your feed and waiting for approval will land your podcast on iTunes or Stitcher, there are a few things we learned about the process that can really increase your chances of being noticed if you’re trying to launch a podcast:
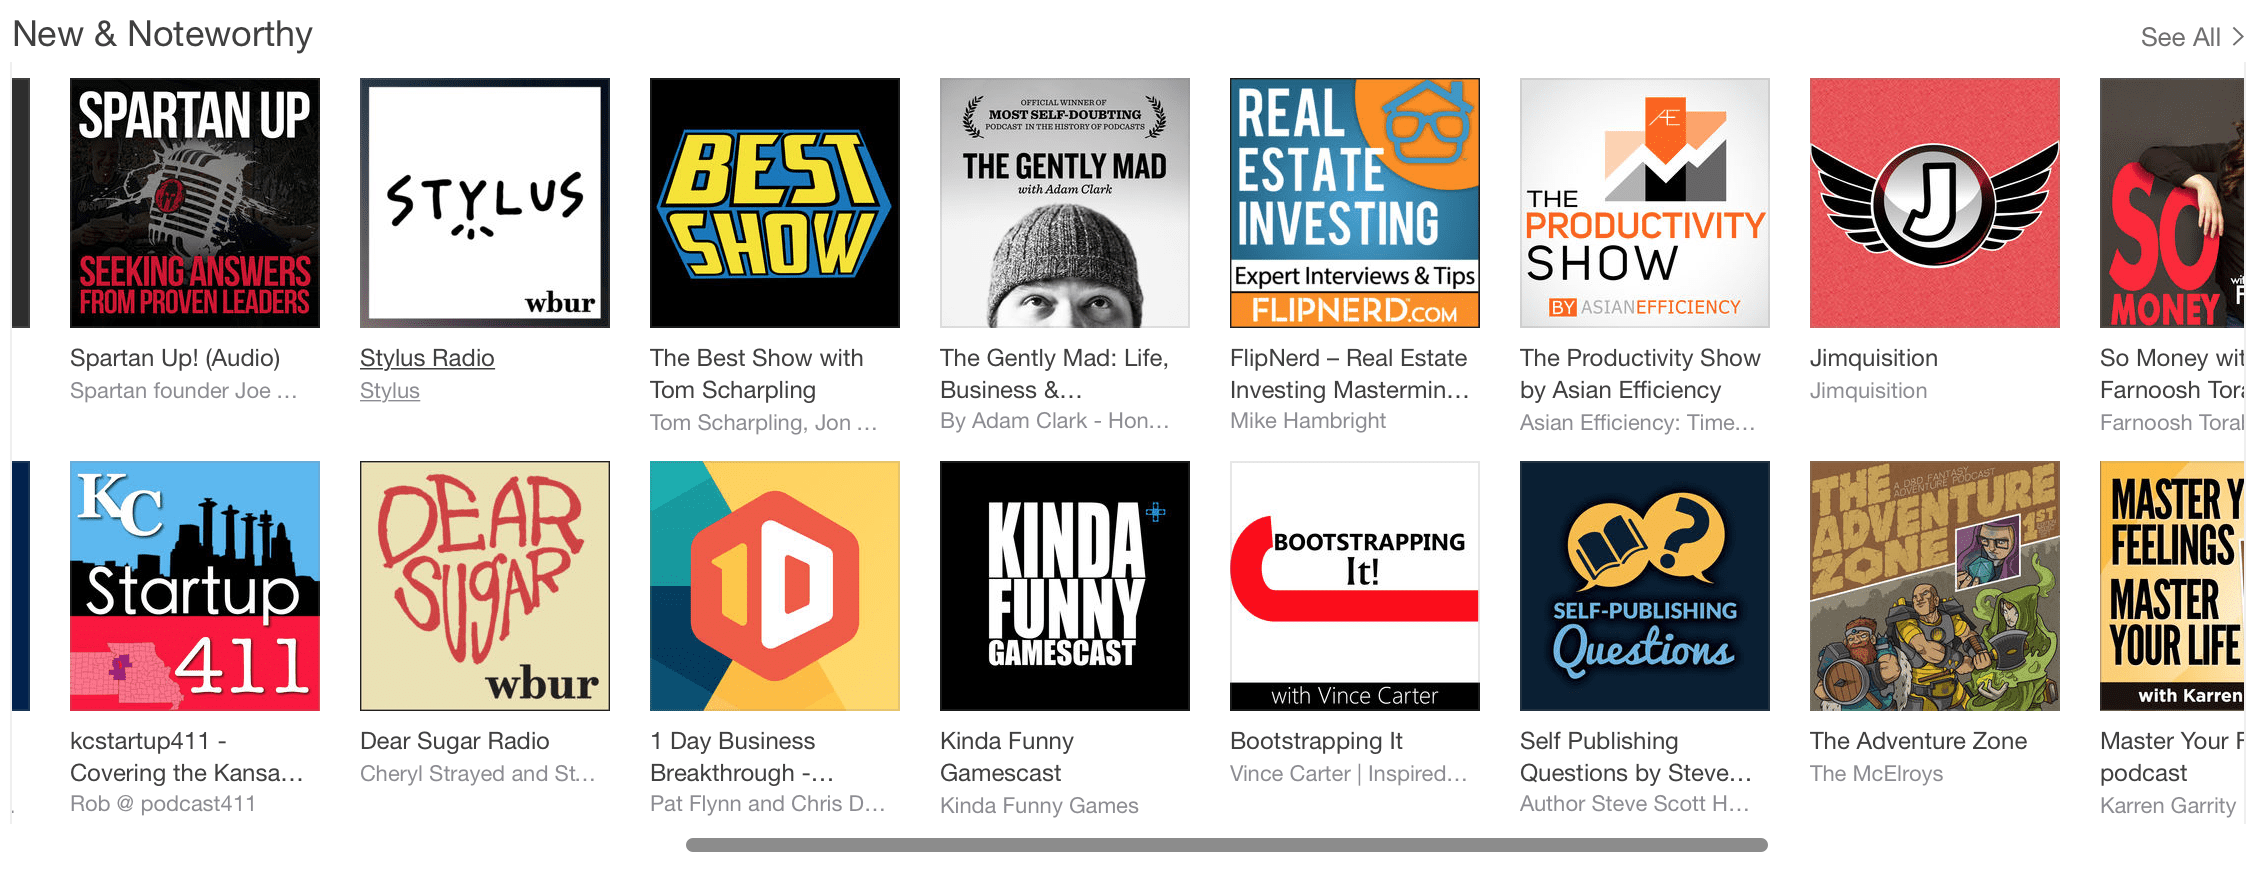
- Getting listed under New & Noteworthy in iTunes is REALLY important. – You can’t expect any significant amount of podcast traffic by simply appearing in iTunes. The #1 way to get significant traffic is to get noticed and picked for the New & Noteworthy section. This is a manual process so there’s no magic formula, but the key metric for this (and the podcast rankings) is velocity. The major components of velocity are downloads and reviews. If you can get significant downloads AND a bunch of reviews at launch, your podcast ranking will be much higher and you’ll have a much better chance of being selected for New & Noteworthy.
- Have a backlog when you launch. – One of the best ways to get more downloads is to have several other episodes people can download if they like the one they listened to. That means you have to have several episodes available though in your podcast feed when you launch. We actually didn’t do this, but instead opted for a daily podcast for the first month while we were trying to get noticed for New & Noteworthy, then switched to weekly after that. This allowed us to maintain a strong velocity of downloads, but we knew that a daily podcast was not sustainable for the long-term. Just make sure you have enough content to keep people interested because you’re only new once.
- Be consistent. – If you’re doing a weekly podcast, don’t miss a week. This tells both iTunes and your listeners that you’re not really serious about consistently delivering content that’s valuable, so they’ll just look somewhere else.
Documentation
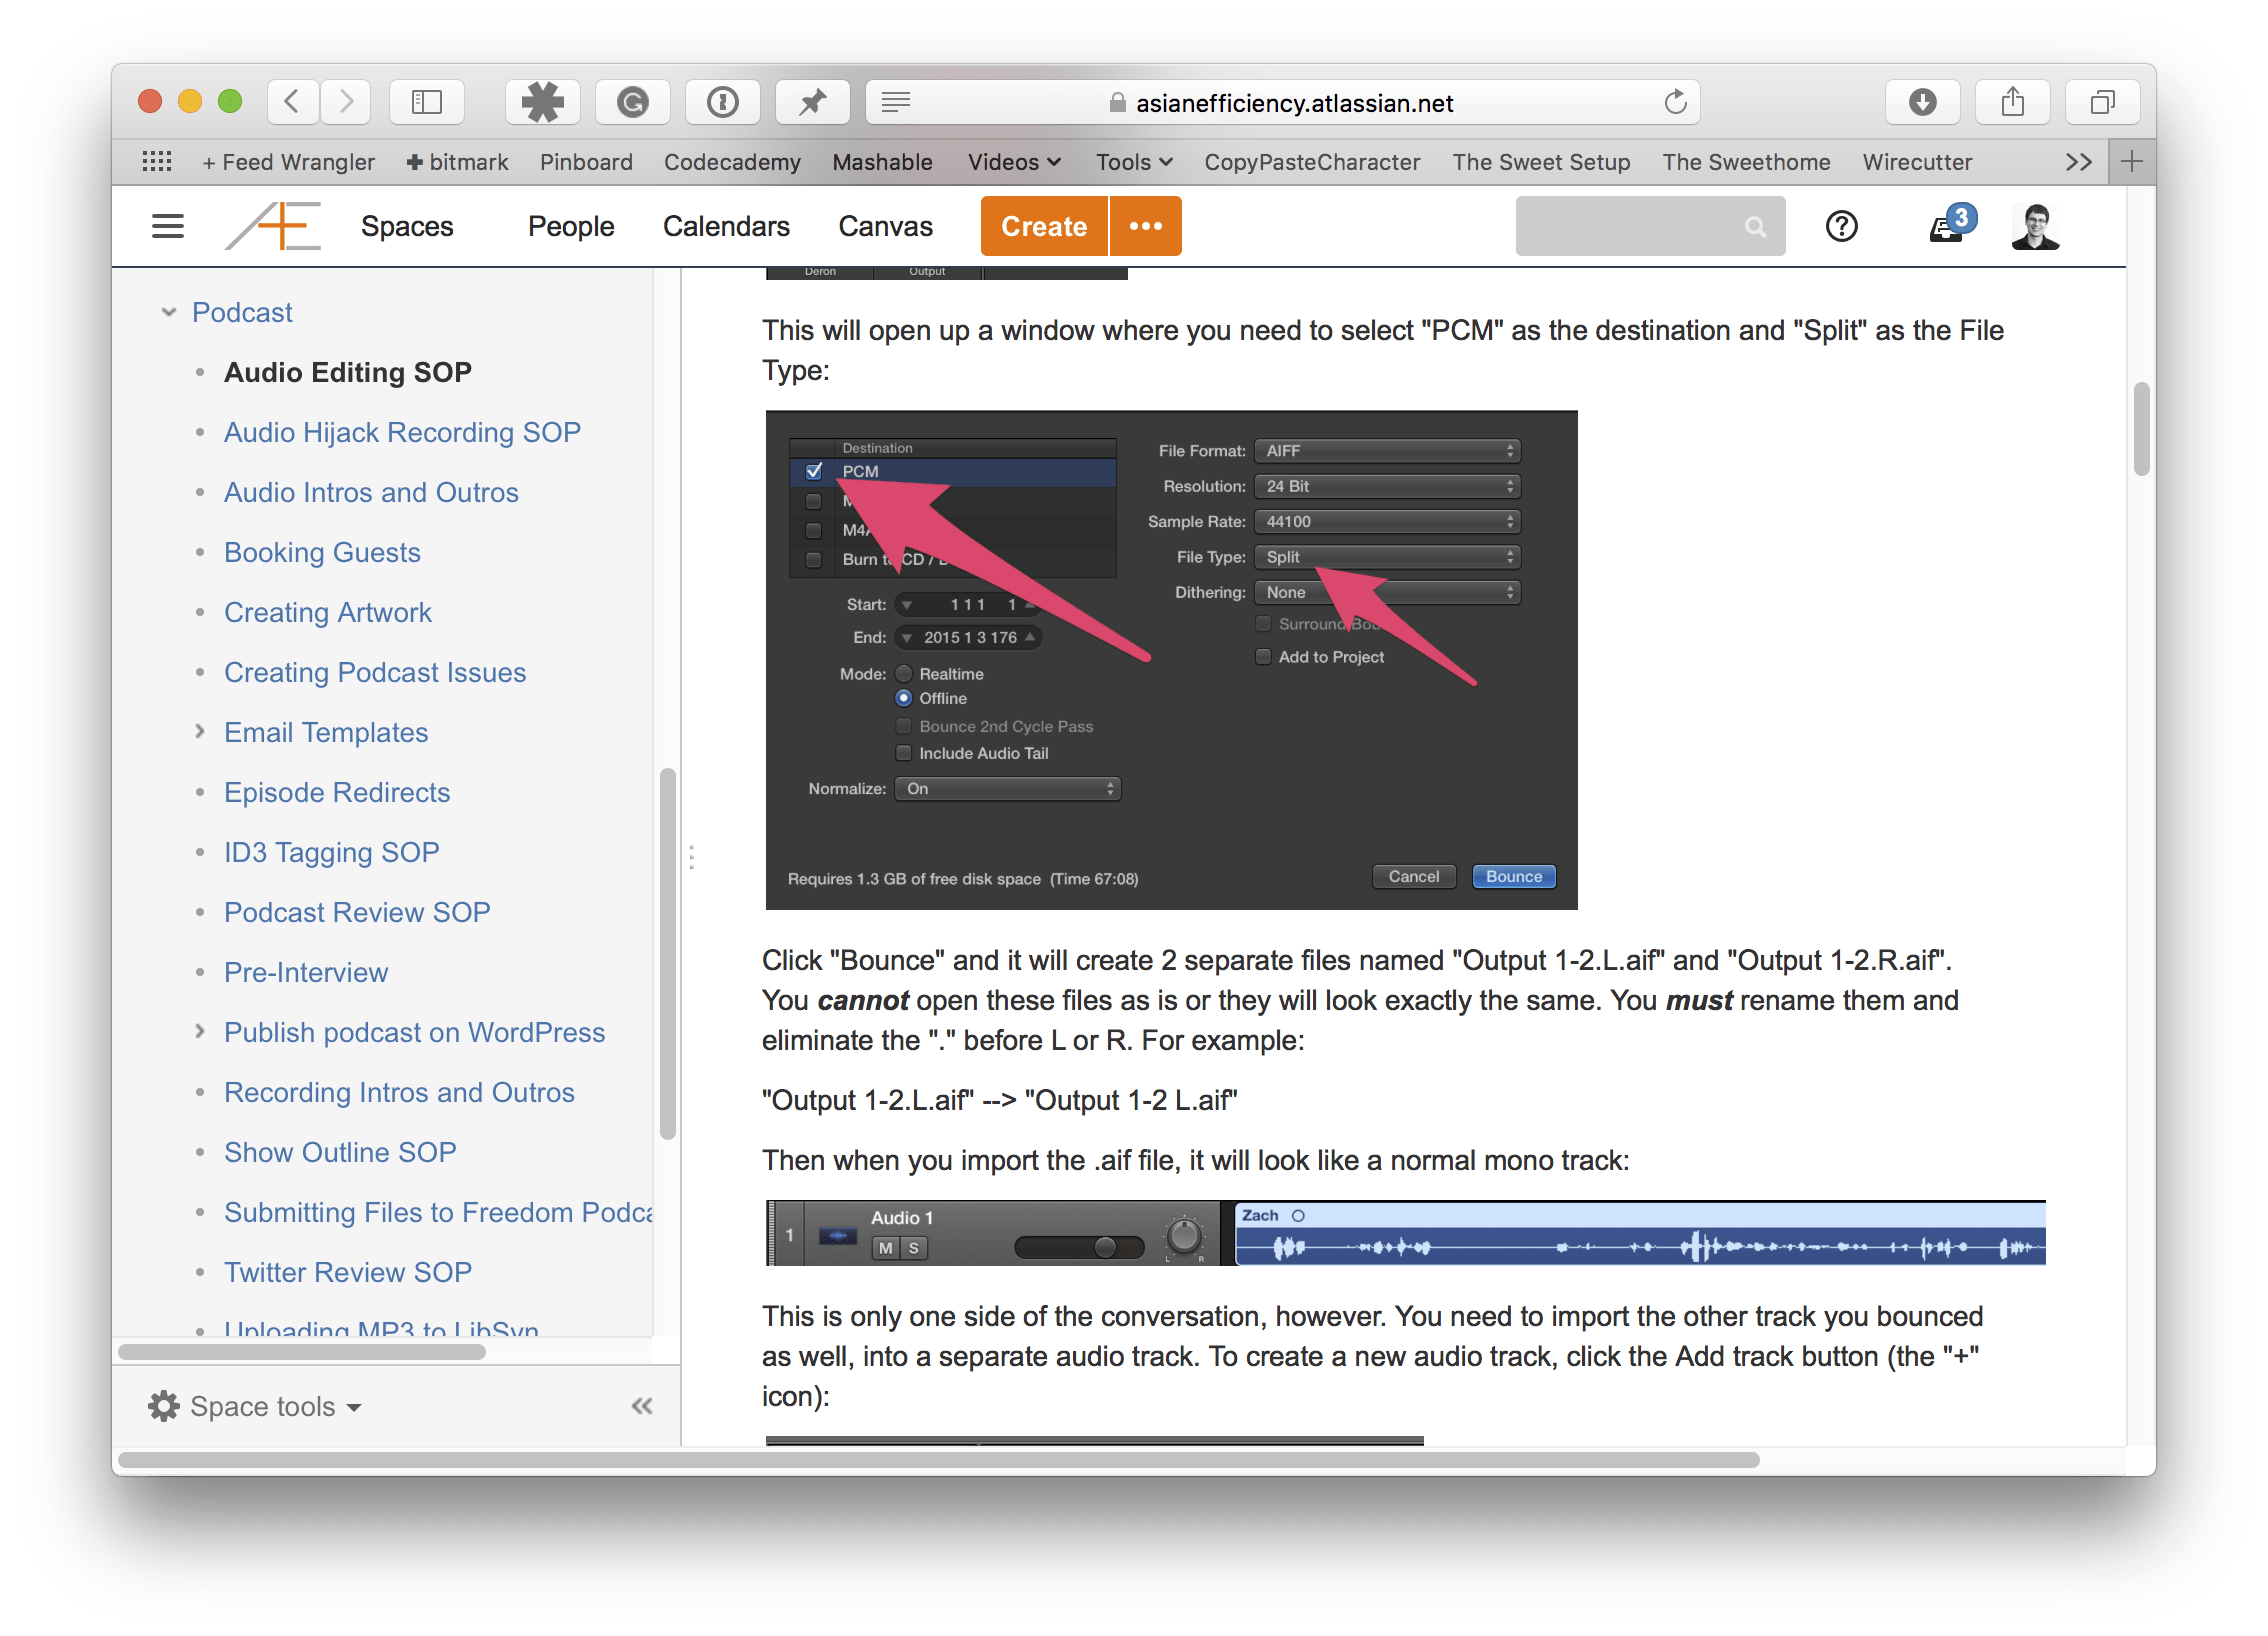
Once we figured everything out, we documented everything. We use the Atlassian software suite here at Asian Efficiency, and all of our SOPs (Standard Operating Procedures) get stored in Confluence. Our SOPs are written in such a way that anyone can pick up the ball and run with it, even if they don’t have any prior training. So while I am the audio nerd on the team, the SOPs are written (with annotated screenshots) in such a way that anyone could potentially edit a podcast episode and publish it if they had the right tools.
Our goal at Asian Efficiency is to have a cross-functional team. SOPs help us do that, so we try to document everything. We even have an SOP on how to write an SOP!
Here’s a list of SOPs we have just for the podcast:
- Audio Editing
- Audio Hijack Recording
- Audio Intros and Outros
- Booking Guests
- Creating Artwork
- Creating Podcast Issues
- Episode Redirects
- ID3 Tagging
- Podcast Review
- Pre-Interview
- Podcast Email Creation
- Podcast Email Uploading and Broadcasting
- Publishing on WordPress
- Recording Intros and Outros
- Show Outlines
- Submitting Files
- Twitter Review
- Uploading MP3s to LibSyn
Editor's Note: If you want to download the actual SOPs we use to manage our podcast, you can actually download them for free at the end of this article.
Because these SOPs are all stored in one central location (Confluence), it is very easy for someone who needs to step in and help with the podcast to do so—even if they don’t have any particular domain knowledge. Having documentation like this also makes it much easier to delegate and outsource, which leads us to the best part…
Automation
Once we have everything figured out and all of the processes documented, it’s time to automate. We did a lot of research in this area and talked to/interviewed several different options, but eventually settled on and picked our current podcasting partner because 1) they offered a variety of services (in addition to audio editing) and 2) they had worked with several other successful podcasts like The Tim Ferris Show and Lewis Howes’ School of Greatness.
 That partner is Freedom Podcasting, a company that offers podcast editing and production services that are professional and top-notch. The team at Freedom Podcasting has been great to work with, and they do a great job handling all the editing, tagging, and publishing of our regular podcast episodes. Working with Freedom Podcasting has allowed us to focus on creating quality content since we know they will do a great job dotting all the i’s and crossing all the t’s when it comes to handling the technical and publishing side.
Here’s a list of what the Freedom Podcasting team does for us:
- edits and cleans up all the audio recordings
- adds intros/outros and inserts the background music into all podcast episodes
- exports the final podcast episode as an MP3 file (which makes the file size more managable)
- applies the ID3 tags and artwork to the MP3 file so that it displays correctly in podcast players (or “podcatchers”)
- uploads the final, tagged MP3 to LibSyn so it can be downloaded by listeners
- creates the WordPress post and includes all the links that are mentioned in the audio
- writes the show summary (including the cheatsheet) and shownotes
- creates the custom artwork for each episode and adds it to the WordPress post
- embeds the podcast episode to the WordPress post via the Smart Podcast Player plugin
- updates the .htaccess file via FTP to make sure redirects for each episode work
Because Freedom Podcasting does a lot of the heavy lifting, here’s what our current podcast workflow looks like:
- Record the episode and throw the files in Dropbox (usually 30–60 minutes)
- Get everything back a couple days later, review the audio and WordPress post (takes about 30–40 minutes usually to re-listen to the whole thing)
- Write the podcast email (for people who like to get notified of new episodes that way) and schedule the post
- That’s it!
Here's a side-by-side comparison of the workflow without Freedom Podcasting vs. with Freedom Podcasting along with an estimation of total time required:
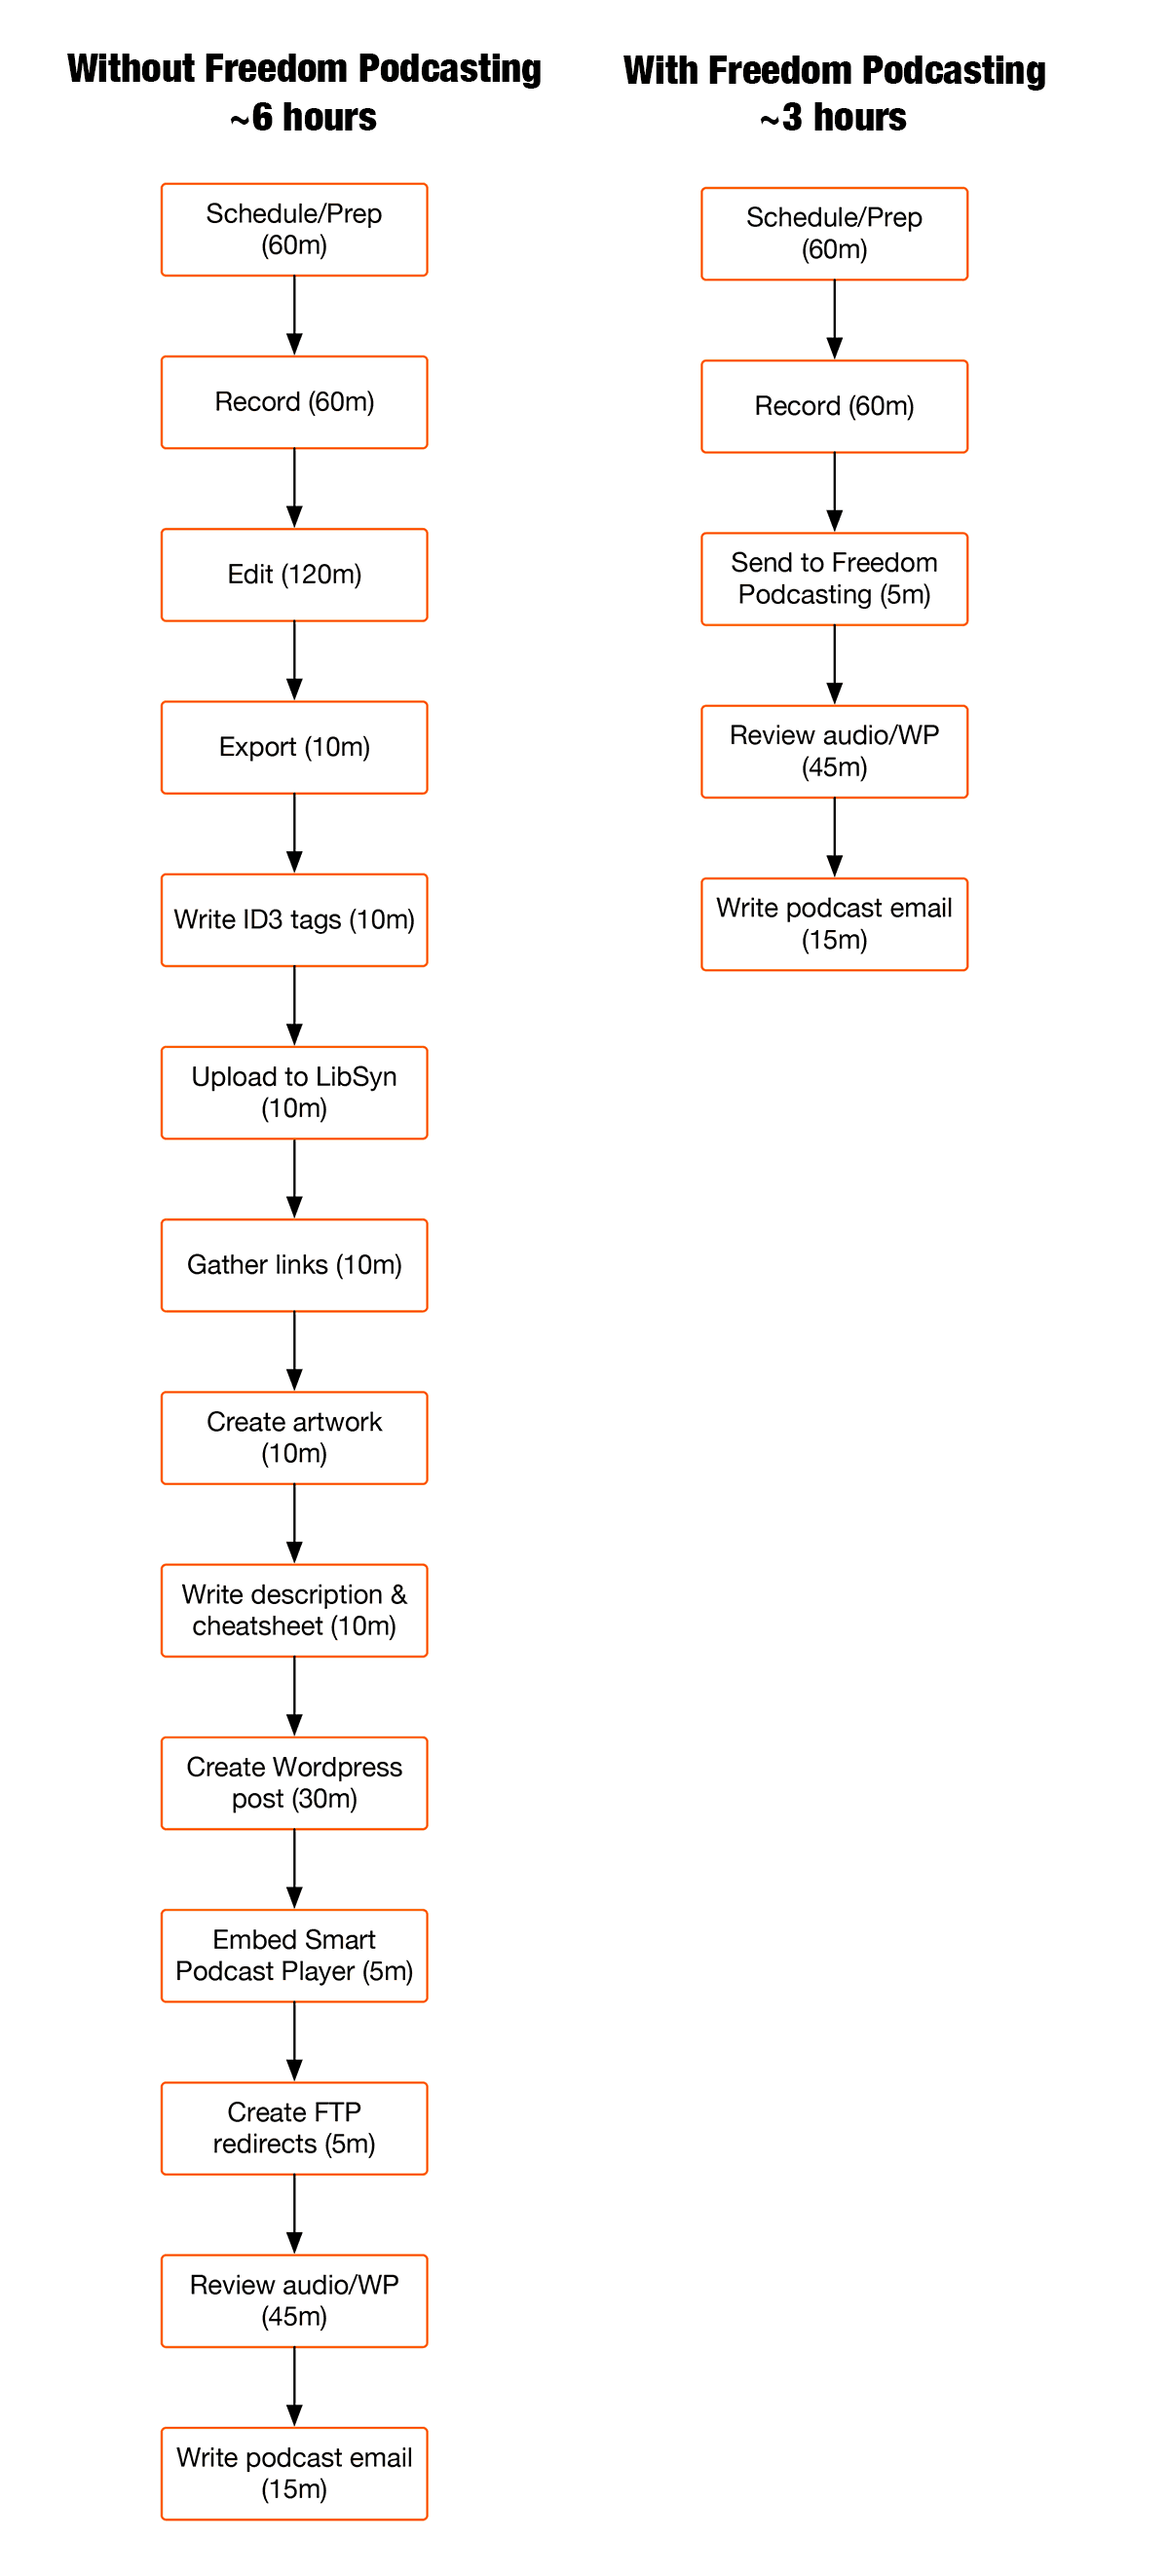
Even more important than the time savings, however, is how much simpler they make the whole process. Using Freedom Podcasting transforms a 14-step process into a 6-step process, so there's much less administration effort required as well. We don't have to keep tabs on every single step of the process anymore. We just have to 1) record content, 2) check it when it's done, and 3) release it into the world. The “simplicity savings” that this contributes to our content production system make using Freedom Podcasting a no-brainer.
Tracking Tasks
One thing we did not do is try and get Freedom Podcasting to embrace JIRA for task management. Because we had documented the entire process, we knew there were specific things Freedom Podcasting could do for us that would provide high ROI (return on investment). We simply exported our SOPs and left the rest in their extremely capable audio-editing hands. Specifically, we gave them all the SOPs that related to tagging the episodes the way we want them, uploading the files to LibSyn according to our standard naming conventions and storage, and formatting for the WordPress post.
In essence, we didn’t want to be involved with every step of the process. I don’t need to know whenever the next step in the process in completed, I just need to be notified when it’s ready to take a look at. Constant updates would just create a larger time investment for project management and wouldn’t add any real value to the process.
So how do we track things in JIRA then? Glad you asked :) Here are the different steps in our podcast workflow (acceptance criteria):
- Recording scheduled
- Recorded episode
- All audio is uploaded to Dropbox and ready for Freedom Podcasting
- Sent to Freedom Podcasting
- Review final audio files and WordPress post
- Create, upload, and schedule email
- Review episode and email
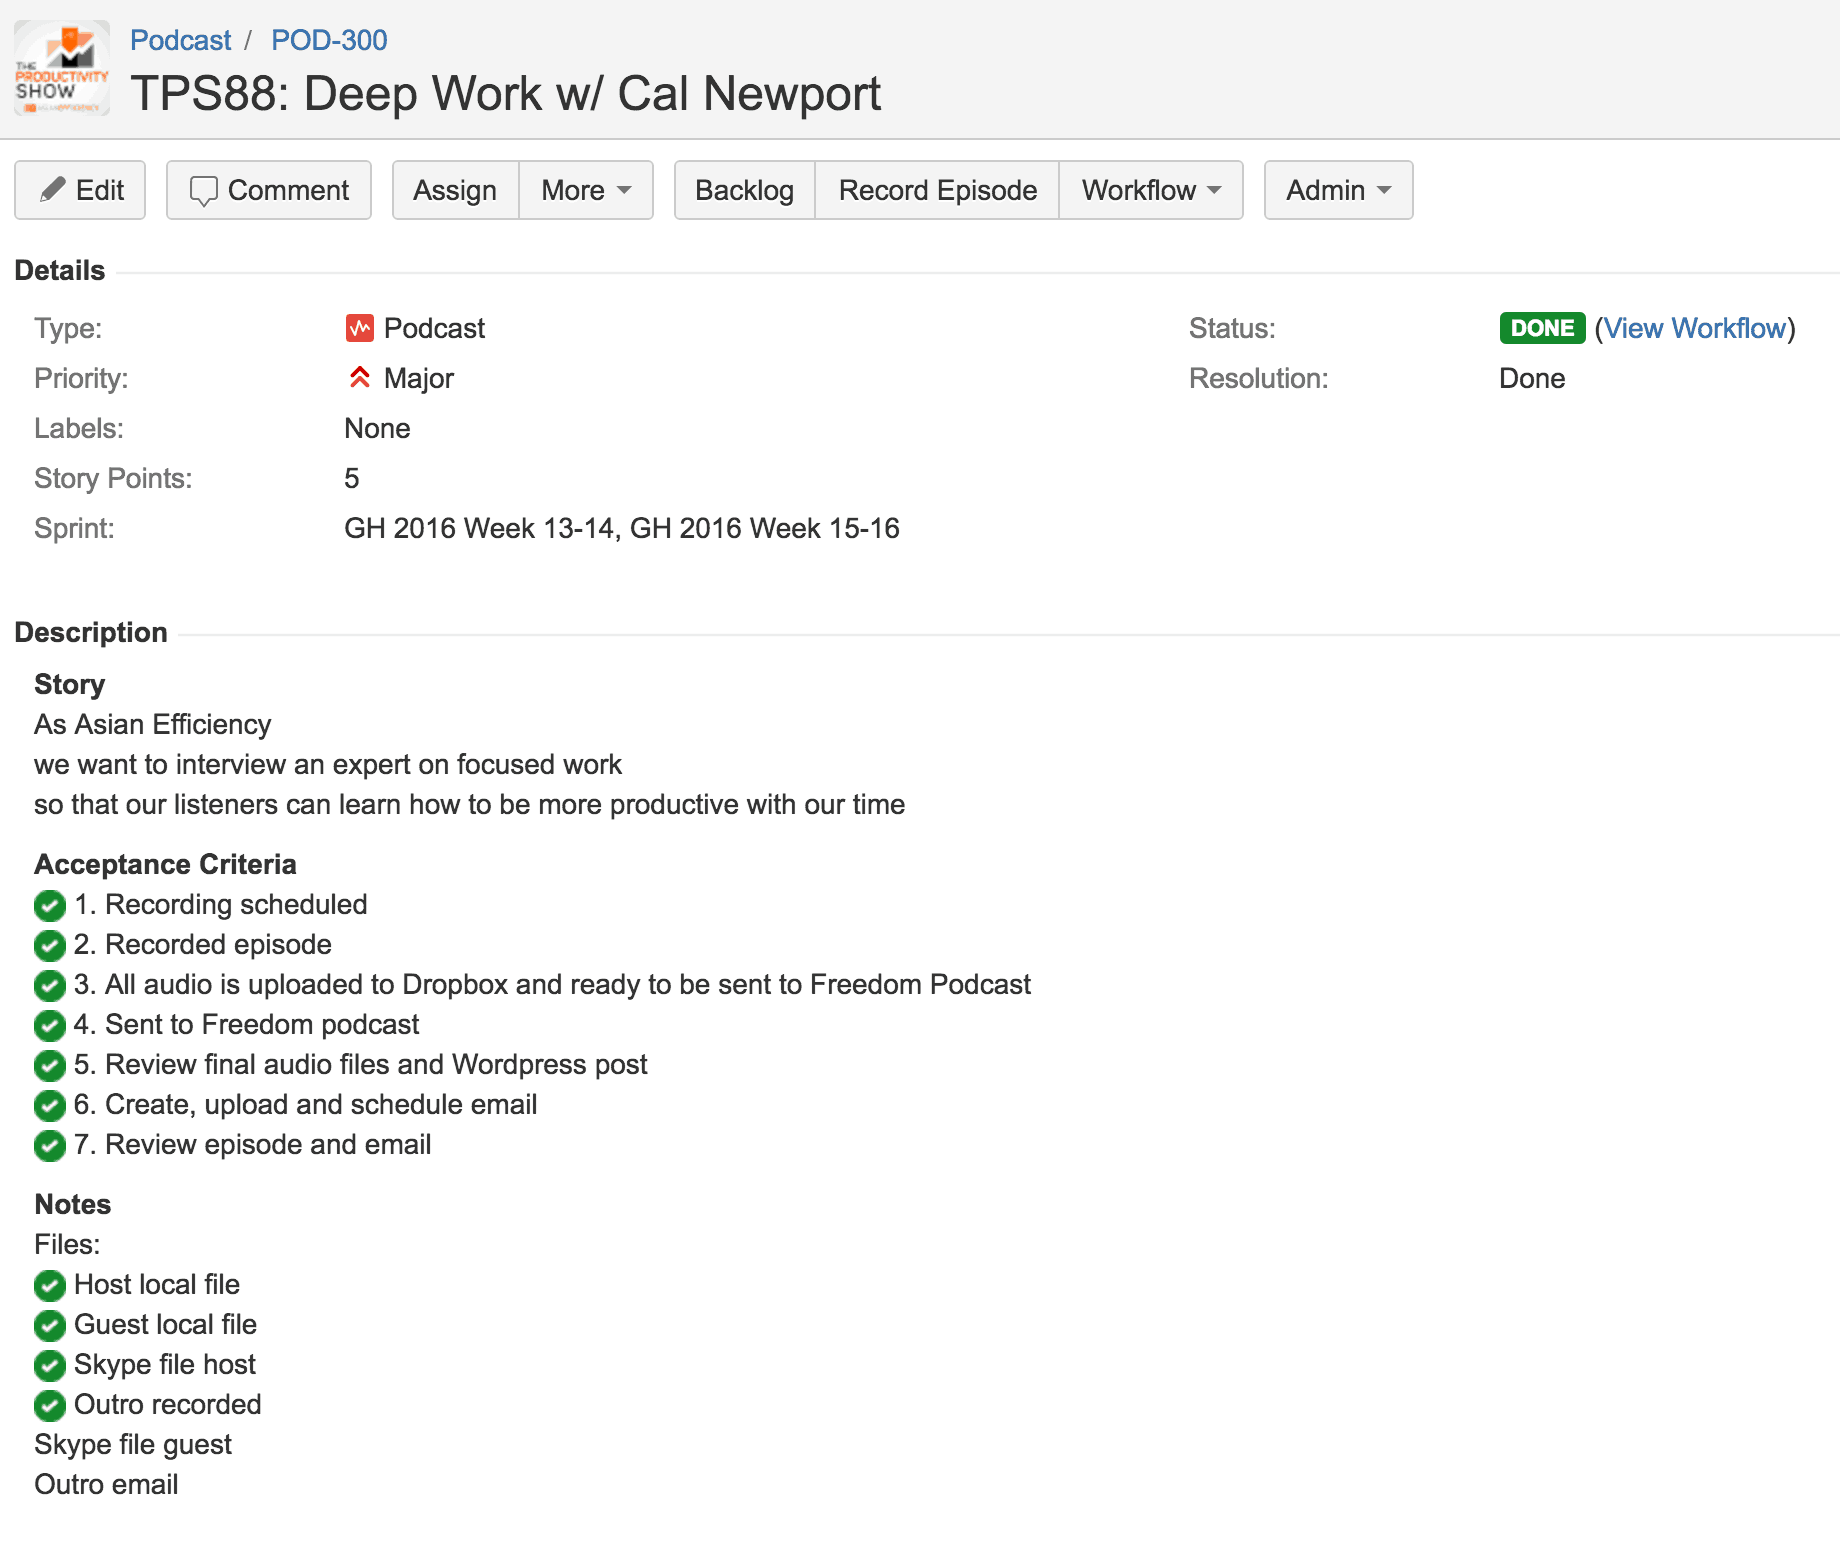
The majority of the post-production work happens between steps 3 and 4, but we (Asian Efficiency) aren’t involved. We just check our email every Wednesday for a message from Jonah at Freedom Podcasting telling us that the files are ready for review.
Automation Takeaway
Working with Freedom Podcasting has made the release process so much more efficient for us, and we recommend you check them out if you’re thinking about launching a podcast of your own. The amount of time that we save having them do the majority of the post-production work more than justifies the cost in our opinion, and they have several other services they offer as well if you need it. For example, they can help with artwork design and launch planning and even have a course up on Udemy if you have no idea where to start (although you should after reading this far).
If you want to try out Freedom Podcasting, you can actually get a discount through this special link. Using that link you can either get a 10% Launch package discount or two episodes produced for free—up to a $400 value.
Conclusion
Launching The Productivity Show has been quite a ride. We've passed several major milestones, and it's great to hear from people who are benefitting from applying the things we teach and talk about to their personal lives and are seeing major results.
If you are on the fence about starting your own podcast, go for it! The process is very rewarding, and hopefully this article has helped pave the way for you in terms of actually getting your idea off the ground. And if you want a little additional help, just use the box below to download all of our podcasting SOPs for yourself.
Happy podcasting!
Download Our Podcast SOPs
Get the step-by-step written procedures we use for producing our podcast:
Hi! Do you know if they make any plugins to assist with Search Engine Optimization? I’m trying to get my blog to rank for some targeted keywords but I’m not seeing very good success. If you know of any please share. Kudos!|
Wow, what a great article! Thanks for the mentions, it’s an honor :-)
Woah, This is too much information to take in a single sitting. I am writing down script to my own podcast and was hoping to launch by June 2016 end. I realize that I have a long way to go. A lot of things here are what I could not find anywhere else. So I thank you for that.