If you’re like most people, you’ve probably heard about Airtable but aren’t exactly sure what it does.
Or maybe you’ve explored Airtable a little bit but were somewhat confused by the platform.
Don’t sweat. We’ve got you covered. In this guide, we’re going to walk through what Airtable is, how it works, and some of the ways you can use it. Plus, we’ll talk about some specific ways you can customize it to fit your workflow.
What Is Airtable?
Airtable is a cloud-based software that combines the power of databases with the convenience of spreadsheets. It features a wide variety of functions and features that allows it to have the functionality of many popular project, task, and workflow management tools, such as Asana, Trello, Todoist, etc.
Airtable is free to set up and use and can be upgraded several levels for additional record storage and features.
One of the most notable aspects of Airtable is that you get a lot of power without all of the complications normally associated with database software.
The Difference Between a Spreadsheet and Database
In order to understand Airtable, we need to talk a bit about databases versus spreadsheets.
Databases and spreadsheets are quite similar, but databases can handle much more data and more complicated functions.
In a nutshell, spreadsheets are generally used to present and/or calculate data, whereas databases are used to store extensive amounts of data that will be accessed and used in a variety of ways. There’s more to it than that, but that’s the gist of it.
Spreadsheets have columns, rows, and cells where the columns and rows intersect. They can automate cell calculations and link data to or from another sheet, but those functions are limited in scope and scale.
A database also uses tables, columns, and rows, but can hold much more data. You can also manipulate the data in a large variety of ways, and even generate temporary tables of data based on static ones.
The data in a database can be relational as well. For instance, you can have a table of authors, and another table with the names of books. You can connect these two tables and see all the books an author has written.
Now, why does any of this matter? Because Airtable feels like a spreadsheet but has the power of a database. But, and this is key, it’s much easier to use than normal database software and doesn’t require you to know any coding.
This whole database/spreadsheet combo makes Airtable really versatile. It’s a tool that you can use for a ton of different things, from managing projects to creating sign-up forms to organizing huge amounts of information.
The 5 Primary Building Blocks of Airtable
Airtable is made up of five primary blocks on which everything else is built. Once you understand these, you can start using the software.
Bases
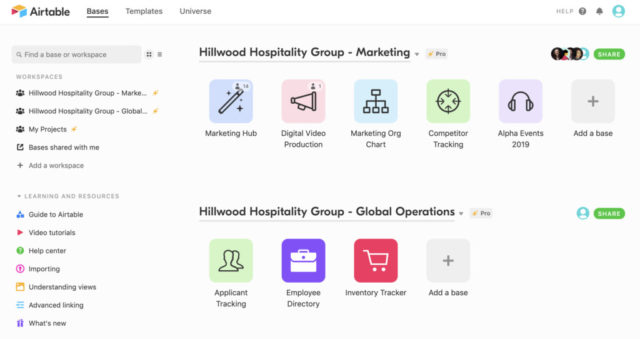
After logging in to your Airtable account you’ll see your workspace. Workspaces simply allow you to organize your bases.
Each of the icons in a workspace is a base, short for database, and each is customizable in a number of ways.
Bases are useful for tracking any number of things. Airtable provides numerous templates that can help you get up and running quicker. These templates include things like:
- Content management
- Marketing campaigns
- Software bugs
- Product launches
- Social media management
The bases in Airtable aren’t just for business use. They can also be used to track personal items and events, privately or in collaboration with others. Wedding planning, record album collection, and house hunting are just a few of the useful ways you can use this tool in your personal life.
To explore the concept of a base, and see some variations of ways to use them, browse through some of the preinstalled ones provided in your default Workspace. Default bases include a preconfigured project tracker, content calendar, and job hunting template with sample data already in place.
Open each of these and explore the features. Don’t be afraid to change things, move them around, click buttons, and so on. Since the sample data isn’t important, you can use it to explore and learn how bases work in Airtable.
Once you’ve fully explored the pre-installed samples, click the Add button, select Start with a template, and try out as many of those as you’d like to. You can also create a new base by importing data from a spreadsheet.
Tables
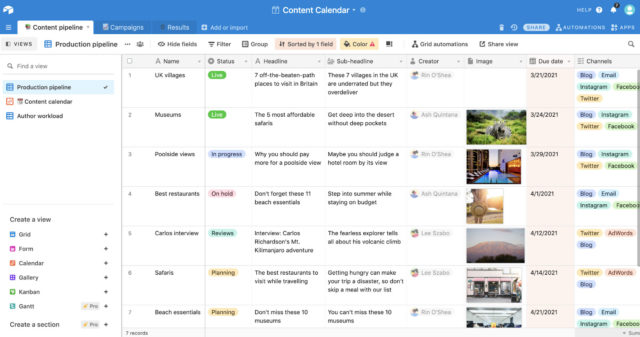
Each base you create will consist of one or more tabs that contain data. These tabs are tables, and the data in each table is related in some way.
You may have one table with a list of customer information for instance, and another with a list of purchase history. Tables might contain inventory, projects, digital assets, or any number of other things.
You can rename each table, as well as add, remove, and reorder them as desired. By default, a table is shown in a grid format with rows and columns. In Airtable, each column is a field and each row is a record.
Records
Every table contains records that hold specific data, and each record is an individual entry. For example, you could have a table dedicated to a specific project and each record in the table could contain details about specific tasks within the project (status, deadline, etc.).
To add new records, simply click an empty row at the bottom of your existing record list, or right-click an existing record and select from the drop-down menu.
Fields
As you would guess, records are made up of fields, and a field can contain almost any type of information. On a customer table, you may have separate fields for name, address, and phone number. On a project management table, you might have fields for due dates, file attachments, and comments. Inventory tables might have pictures, videos, stock locations, and reorder information, among other things.
Fields are very powerful and interactive. You can create an attachment field, for instance, then easily add the cover image for a book, a product image, a scheduled social media image, and so on. You can also create fields with checkboxes, dates, collaborators, blocks of text, and many other things.
Views
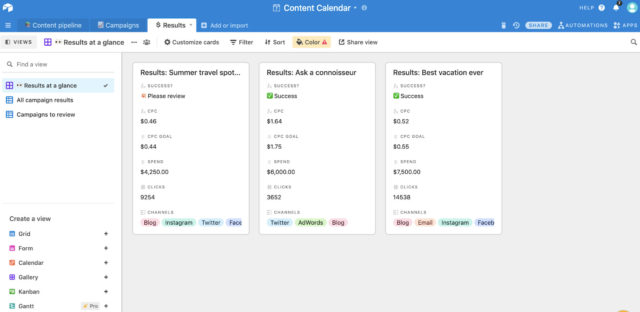
Views are one of the best features of Airtable because they allow you to see your data in a way that works best for you, your data, and your team. Essentially, views are a way of sorting data by a specific field.
The different views you’ve created are on the left side of your screen, along with the option of creating a new view.
A project management base often benefits from using a Kanban view style, while an editorial calendar may be more useful viewing in calendar mode. Some views allow you to group records, making it easy to manage a GTD (Getting Things Done) style productivity list, social media calendar, and anything in between.
Airtable offers several types of views for use with each table, but not all views can be used with all data. To use a calendar view, for instance, your table must have at least one date field in it.
The gallery view is useful for tables that have images, but images are not required to use it. It comes in handy for project details as well, because it presents the data in card format so that you can see more details at a glance.
Using Templates
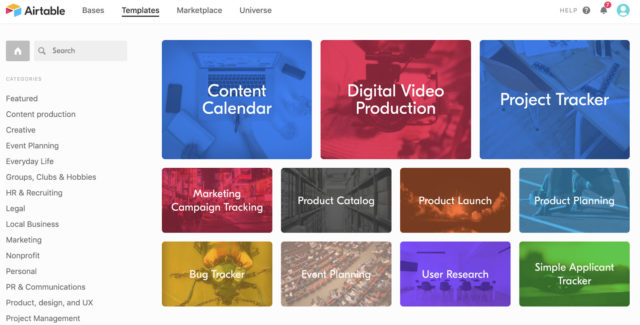
As noted, Airtable offers a wide variety of useful templates to help you get started. Each template is prefilled with sample data, so that you can see how it was designed to work, and how useful it may be for your specific needs.
Once you’ve familiarized yourself with the template base, you can delete all of the default data and add your own. You’re also able to customize the base in any way you’d like.
One of the biggest advantages of using templates is that you don’t have to start from scratch and figure out the best way to organize all your information. A lot of the work is done in advance for you. All you have to do is tweak it to fit your data and the way you want to use the base.
On the Airtable dashboard, click “Add a Base” and choose “Start with a template” from the dropdown list. This will take you to the main templates made by Airtable, and you can browse through using the categories or by searching for specific keywords.
If you’re curious or looking for more options, you can also visit Airtable Universe, which contains hundreds of user-contributed bases covering all manner of topics.
Importing Data from Other Sources
There’s a good chance you probably already have a lot of data you’re trying to manage, and it’s probably scattered across multiple sources, like Google Sheets, a project management tool, etc. Airtable makes it simple to import that data into tables and bases in your workspace.
Log into Airtable from a desktop computer. Click the Add a Base button, then select Import data. A window appears offering a variety of import options: Asana, Excel, Google Sheets, Trello, and more.
Most of these options walk you through exporting your data from the original source in the form of a CSV file and then importing it to your Airtable base. Once you’ve exported your data from another program into a CSV file, you simply upload that file to your Airtable base and you’ll be ready to use and manage it alongside any manually entered data.
Adding Collaborators to Airtable
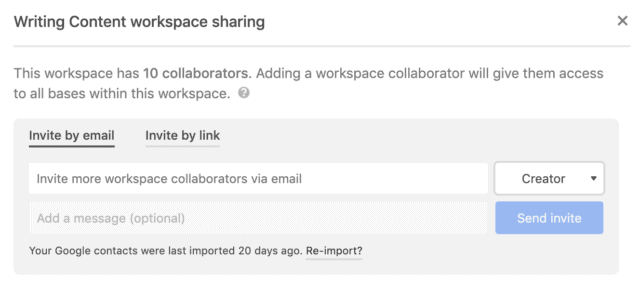
One of Airtable’s strongest features is the ability to collaborate with others on just about anything.
Airtable lets you collaborate on an individual base level, or through an entire workspace, depending upon your needs. When you add collaborators, you can choose what level of access they have.
Collaborators can be set to Read-Only, Commenter, Editor, and Creator levels, and you can limit them to access only a specific base, or you can give them access to your entire workspace.
For example, you could allow customers to have commenting privileges on a customer support base, and add a freelance writer with editing privileges to your social media marketing calendar.
To add a collaborator to a base, click the drop-down arrow on the base icon in your workspace and select “Share” from the drop-down menu. Alternatively, open the base and click the “Share” button at the top of the screen.
When you do it from within an open base, you’ll get a different initial menu choice.
After selecting what you want to share, you’ll have the option to add email addresses for the people you want to give access to. Alternatively, you can share a private link that allows people to access a base or workspace, without having to sign up for Airtable.
When you choose to create a link, you can make it accessible to anyone who has it, or you can limit it to only people who have an email address at a specific domain. This helps you limit access to only people from your company, for instance, and limits the risk of someone randomly being able to access your data.
Automations
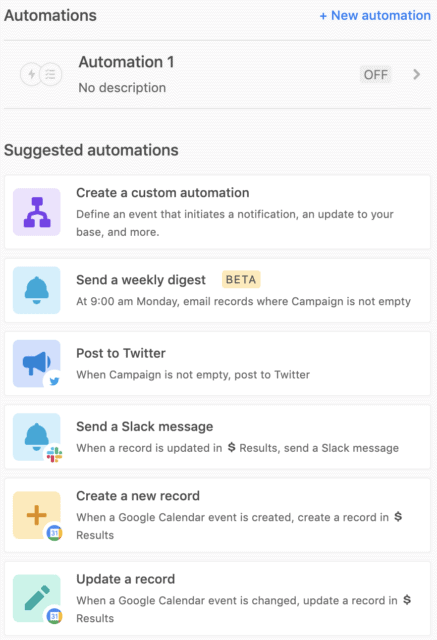
Automations are a powerful feature that are available on the desktop and web-based versions of Airtable, and they can be very useful for streamlining your workflow. If you’ve ever used a tool like Zapier or IFTTT, you know how powerful automations can be when it comes to increasing your productivity.
An automation is an action that is started automatically when a specified trigger executes. Once triggered, the automation will take one or more steps based on how it was configured.
Preconfigured examples are available in each base. You might set up an automation to post automatically to Twitter or Facebook content on a specified calendar date, for instance, or you might send a Slack message when a record is marked complete in the base.
Trigger events can be customized based on your specific needs. Some examples include triggering a sequence of events based on an email, a calendar date, a specified time, when a specific field is updated on a record, and much more.
App Marketplace
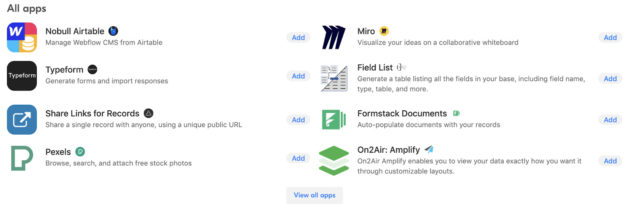
The app marketplace for Airtable is filled with a variety of plugins and extensions that work in tandem with your Airtable workspace and bases.
Via the Airtable apps database, you can add tools that allow you to:
- Create charts from your data
- Use stock photos in your bases
- Delete duplicate records
- Change groups of records at once
- Track time
- Send text messages
- Embed web pages into your Airtable workspace
- And much more…
The extensive number of apps provided by Airtable cover some of the most requested features by users, and you can expand into even more specialized tools through the Airtable Universe.
Airtable Universe is where you’ll find templates, scripts, automations, and apps created by other Airtable users.
Integrations with Other Apps
If your organization uses other services and applications, you can integrate many of the most popular ones with your Airtable workspace and bases. For example, you can connect Airtable with Asana, Microsoft Teams, Facebook, Mailchimp, and so on.
These connections make it much easier to manage all of your data into one area and manage multiple services at once.
You may have a customer email list in Mailchimp for instance, and by tying it into your Airtable marketing base, you can automate sending out newsletters through Mailchimp. Similarly, you might connect Trello with Airtable, and update client billing records in Airtable when a project is completed in Trello.
Obviously, these are just simple examples that won’t apply to everyone, but they illustrate the power that can be achieved by integrating your workspace applications and services with Airtable.
Wrapping Up
Hopefully, this guide gives you a sense of just some of the ways you can use Airtable, personally or professionally.
If you find yourself using spreadsheets a lot and wishing they had more functionality or struggling to manage a lot of data, Airtable just might be the solution you’re looking for.
Recommended for you
Want the full system? 25X is the flagship productivity system we teach.
Explore 25X →