
Every time Apple releases a new version of their mobile operating system, excited Apple fans rush to do a software update hoping that they can check something off their wish list.
People live on their phones and tablets because of how much they can do with them. Our mobile devices make life easier in so many ways. It is hard to imagine now how we did things before the iPhone. How did we listen to music, watch videos, or chat with friends? How did we buy things online, get directions, or take photos? The list goes on. Yet, every year Apple adds something new to the list of possibilities or makes some improvement to something we are already doing.
2021 is no different. There is a lot to love in the newest releases of Apple’s operating systems iOS15 and iPadOS15. In this article, we will give. you a summary of the best new features in iOS 15 and what you can do with them to make your iPhone or iPad more useful than ever.
Compatible Devices
Let’s start with compatibility.
Apple takes great care to extend the life of its Apple devices. The newest mobile operating system is available to anyone with an iPhone 6S (2015) or newer. However, some of the latest feature releases such as Portrait mode on FaceTime, Live Text, augmented reality directions in Maps, and spatial audio requires iPhones powered by an A12 Bionic Chip or newer. If your device is compatible, now is the time to do the software update to take advantage of the new features in iOS 15.
New Features in iOS15 and iPadOS15
New Features in iOS 15

- Notes gets Tags and Custom Smart Folders
- Focus is the new and improved version of Do Not Disturb
- Facetime gets SharePlay, Spatial Audio, and Facetime Links
- Notifications gets Notification Summary and Time-Sensitive Notifications
- Safari gets Redesigned Tabs, Tab Groups, Customizable Start Page, and Compact Tab Bar
- The camera gets Live Text and Visual Look Up
- iCloud+gets Hide My Email
New Features in iPadOS15

- Multi-tasking
- External Keyboard
- Widgets
- App Library
- The Shelf
- Quick Note
- Web extensions on iPadOS
15 Tips and Tricks to Make the Most of iOS 15 Features
Notes and Quick Note

Apple Notes gets some new features this year to help you capture, organize, and interact with all the digital pieces of information in your life. You can add one or more tags to your notes by combining a hashtag (#) with typed or handwritten tags like #iPhone or #iOS15. You can also use tags to create custom smart folders to keep all your notes organized in one collection based on the tag
Tip 1: Use Tags to Create Smart Folders in Notes
This is a great way to organize your notes. Even if the notes live in different folders, you can use Smart Folders to group related notes together in one place.
- Open Notes and tap the New Folder option available in the bottom-left corner of the screen.
- Select if you want to create a local folder or you want to have it available on iCloud.
- Tap on New Smart Folder.
- Name the new folder and select the tags that you want to collect in this Smart Folder.
Tip 2: Use Quick Notes to Easily Capture Information on the iPad
On iPad, there is a new feature called Quick Note. This allows you to invoke a note from anywhere in the system using your finger or the Apple Pencil. You can invoke a new Quick Note in three ways.
Three Ways To Invoke a Quick Note On The iPad
- Swipe up from the bottom right corner of the device using your finger or the Apple Pencil.
- Using a keyboard, you can hold down the globe key and tap “Q”
- Add a Quick Note button to the Control Center
Tip 3: Add Safari Links To Your Quick Note on the iPad
Once you create a quick note, you can type, write, or draw on the note. However, there are other ways to add content to the note. The note window floats over other open apps on the iPad. This is useful for doing research online. If your Safari browser is open underneath the Quick Note, and “Add Link” button will appear at the top of the note. When you tap the button, the link is then saved within the note.
Tip 4: Dock your Quick Note for Easy Access
You can save a note for fast access by dragging the top handle of the note to the edge of the display. This will hide the note, but allow you to quickly reveal the note again by tapping on the small tab on the edge of the display. This is useful if you are doing research, and you want to add more information to an existing Quick Note.
Quick Notes on iPhone: Quick Notes are automatically saved into their own “Quick Notes” folder in the folder stack of the Notes app. On an iPhone, you can access the Quick Notes folder to create a new Quick Note or edit a Quick Note in the same manner as you would do with any other note.
Focus in iOS 15
This is my favorite new feature of iOS 15 and the one I find the most helpful.
Focus is a replacement for what was once Do Not Disturb. It is essentially the same concept, but it is significantly more powerful. Focus mode allows you to create the perfect digital environment for your work or other activities. In Focus mode, you can filter who can contact you, which applications are allowed to send you notifications, and even what apps are visible to you on your Home Screen.
The uses cases for Focus are almost limitless. Think about how many times you have been distracted from your intended focus because you live and work in a digital environment. What if you could use your mobile devices for a specific area of focus without being distracted? What if you could take advantage of the apps and services your phone or tablet make possible without risking that you will break your focus by a random notification, phone call, or message? In iOS 15, Apple has made that possible. Focus mode allows you to match your device with your current mindset. Your device can collaborate with how your mind works when you are doing a specific task or working in a specific context.
For example, you can create a Focus for exercise. When you arrive at the gym, a smart activation trigger can automatically turn on your Focus for exercise. You can block notifications from all your apps, and only allow designated people to contact you. You can arrange the Home Screen to only show your exercise tracker application along with the weather and your workout playlist in Apple Music or Spotify.
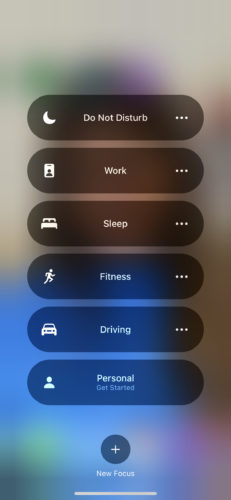
Focus can be accessed from the control center. Swipe diagonally from the upper right corner of your device to access the control center. Tap on Focus, and you will see a list of available focus modes. There are several pre-configured focus modes including Do Not Disturb, Work, Sleep, Driving, and Personal. Each one can be edited according to your specific needs. However, the true power of the feature is that you can create your own custom Focus modes.
Focus Mode Syncs Across Your Devices
When you create a custom Focus mode, you can choose to share those settings across all of your devices. For example, if you set a custom Focus for doing deep work (when you do not want to be disturbed by calls or notifications), you can have those settings automatically extend to your iPad and Apple Watch.
Tip 5: Set Up Focus Modes For Specific Purposes
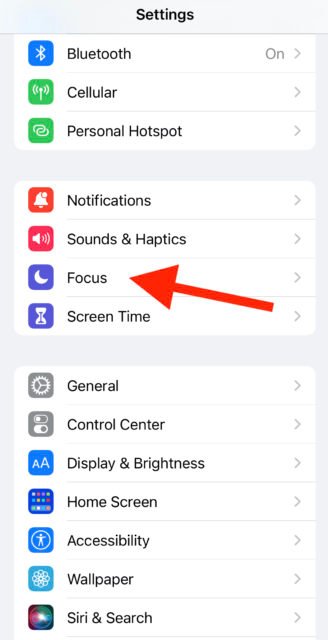
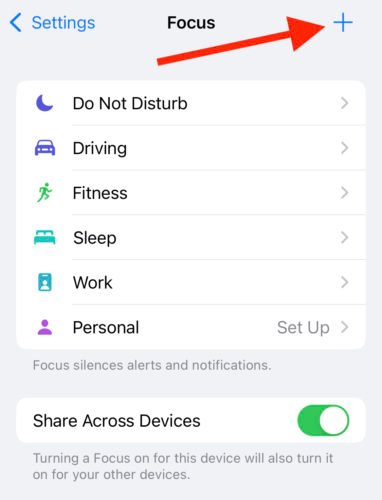
First, go to Settings, and select Focus. Tap the “+” icon in the top right corner. Select Custom, and you are ready to begin creating your custom focus mode.
- Name your focus mode
- Choose the color and icon
- Choose which people can contact you
- Choose which apps can send you notifications
- Choose to allow time-sensitive notifications (for example, a meeting that you placed on your calendar).
- Setup a unique Home Screens for each focus mode
- Setup triggers to enable specific focus mode
Tip 6: Use Smart Activation Triggers in Focus
Smart Activation Triggers allow your iPhone or iPad to turn on particular Focus modes automatically based on triggers such as time, location, or app usage. Once you complete this step Focus mode will be automatically activated for you based on certain conditions.
- Open the Settings app, then select Focus
- Under “Turn On Automatically” select Smart Activation
- Toggle the switch next to Smart Activation to the green ON position
Schedule or Automate Your Own Triggers
Alternatively, you can schedule or automate your focus mode triggers according to your own set of rules or criteria.
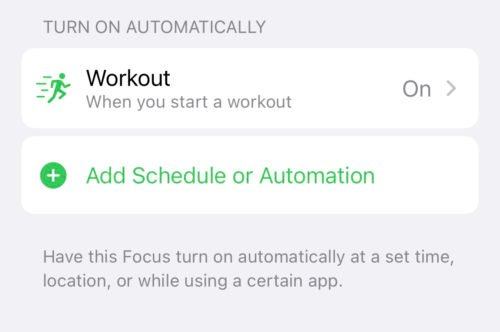
If you find that the Smart Activation Trigger is not accurate when the Focus mode is activated, you can create your own rules by choosing the option to Schedule or Automate a Focus mode trigger. For example, my focus mode for fitness is automatically activated when I start a workout in the Fitness app. You might choose to have it activated when you arrive at your local park or gym.
- Open the Settings app, then select Focus
- Under “Turn On Automatically” select Add Schedule or Automation
- Define your trigger by selecting Time, Location, or App
Tip 7: Create Custom Home Screen Pages for Focus mode
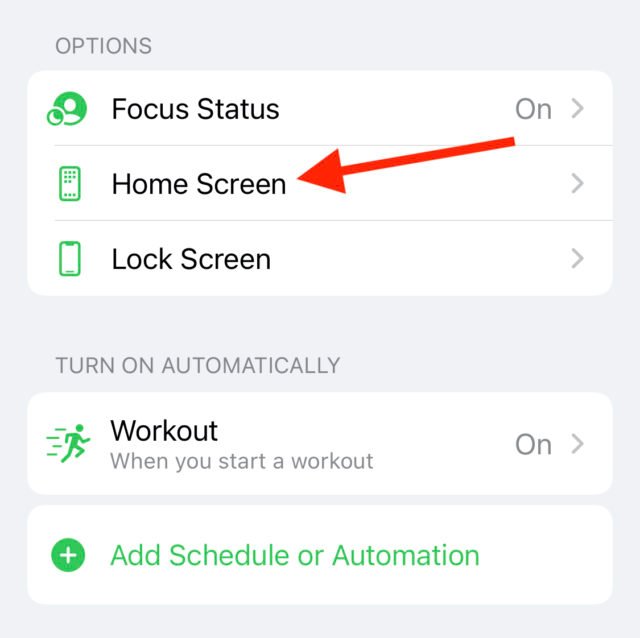
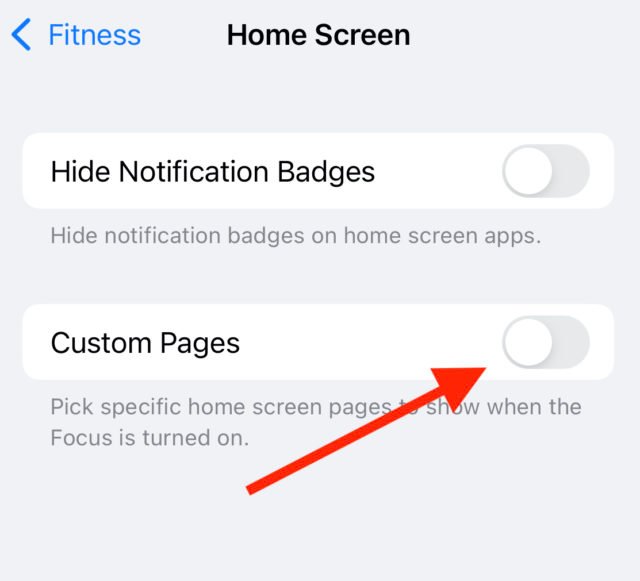
- Open the Settings app, then select Focus
- Under “Options,” tap Home Screen.
- Toggle the switch next to Custom Pages
- Any pages without a blue checkmark will be hidden in this Focus mode
A new feature of iOS15 and iPadOS15 is the ability to use more than one instance of an app on your Home Screen pages. Simply drag any app out of the App Library and onto your Home screen as many times as you like. You can place any combination of apps on each Home Screen page that you create.
This feature allows you to design the ideal Home Screen for each area of focus. You can create a custom Home Screen page for work, the gym, or surfing social media.
Notifications
Tip 8: Schedule Your Notification Summary
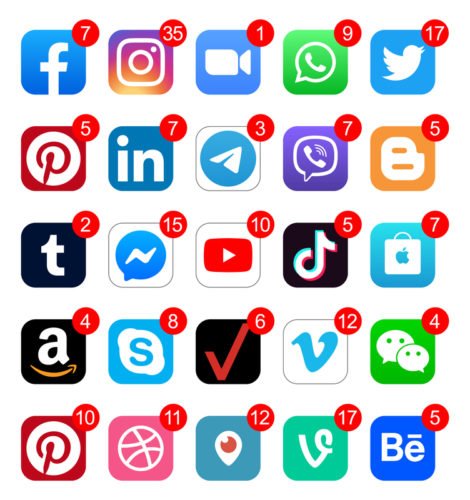
Every time your phone delivers a notification it is an interruption that has the potential to break your focus and wreck your productivity. It is like someone taps you on the shoulder and takes your attention away from what you were doing or thinking or saying to let you know an email arrived or someone just posted a new story on Instagram. Those may be interesting or even important (sometimes). However, without some sort of filter, your notifications can quickly spiral out of control.
In iOS 15, you can now schedule when you will review your notifications. By default, it is twice per day, but it can be as much as 12 times per day. This allows you to be intentional about your focus without the fear of missing out on something vital.
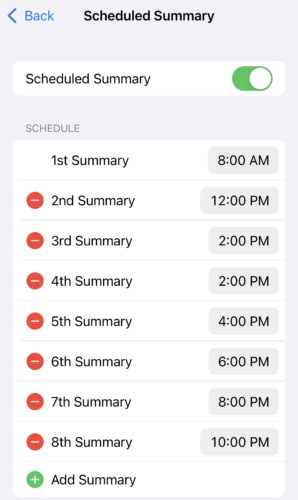
- Open the Settings app, and select Notifications.
- Tap Scheduled Summary and toggle the switch next to Scheduled Summary the green ON position
- Set your preferred summary schedule (up to 12 times per day)
- Follow the on-screen instructions to select which apps you want to include in your summary
Note: If an app is missing from the list, verify that the individual app has permission to send notifications.
Safari
Safari has been completely redesigned in iOS 15. The most noticeable change is that the address bar is located at the bottom of the screen. Apple is making it easier to manage the browser controls with one hand.
Tip 9: Swipe the Tab Bar

The new default location in Safari is at the bottom of the screen. If you think about it, it makes sense. The location next to the onscreen keyboard makes it more convenient to use. By design, it is slightly more compact. It has the added advantage that its location makes it easy to swipe left or right between the tabs.
If you only have one page open in the browser, you can swipe from right to left on the address bar to open a new start page. If you have multiple pages open, you can seamlessly swipe between all open pages. It makes browsing much simpler and faster.
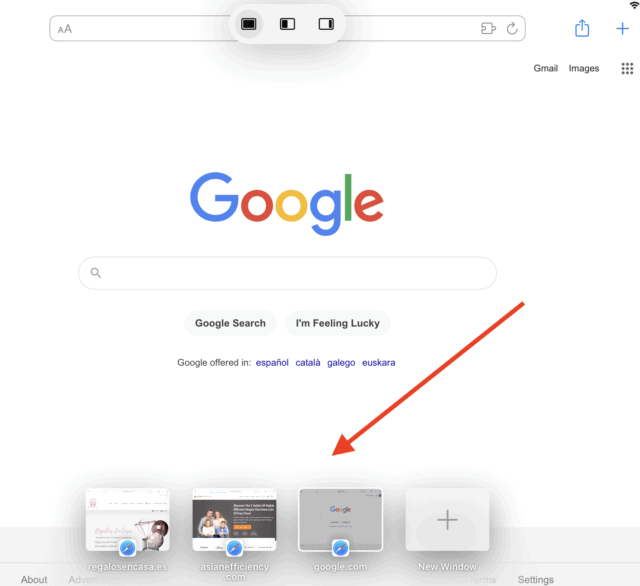
Tip 10: Create Tab Bar Groups
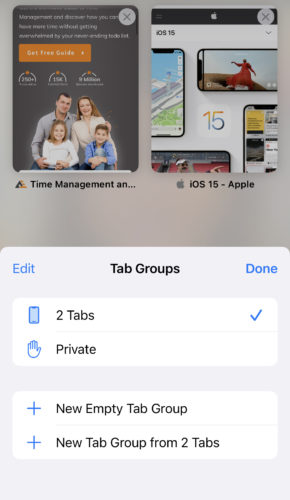
In iOS 15, doing research on the internet or working on a project just got a lot easier by using tab groups. iOS 15 allows you to collect a group of tabs into a set. It is not hard to do, and your stay synced across all your devices running iOS 15, iPadOS15, or macOS Monterey.
- To access the open tabs in Safari in iOS 15, tap the double square icon in the bottom right corner or swipe up on the tab bar.
- To create a custom Tab Group, tap the tabs indicator in the bottom middle of the Tabs screen
- Choose New Empty Tab Group or New Tab Group from your open tabs.
- Name your Tab Group, tap OK
This will give you fast and easy access to that specific set of tabs with only one tap.
Tip 11: Leverage the Power of Extensions
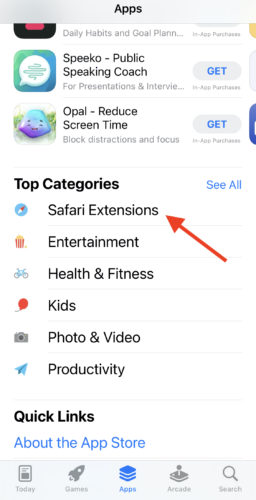
Apple now supports the use of extensions in Safari for iOS 15. Now third-party developers can create extensions for their apps on iPhone and iPad that match the power of their desktop counterparts.
You can find extensions for Safari in the app store. They will be distributed like any other app. Some will be free, and some will be for purchase. Search categories in the app store, and scroll until you find the category for extensions.
Once you download and install an extension, you need to enable it in the Settings app.
- Open the Settings app, and select Safari
- Select Extensions
- Scroll down to view the list of installed extensions
- Toggle the switch next to the desired extension to the green ON position
Camera and Photos
Tip 12: Live Text
Live Text is possibly the most fun of any new feature in iOS 15 and iPadOS 15. Live Text empowers Camera, Photos, Notes, and Safari to recognize text in photos. This is useful because you can select the text, copy it, and paste it anywhere from the clipboard.
Live Text also works in system-wide search. Sometimes you take a picture of something that contains text, but you can’t find it when you need it. Now you can search for it by text using Spotlight. If you have an important phone number or email that you wrote down on a post-it note, you can snap a photo of it to make it searchable in the future.
Using Live Text in a photo works like any other text. You can press it to highlight the text, then copy it to the clipboard. To assist in locating text in photos, there is also a small “Detect Text” icon in the bottom right corner of your photos.
This feature does require an A12 Bionic processor or better.
Tip 13: Visual Search
Visual Search is powered by on-device machine learning. It means that Apple Photos is smarter than ever at identifying objects in your photos. Visual Search identifies the contents of your photos to improve search, but it also creates connections that you can explore for even more information about your photos.
Let’s say you have a photo of an important landmark. Visual Search can recognize the landmark and create a link for you to other similar images and online sources of information about that landmark.
You access the Visual Search through an info pane at the bottom of the screen when viewing a photo. Tap on the information icon (i) to reveal if Apple Photos has more information about the object in your photo.
Visual Search can recognize various objects, landmarks, animals, books, plants, and works of art.
As with Live Text, Visual Search requires an A12 Bionic processor or better.
iPadOS
Tip 14: MultiTasking in Split-View and Slide Over
iPadOS 15 adds a few more multi-tasking tools to the toolbox. For example, you have new ways to enter split-view on the iPad.
Option 1: Multi-tasking Menu
You are no longer limited to drag-and-drop apps from the doc. iOS adds an ellipsis (…) at the top of the screen. When you tap the ellipsis, you can select from three options – full screen, half-screen, or slide over. Once you make your selection, the current app slides out of the way revealing the Home Screen. Now you can choose any app in your library to use in Split-Screen view or Slide Over.
Option 2: Use the App Switcher to Create Split-Screen View Combinations
The App Switcher has a fresh look and new functionality. To open the App Switcher, swipe up from the bottom of the screen or double-click the Home button. Once the App Switcher is open, you can drag any app window on top of another one to create a split-screen view combination. Click on the app window and both apps will open in Split View.
Tip 15: Use The Shelf
The Shelf is a new visual way to manage all of the open applications on your iPad.
One of the more useful multitasking features on the iPad is the ability to have multiple windows of a single app open at the same time. The Shelf is a way to manage those open windows.
Any time you are in a supported application that has multiple windows open, you can invoke the shelf by tapping on the multitasking menu (…) at the top of the screen. The Shelf will appear at the bottom of the screen with thumbnail images of each instance of the application that is open on your device. You have the option to scroll through windows by swiping left or right. You can close any of the windows by dragging it to the top of the screen and releasing it. When you make one of the windows active, The Shelf will disappear from the screen.
iCloud+
Alongside the release of iOS 15, Apple is upgrading its iCloud service. All paid subscribers will receive the upgrade at no additional cost. The new features include:
- iCloud Private Relay (in beta) is a new service that allows you to hide your IP address when surfing the internet in Safari. It makes your connection more private and secure.
- Hide My Email allows you to generate a random email to use when signing up for a newsletter or sending an email to someone you don’t know that well. The emails are forwarded to your inbox, but your personal email remains private.
- HomeKit Secure Video connects your home security cameras to the Home App. You can record the footage and securely view it from anywhere.
- Custom Email Domain allows you to create an iCloud email with a personalized domain name. Visit icloud.com/settings to get started. According to Apple:
If you subscribe to iCloud+ and own a personal domain name, you can set up iCloud Mail to use it when sending or receiving mail so your recipients see mail coming from your personalized email address.
Bonus Tip: Hide My Email
To use Hide My Email, Apple provides the following instructions:
- In Safari: Open a website, tap in an email field, then tap Hide My Email above the keyboard to generate a new random email address or use one you’ve already created for the website.
- In Settings: Tap [your name] > iCloud, then tap Hide My Email. You can see and manage all your Hide My Email addresses.
Next Steps For Using Our iOS 15 Tips and Tricks
Apple’s latest mobile operating systems iOS 15 and iPadOS 15 are loaded with massive potential to increase your productivity. The best way to discover all of the benefits is to update your devices and begin using the new features.
The iOS 15 tips and tricks in this article are a great place to start.
Recommended for you
Want the full system? 25X is the flagship productivity system we teach.
Explore 25X →